For a change from the usual posts on wood and metal puzzles, I am featuring here a small collection of 7 different twist type puzzles all plastic and very retro!
 |
| Top Row L to R: Wisdom Ball, Gerdig UFO, Puck Puzzle, Saturn Brain Killer Bottom Row L to R: Brain Ball, Back Spin, Enigma |
The Wisdom Ball, Gerdig UFO, Brain Ball and Back Spin came from a gentleman from the Czech Republic by the name of Milan Vodicka who has a site featuring an extensive number of plastic twist/non-twist puzzles for sale, some produced as far back as the 1980s. The Puck Puzzle came from the puzzle shop of Hendrik Haak, Saturn Brain Killer from Amazon and the Enigma from an Ebay seller who, at the time of this writing still has several of these puzzles left.
Wisdom Ball


The puzzle is not unduly difficult and I had a lot of fun turning the circles and sliding the number tabs here and there. It came solved, so I was quite happy just to scramble it enough for me to have a decent feel for arranging it back to its solved state.
My copy of the Wisdom Ball is well constructed and quality is very good. The surface is matted so that there is some texture and will not slip easily for those with sweaty palms. The ball is of a good size for the hands (diameter of about 3 1/4in) and all the coloured circles rotate smoothly.
The only grouse I have, and this is a minor one, is that to slide a tab, the two circles in question must be properly lined up so that the tab can slide across from one circle to the other smoothly, otherwise you will find that the tab gets stuck sometimes. However as I played more with the ball, I realised that after a while, one can easily get the hang of properly aligning the circles quite quickly and efficiently and solving becomes a much easier process. The Wisdom Ball is pretty rare so its worth getting if you come across one.
The only grouse I have, and this is a minor one, is that to slide a tab, the two circles in question must be properly lined up so that the tab can slide across from one circle to the other smoothly, otherwise you will find that the tab gets stuck sometimes. However as I played more with the ball, I realised that after a while, one can easily get the hang of properly aligning the circles quite quickly and efficiently and solving becomes a much easier process. The Wisdom Ball is pretty rare so its worth getting if you come across one.
For more information on the Wisdom Ball, check out Jaap's Puzzle Page and Gabriel's blog. There is also a video review of the Ball on YouTube.
 |
| A green stopper restrains the two dials to prevent unintended movement |
The puzzle is round with a diameter of 3 1/4in and 7/8in thick. Made of sturdy plastic, it consist of 3 parts; a top and a bottom circular dial with finger grooves along its edge, both which can rotate. These two dials sandwich a centre disc with gear teeth. What the two top and bottom dials do is that when they are turned clockwise or anti-clockwise, they manipulate a series of internal gears within the puzzle which in turn will cause 8 small circles around the edge and a larger centre ring, all on the top surface to turn in various directions. This has the effect of jumbling up the image printed on the surface of the puzzle. In the solved state, the image looks normal and nothing appears to be amiss. The 8 circles and ring have pretty tight tolerances and they are not obvious within the image unless you look closely at the puzzle. The image looks normal just as in the photo on the right above.

Overall, the Enigma is a fun and unusual puzzle (I think great for kids too since it is plastic, safe with no sharp edges, loose parts or unduly heavy). I just wished I had been able to obtain one with a nicer image and colours and not bearing the name of some organisation, but alas, my Ebay seller had already run out of decent looking ones. See Jaap's Puzzle Page for more info.
Back Spin

The puzzle consists of two flat rotating black discs joined together at the centre. Both the top disc and the bottom disc each have 6 coloured slots, each containing (in the solved state) 3 balls of the same colour. In total, there are 12 slots from both the top and bottom discs. However, at any one time, one of the slots (depending on whether you are looking at it from the top or bottom) will have only two balls.
 |
| At any one time, one of the 12 slots on the Back Spin (for top and bottom) will only have 2 out of 3 balls such as the blue slot at 12 o'clock containing only a red and a blue ball |
The puzzle is not overly difficult but presents a fair challenge. However it can be a bit tedious since you are required not only to rearrange all 35 coloured balls back into 3 same coloured balls per slot but also into the slot of the correct colour.
After I had scrambled the Back Spin, I went about diligently trying to put everything back in order but at the time of this post, I still have not return it to the solved state....yet. Maybe I should have jumbled it less!! It's hard to describe the Back Spin in action so do watch videos of it; click here and here. Also check out Jaap's Puzzle Page; which gives the solution in very detailed steps. The Back Spin is no longer sold by ThinkFun. It also has a number of spin-offs (no pun intended) and imitations found for sale on the internet, so getting an original version may be quite difficult and would probably be via a private sale.
Puck Puzzle
 For a puzzle with just one size, design and construction, I think the Puck Puzzle ranks up there with the Rubik's cube for having the most variants; perhaps even more than the basic Rubik's cube. The variants here I am talking about are the myriad of colours and graphics that adorn the Puck Puzzle in its many guises. If you did a Google search under Images for "Puck Puzzle", you will probably find no less than 15 different colours and designs of Puck Puzzles. My puck is the Blue IQ139. From what I can see from the Internet, there is also a Red, Yellow and Rainbow IQ139 puck.
The Puck measures about 3in in diameter and 1in thick and made of high quality plastic. Fit and finish is good and parts that are suppose to move all move smoothly. However, as you start twisting and turning, the puzzle becomes "seasoned" and the fit becomes less snug. Unlike a lot of plastic puzzles where parts are coloured using coloured stickers (eg; Rubik's Cube), the Puck's numbers are silk screen printed giving the puzzle a feeling of quality.
 On all Pucks, the outer ring is made up of twelve separate sections (each shaped like a wedge) and together they can rotate around the centre circle.The centre circle is split into 2 halves and each half can also be turned 180 degrees forwards or backwards. In my case, rotating the outer ring in combination with turning either of the 2 centre halves has the effect of scrambling the twelve separate numbered sections.
The object is to rearrange the scrambled numbers back in running order from 1-12. To do this will again require rotating the outer ring and turning the centre halves. It takes a bit of figuring out to get the hang of rotating and turning the numbers to bring the numbers back in order again, since once you turn one half over, 6 of the top numbers disappear to the bottom leaving some to remain on top, so you may have a mix of numbered sections and blank sections. I scrambled the puzzle quite a bit but could not seem to get the numbers back in correct order again. I looked at Jaap's Puzzle Page and despite following his solution steps, can only manage Nos 4-12 in order. So now my Puck remains in a half scrambled state :-(. For a Puck in action, check out the videos on YouTube.
The Puck is not too bulky and quite pocketable. A portable puzzle to bring along to frustrate you on your travels!
Saturn Brain Killer
The Saturn puzzle consist of a ring with a recessed track on both sides. Within the track on either side are a number of movable discs. Each disc has a different colour on both sides. There are altogether 32 discs in the puzzle. In the centre of the ring is a bridge which can also rotate on its own axis.
The function of the bridge is to enable a disc to move from the top side to the bottom side of the ring and also allow a disc to change sides hence changing the colour from top to bottom or vice-versa. The object of the puzzle is to arrange the discs (with the help of the bridge) of 4 colours on 4 discs on each side of the rings. The Saturn measures 4 1/2in in diameter and is about 7/8in thick.
When I first unpacked the puzzle, I thought the puzzle was pretty simple, just rearrange the discs by pushing them around the rings and using the bridge to change the colours or flip it to the opposite side etc. Little did I realise that there are more than 8 colours (I had assume only 4 different colours for each side of the ring, hence a total of 8 colours for both sides).
As I continued playing with the puzzle, I found myself going around in circles (no pun intended) and it was then I discovered that there are more than 8 colours. There are actually 14 colours covering the 32 discs. This makes the puzzle very much harder to solve. Difficult because you can't remove the disc to see what colour is under a particular disc....the only way to know is for you to move a disc onto the bridge and then you can see the underside of it. Also difficult because you need to figure out which are the relevant 8 colours to solve the puzzle as intended.
After the usual scrambling of the colours, I tried to solve it but gave up after some time, not only because the puzzle is difficult, but also because the bridge keeps getting stuck and cannot rotate properly because one or more discs keeps getting jammed (half of the disc is in the ring and half onto the bridge). I wouldn't say the quality is bad, in fact the build of the puzzle is pretty solid and sturdy with the use of good plastic. The only complaint being that of the bridge and I guess its the way the puzzle has been designed.
I checked out Jaap's Puzzle Page for some explanation on how to figure out the colours in order to solve this puzzle, but unfortunately (through no fault of his) I can't quite follow his analysis and reasoning to determine which are the 8 colours needed to solve the puzzle. Jaap has listed the 8 colours on his site and once you know the 8, solving becomes relatively easy. Randomly trying to solve the puzzle by trial and error is not going to work as I also discovered. Now that I know what are the 8 colours to use, I am quite happy come back to the Saturn again another other day. While I thought this puzzle was a rare find, they are still available via Amazon.
For how the Saturn looks in action, check out this video on YouTube.
BrainBall
 The BrainBall ("BB") looks like the planet Saturn; it consists of a ring of numbers from 1-13 (white on one side as in the photo and yellow on the reverse side). This ring encircles and can rotate in either direction around the ball. The ball itself consist of 3 parts, the blue portion which is flanked by two black circles (one larger than the other) on the sides and both these circles can rotate on its axis but not independently; ie both circles can only rotate together in the same direction at the same time.
 In a way, the BB is similar to the Puck, the object of the puzzle is to unscramble and rearrange the numbers back in running order and in the same colour scheme. The BB looked to be promising at first but I had a hard time with it, not because the puzzle is difficult (yes this as well!) but I found the rotation of the number ring very stiff and arduous and I was practically using quite a bit of force to get it to turn around the ball. Flipping the black circles to turn the white numbers to yellow and vice-versa was only slightly easier. Having seen a video of the BB in action, I think its my own copy of the puzzle that is having this problem. Notwithstanding,
I would say the quality of the puzzle, in terms of materials used and colours applied (no stickers here) is very good. Everything is strong and sturdy, perhaps too sturdy! It could certainly do with some hard twisting to "season" the puzzle. The BB measures about 3 1/2in across at the widest points and the ball itself is 2 1/4in in diameter. Size is about right in the palm of the hand.
I didn't spend a lot of time with the BB; I scrambled it just a wee bit to get a feel of how the puzzle works and given how difficult my copy was to manipulate the number ring around the ball, I didn't want to make things too difficult for myself and was content to get it back to its solved state quickly. According to Jaap, the BB is a "very difficult puzzle". Looking at his analysis of the BB, the various permutations that abound and the moves required to solve the puzzle, I would not argue with his statement. There was even a website dedicated to the BB which now appears to be defunct, although Jaap on his site also mentions another link which has info about the BB. For its rarity, definitely worth getting one for keeps if you happen to come across a unit for sale.
Gerdig UFO
The Gerdig UFO ("GUFO") I think is probably the most mechanically complicated plastic twist puzzle I have ever come across. The design and number of moving parts integrated to form a workable puzzle is really quite amazing. The GUFO has its own website with a video, photos and a guide to how to play and solve the puzzle although you will probably require Google Translation unless you understand the Slovakian language.

The GUFO consist of a white and thick flat "pancake" which is split horizontally in the middle into two halves with finger grooves for easy gripping. These two halves are connected via the centre and can rotate against each other. On the top rotating half, there are eight coloured semi-spheres protruding upwards. On the opposite, the bottom rotating half similarly also has 8 coloured semi-spheres protruding downwards. In the solved state, each semi-sphere is of the same colour, when viewed from either the top or bottom. When the top or bottom half is rotated, the 8 coloured semi-spheres move together along with whichever half that is being rotated. This has the effect of changing the colours of the top and bottom semi-spheres resulting in their colours being mixed. In the centre is also a rotatable light blue dial with a red dot and within the dial is a white button. When the button is depressed, depending at which semi-sphere the red dot is pointing ti, that sphere will flip over to reveal its bottom colour; ie top colour goes to bottom and bottom colour comes to the top. The GUFO is about 4 1/4in in diameter and 2in tall. Quality and construction is very good and all the parts move smoothly and click into position without anything getting stuck so far....
The puzzle must first be ramdomly scrambled to mix the colours of the semi-spheres top and bottom. This is done via rotation of the two halves, turning the blue dial's red dot to a semi-sphere and pressing the white button which will flip the spheres and mix the colours. Once its sufficiently scrambled, the fun of solving begins using the same type of actions that caused the puzzle to be scrambled in the first place.
The GUFO not only has an unusual design but it comes with 5 levels of difficulty built into the puzzle as well (ie something for the whole family as stated by the maker!). By increasing the level of difficulty beyond level 1, each time you depress the white button, more than 1 semi-sphere will flip simultaneously. At level 5, 4 semi-spheres (marked by 4 red dots) will flip at the same time. Each of the 5 levels can be adjusted by unscrewing the back plate of the white button to reveal a set of gear sticks which can be removed and placed at certain positions within the internal mechanism to set the puzzle to the desired level of difficulty.
I scrambled the GUFO quite sufficiently at random and was able to solve it fairly quickly. But this was only at Level 1. I did not want to be too ambitious, so I didn't challenge myself to the other more difficult levels. Besides, I wasn't sure about messing around with the internal mechanism, just in case I jam something in the process. Overall I found the GUFO to be pretty fun and engaging (in my case at level 1) and watching the spheres flip and change colour when pressing the white button is pretty cool. I think I had a bit more fun with the GUFO than the rest of the twisties above (all which I enjoyed except maybe for the BrainBall), or maybe its just the fairly intricate mechanism that captivated me. If only someone would produce a metal version....now that would be really cool!
For another take on the GUFO, see Gabriel's blog. As usual Jaap has detailed information and analysis on solving the GUFO so be sure to check that out if you decide to acquire a GUFO. Its a pretty rare puzzle and you might still be able to get one from Milan Vodicka mentioned at the beginning of this post if he has any left or possibly from this site as well.
After I had scrambled the Back Spin, I went about diligently trying to put everything back in order but at the time of this post, I still have not return it to the solved state....yet. Maybe I should have jumbled it less!! It's hard to describe the Back Spin in action so do watch videos of it; click here and here. Also check out Jaap's Puzzle Page; which gives the solution in very detailed steps. The Back Spin is no longer sold by ThinkFun. It also has a number of spin-offs (no pun intended) and imitations found for sale on the internet, so getting an original version may be quite difficult and would probably be via a private sale.
Puck Puzzle

The Puck measures about 3in in diameter and 1in thick and made of high quality plastic. Fit and finish is good and parts that are suppose to move all move smoothly. However, as you start twisting and turning, the puzzle becomes "seasoned" and the fit becomes less snug. Unlike a lot of plastic puzzles where parts are coloured using coloured stickers (eg; Rubik's Cube), the Puck's numbers are silk screen printed giving the puzzle a feeling of quality.

The object is to rearrange the scrambled numbers back in running order from 1-12. To do this will again require rotating the outer ring and turning the centre halves. It takes a bit of figuring out to get the hang of rotating and turning the numbers to bring the numbers back in order again, since once you turn one half over, 6 of the top numbers disappear to the bottom leaving some to remain on top, so you may have a mix of numbered sections and blank sections. I scrambled the puzzle quite a bit but could not seem to get the numbers back in correct order again. I looked at Jaap's Puzzle Page and despite following his solution steps, can only manage Nos 4-12 in order. So now my Puck remains in a half scrambled state :-(. For a Puck in action, check out the videos on YouTube.
The Puck is not too bulky and quite pocketable. A portable puzzle to bring along to frustrate you on your travels!
Saturn Brain Killer
 |
| The coloured discs can slide along inside the tracks around the ring |
The function of the bridge is to enable a disc to move from the top side to the bottom side of the ring and also allow a disc to change sides hence changing the colour from top to bottom or vice-versa. The object of the puzzle is to arrange the discs (with the help of the bridge) of 4 colours on 4 discs on each side of the rings. The Saturn measures 4 1/2in in diameter and is about 7/8in thick.
 |
| The bridge in the centre of the ring transport the discs from top to bottom and allows the disc to change sides so the colour is correspondingly changed |
As I continued playing with the puzzle, I found myself going around in circles (no pun intended) and it was then I discovered that there are more than 8 colours. There are actually 14 colours covering the 32 discs. This makes the puzzle very much harder to solve. Difficult because you can't remove the disc to see what colour is under a particular disc....the only way to know is for you to move a disc onto the bridge and then you can see the underside of it. Also difficult because you need to figure out which are the relevant 8 colours to solve the puzzle as intended.
After the usual scrambling of the colours, I tried to solve it but gave up after some time, not only because the puzzle is difficult, but also because the bridge keeps getting stuck and cannot rotate properly because one or more discs keeps getting jammed (half of the disc is in the ring and half onto the bridge). I wouldn't say the quality is bad, in fact the build of the puzzle is pretty solid and sturdy with the use of good plastic. The only complaint being that of the bridge and I guess its the way the puzzle has been designed.
I checked out Jaap's Puzzle Page for some explanation on how to figure out the colours in order to solve this puzzle, but unfortunately (through no fault of his) I can't quite follow his analysis and reasoning to determine which are the 8 colours needed to solve the puzzle. Jaap has listed the 8 colours on his site and once you know the 8, solving becomes relatively easy. Randomly trying to solve the puzzle by trial and error is not going to work as I also discovered. Now that I know what are the 8 colours to use, I am quite happy come back to the Saturn again another other day. While I thought this puzzle was a rare find, they are still available via Amazon.
For how the Saturn looks in action, check out this video on YouTube.
BrainBall


I would say the quality of the puzzle, in terms of materials used and colours applied (no stickers here) is very good. Everything is strong and sturdy, perhaps too sturdy! It could certainly do with some hard twisting to "season" the puzzle. The BB measures about 3 1/2in across at the widest points and the ball itself is 2 1/4in in diameter. Size is about right in the palm of the hand.
I didn't spend a lot of time with the BB; I scrambled it just a wee bit to get a feel of how the puzzle works and given how difficult my copy was to manipulate the number ring around the ball, I didn't want to make things too difficult for myself and was content to get it back to its solved state quickly. According to Jaap, the BB is a "very difficult puzzle". Looking at his analysis of the BB, the various permutations that abound and the moves required to solve the puzzle, I would not argue with his statement. There was even a website dedicated to the BB which now appears to be defunct, although Jaap on his site also mentions another link which has info about the BB. For its rarity, definitely worth getting one for keeps if you happen to come across a unit for sale.
Gerdig UFO
The Gerdig UFO ("GUFO") I think is probably the most mechanically complicated plastic twist puzzle I have ever come across. The design and number of moving parts integrated to form a workable puzzle is really quite amazing. The GUFO has its own website with a video, photos and a guide to how to play and solve the puzzle although you will probably require Google Translation unless you understand the Slovakian language.

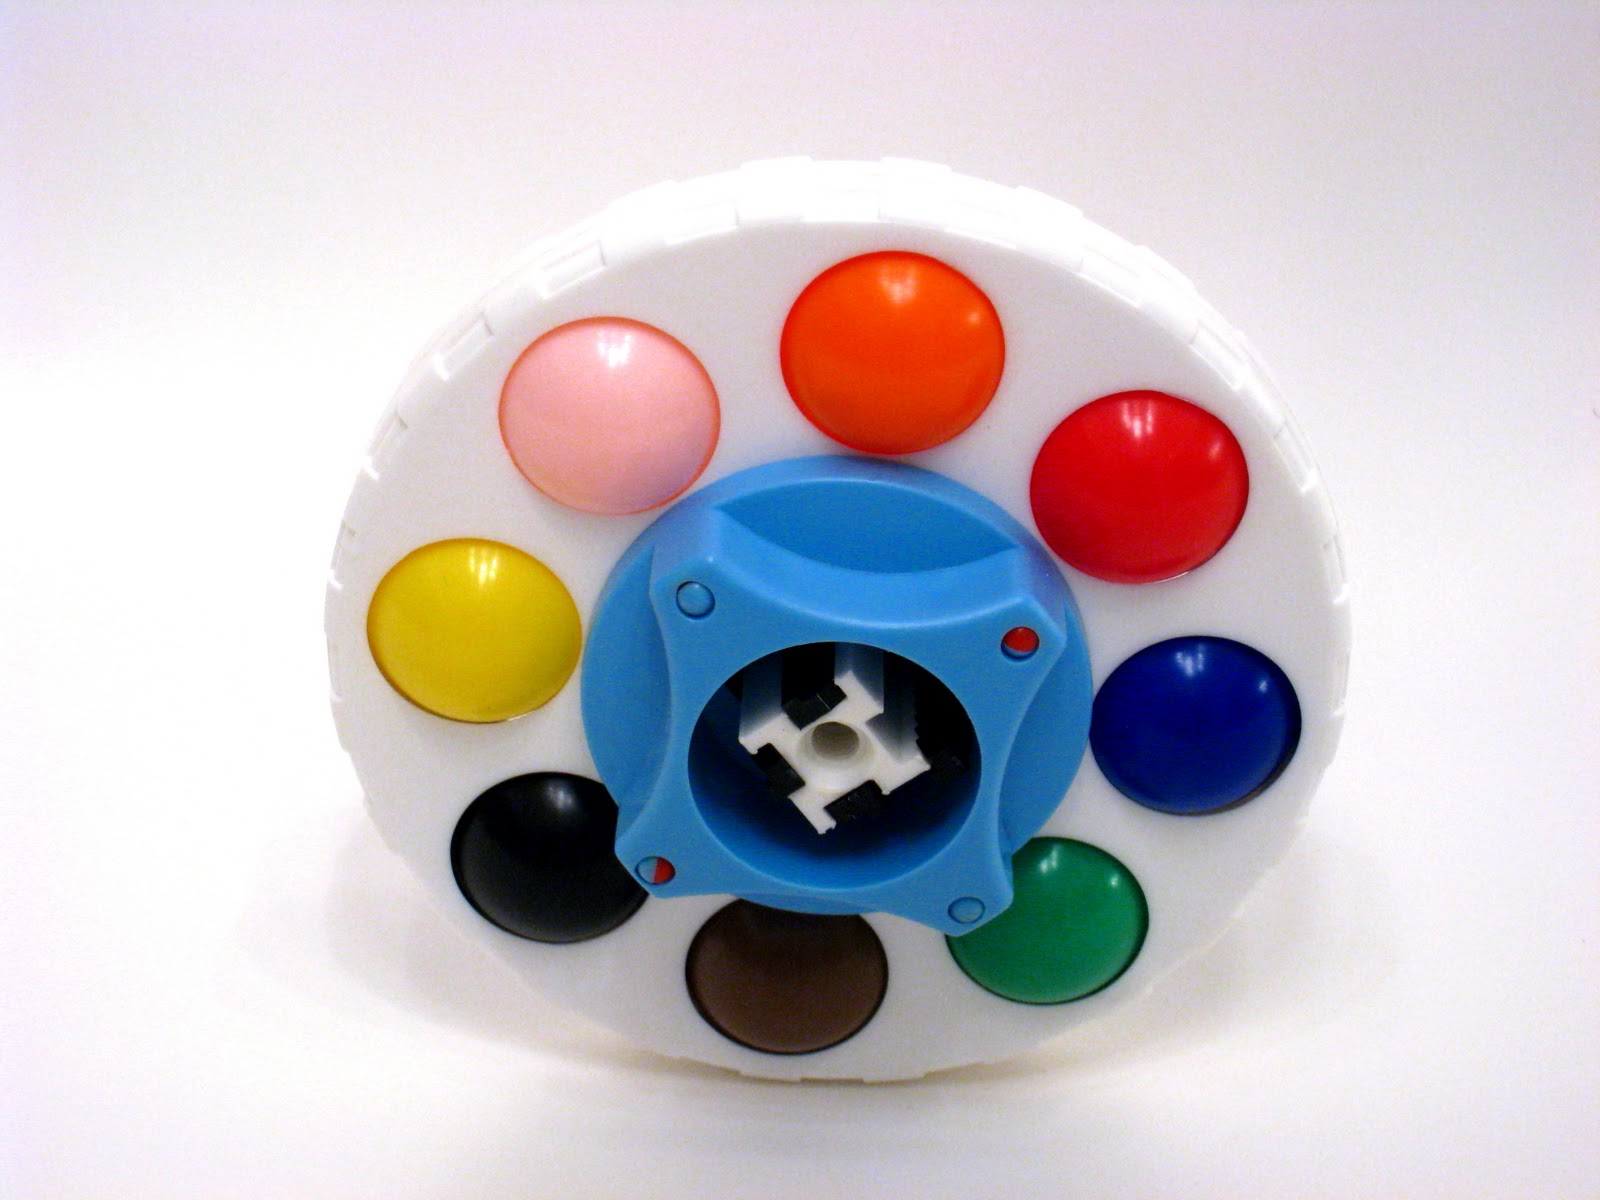
 |
| The Gerdig UFO standing vertically on its side to show the two halves and the 8 coloured semi-spheres on both the top and bottom halves |
The puzzle must first be ramdomly scrambled to mix the colours of the semi-spheres top and bottom. This is done via rotation of the two halves, turning the blue dial's red dot to a semi-sphere and pressing the white button which will flip the spheres and mix the colours. Once its sufficiently scrambled, the fun of solving begins using the same type of actions that caused the puzzle to be scrambled in the first place.
The GUFO not only has an unusual design but it comes with 5 levels of difficulty built into the puzzle as well (ie something for the whole family as stated by the maker!). By increasing the level of difficulty beyond level 1, each time you depress the white button, more than 1 semi-sphere will flip simultaneously. At level 5, 4 semi-spheres (marked by 4 red dots) will flip at the same time. Each of the 5 levels can be adjusted by unscrewing the back plate of the white button to reveal a set of gear sticks which can be removed and placed at certain positions within the internal mechanism to set the puzzle to the desired level of difficulty.
 |
| The back plate removed to show the internal mechanism and the black gear sticks which can be moved to different positions to adjust the level of difficulty |
For another take on the GUFO, see Gabriel's blog. As usual Jaap has detailed information and analysis on solving the GUFO so be sure to check that out if you decide to acquire a GUFO. Its a pretty rare puzzle and you might still be able to get one from Milan Vodicka mentioned at the beginning of this post if he has any left or possibly from this site as well.


