Saturday, 28 December 2013

H Burr

Name
H Burr

Designer
Designed by Junichi Yananose in 2001. For Junichi's other designs (there are over 40), click here.


Manufacturer
Torito of Japan. Sold by Satomi Beattie of CU-Japan who's based in the United Kingdom. 

Type & Classification

Interlocking

Dimensions
8.3cm (Length) x 8.3cm (Width) x 8.3cm (Height). Chunky, heavy and solid..very nice!

Materials & Construction
Aluminium. Construction, fit and finish is very good. The burr has a nice matt finish (probably this is necessary since a polished surface would inevitably result in scratches after some time of playing). Each of the 12 pieces are smooth to touch with slightly bevelled edges.

Overview
I first found out about this puzzle from the Revomaze forum and wow! it's a metal burr...nice; got to have it! You can tell from the photos why its called the "H" Burr.

The H Burr consist of 12 separate pieces of which three pairs are congruent (ie identical). Object is to separate the 12 pieces and put it together again. 

Taking apart the puzzle literally meant "splitting" the puzzle in half. Here, there is not the usual single unique piece which holds the entire puzzle together which first needs to be removed. Instead, as I found out, the puzzle consists of two "halves" of 6 interlocking pieces each, which sort of "dovetails" nicely together. Depending on the orientation of the puzzle, you can either lift the top half upwards or pull the two halves apart sideways and then continue the rest of the disassembly.


Once the two halves have come apart, the rest of the disassembly was pretty easy. The real challenge is putting all the pieces back together to form the original shape. Although all the pieces are "H" shaped and similar looking, there are differences (some subtle) due to the various cuts and notches of each piece and this adds greatly to the challenge of putting them back together.

I was glad the puzzle came boxed with the solution. There are just too many pieces to grapple with to even try to memorise where each piece is suppose to be.

Difficulty Level
Very difficult even tho' there are 4 solutions. But I am sure there's someone out there who could probably solve it without the solution.

Summary

You don't often see an interlocking burr made of metal. Most burrs are made of wood. The only other ones I am aware of made of aluminium are the 7-Move and 10-Move Aluminium burrs from Wil Stribos and the Lee Valley Burr. The H Burr is a handsome and well made burr. Owing to its relatively large size and physically complicated looking interlocking appearance, it also displays extremely well.

Thursday, 19 December 2013

Dancing Shoes

Name
Dancing Shoes. 

You can probably tell why the puzzle bears this name.

Designer
Goh Pit Khiam. Goh has designed well over sixty puzzles to-date, including the highly sought after (and no longer available) Tenary Burr first made by Brian Young and most recently by Eric Fuller. For some of Goh's other puzzle designs, click here


Manufacturer
Tom Lensch. Limited availability as far as I am aware. Priced at US$66/- plus S&H. 

Type & Classification

2D Packing

Dimensions
12.5cm (Length) x 12.5cm (Width) x 1.9cm (Height)

Materials & Construction
The frame is made of Maple while the four individual lighter pieces are made of Tulipwood. The dark piece is Kingwood. Construction, fit and finish is very good. Good size puzzle and handling of the loose pieces is comfortable.

IPP
Dancing Shoes won the Puzzler's Award at IPP33 in Tokyo, Japan this year. This award goes to the design entry that had garnered the most votes from the IPP33 attendees. This was Goh's first puzzle design award but unfortunately he was not present in Tokyo to collect his prize in person.

Overview
I first handled this puzzle at IPP33 during the two days judging process of the design entries. Given I had to go through around sixty puzzle designs, I didn't have the time (nor stamina) to try to solve it. Since Goh and I both live in Singapore, I was pretty sure I would be able to get my hands on a copy from him to play with at some subsequent date.

Just several weeks back, Goh contacted me to ask if I wanted a copy from him as Tom had sent over to him several copies which had just been newly made. Of course I said a resounding yes! 

The object of Dancing Shoes is the fit all five loose pieces flat into the tray. The tray itself is rather unusual in that the four corners have an L-shaped protrusion . At first glance, you might think that you can arrange the five pieces outside the tray to get the correct formation and then try to fit the pieces one at a time into the tray. Well this is what I tried initially only to discover (and I should really have known better) that this is impossible. The pieces won't fit in the way you want them to.

This is a packing puzzle with a twist; you need to think beyond the traditional methods of solving, which obviously will not work here. I am not good with packing puzzles so I grappled with Dancing Shoes for quite a while before finally hitting upon the solution. However I had the benefit of seeing how a couple of Goh's other puzzle designs work so I had an idea to the possible solution for Dancing Shoes. 

Difficulty Level
Challenging enough but not unduly difficult. It's not a puzzle that would frustrate one to wits' end (although it possibly might for some people). Its one of those puzzles that spur you to puzzle on because everything is there in front of you, doesn't seem to look that difficult, yet the solution is somehow rather elusive! 

Summary

Another great puzzle design from a prolific puzzle designer. Good quality too. Well deserving of the IPP33 Puzzlers' Award and definitely a must-have for the collector.or packing puzzle enthusiast. 

Sunday, 15 December 2013

Konstrukt

Name
Konstrukt

Designer
Yavuz Demirhan. For some of Yavuz's other designs, click here.


Nice contrast of light and dark woods and textures

Manufacturer
Pelikan

Type & Classification

Interlocking

Dimensions
9.0cm all round. This is a relatively large puzzle making for comfortable handling.

Materials & Construction
The Konstrukt is made of four different hardwoods; Maple, Wenge, Acacia and Paduok. Construction fit and finish is excellent and everything is not too tight and slides smoothly. All the pieces are very nicely cut with fine bevelled edges. Visually the Konstrukt is also an aesthetically pleasing burr due to the contrast of its different coloured woods.

Overview
The Konstrukt is a recent 2013 design from Yavuz Demirhan. An interlocking burr, it consists of 15 pieces of which 12 are congruent. From the remaining three, one pair is also congruent.

The object is to disassemble and reassemble the burr. At first glance you will notice that the puzzle is made up of the pieces criss-crossing each other on all the three axes. Symmetrical all round. Here is where Pelikan has made very good use of the contrasting woods to enable the opposite sides of the puzzle to have distinct colour tones.

The Konstrukt has a 3.2.1.1.2.1.1.1.1.1.1.1.3 solution, meaning it takes three moves to remove the first piece, followed by two for the second and so on. Disassembly is not too difficult once you discover that first (and only) moving piece that locks the entire puzzle in place.


While it took me several minutes to take apart all the outer pieces, for some reason, it took me longer to get the remaining three inside ones free. Putting the pieces back together is the real challenge here. 

As usual, I got stuck after several of the initial moves.Thank goodness Pelikan provided a printed solution which got me going in the right direction. About halfway, I sort of figured out where each piece was supposed to go and didn't have to rely on the solution any more (the printed solution was not too clear anyway, at least nothing compared to the ease of using Burr Tools). 

I eventually got the last two pieces into place only to discover that one of the early pieces was in the wrong position; so I had to re-do part of the puzzle again.

Difficulty Level
Taking the puzzle apart is relatively easy but reassembly is the challenging part, but not unduly so painful. As I mentioned, once you get the first five or six pieces correct, you sort of can figure out the rest slowly even without the solution. If the puzzle had all been of one colour, I think it may have been slightly easier.The correct solution requires that each two opposite sides of the puzzle comprise of just one colour and not a mix of different woods. So a bit of forward thinking early on is necessary. 

Also, because you are trying to grapple with several loose pieces at one time, it can be quite fiddly to physically hold the puzzle to position the pieces correctly.

Summary

A very high quality and fairly challenging burr to collect if you enjoy this genre of puzzles. With sufficient practice, you can actually solve it repeatedly without the solution or Burr Tools. Aside from the puzzling, the rather handsome Konstruckt also displays very well! 

Monday, 9 December 2013

Ball In Cylinder #2

UPDATE 30 September 2017: Ball In Cylinder #2 is now AVAILABLE again! Please email me at smallpuzzlecollection@gmail.com to purchase.

Update 23 October 2017 - Dear Reader, please check out my new puzzle blog and e-storat http://mechanical-puzzles.com

Name
Ball In Cylinder #2

Designer
Jerry Loo. Jerry also designed the Ball In Cylinder #1.


Manufacturer
Jerry Loo. Limited availability as of this post. Please PM me via my Profile email if you are keen to buy one.

Type & Classification

Sequential Movement.

Dimensions
7.5cm (height) x 4.4cm (diameter).

Materials & Construction
The BIC #2 is made entirely of 6061 aluminium, while the Special Edition, copper. Ball bearings are steel. 

IPP
I had planned to enter both my designs the BIC#1 and BIC#2 for the IPP33 Nob Yoshigahara puzzle design competition but was advised by Nick Baxter, the organising chairman, to only enter one design in order to avoid confusion. Hence the BIC#1 became the competition entrant, my first!

Overview
The design of the BIC#2 was conceived at the beginning of this year, a couple of months after my BIC#1 appeared on the market. For a brief history of my first and second puzzle design attempts which resulted in the BIC#1, click here

How to tell difference between the BIC#1 and #2? Dimensionally they are the same. The BIC#2 has a pair of circular lines on either end while the BIC#1 has only one. The exit hole on the BIC#2 is also off-centre to one side. Like the its predecessor, the object of the puzzle is to remove the hidden ball bearing within the cylinder.

I had received positive reviews from several well known puzzle bloggers in the community who had played with the BIC#1, including Allard Walker, Kevin Sadler, Roxanne WongGabriel Fernandes and Oli Sovary-Soos. I was very encouraged by this especially since my second design, the BIC#2 employed not only a totally different mechanical trick from the #1 but was in my personal opinion, measurably harder as well.

With this new design I went back to my old pal the metal fabricator (an elderly gentlemen who cuts, drills and grinds everything by hand) and showed him what I wanted. By now he has had a lot of experience producing my BIC#1s. So he gave me a nod and a smile and said "no problem". While the BIC#2 is a more difficult puzzle with more complicated internals, strangely it is actually easier to fabricate than the BIC#1 The first prototype was made and after some minor adjustments and tweaking, I produced a small batch of BIC#2s. 


During this time I also wanted see how the puzzle would turn out in copper. As copper is less common for sale on the retail market in small quantities than aluminium, the raw material was prohibitively expensive! And not knowing the kind of response I would get, I bought just enough copper to make four copies, three of which have all been sold, leaving the last one for myself. One thing's for sure, a copper BIC#2 is really heavy! It weighs about three to four times the aluminium version. At around 600 grams or so, its about the weight of a Revomaze Ex.

Difficulty Level
From what I have heard, so far only a handful of puzzlers have managed to solve the BIC#2. Not sure if this is good or bad tho'? Perhaps there are those who have solved it already but make no mention of it. I hope no one has given up on it yet. If anyone who is reading this needs clues or the full solution, please don't hesitate to contact me.

Finally, a word of thanks also to Kevin Sadler for posting his review of the BIC#2 on his puzzle blog.


Tuesday, 3 December 2013

Lee Valley Trick Bolts V2

Name
Trick Bolts V2

Designer
Unknown


Manufacturer
Lee Valley & Veritas. Available for US$19.50 per pair. 

Type & Classification
Take Apart

Dimensions
3.3 cm (Length) x 1.8cm (Width) 1.8 cm (Depth)

Materials & Construction
Stainless steel. Made in Canada, this pair of trick bolts is very well made and exudes quality, belying their inexpensive price tag.

Overview
Trick bolts come in all sorts of shapes, size, materials and quality. Prices also range from inexpensive (like the ones featured here) to the high end, hand-tooled bolts and nuts like the Wan-Wa-Sure by Rocky Chiaro. And there are some like the Bolt & Washer that fall somewhere in between the price spectrum.

This is the second pair of trick bolts to come from Canadian hardware retailer Lee Valley Tools. The first (and slightly cheaper) pair which they now call the Trick Bolts V1 was reviewed earlier in this blog.

From Left: Trick Bolts V1 & Trick Bolts V2
Physically both bolts look similar in appearance but have different mechanisms. Lee Valley claims the V2 to be harder than the V1. Well, yes and no. For puzzlers who have experience with trick nuts and bolts, they are pretty simple. I solved both bolts in about a minute. For new puzzlers and the uninitiated, yes, they may prove to be a bit of challenge. The tricks the V2 bolts employ tho' are not entirely new for this genre.

Difficulty Rating
Generally easy for most puzzlers other than the absolute novice.

Summary
Extremely good value for money given the high quality of manufacture. If you are new to bolt puzzles and not sure whether you want to invest in them, well, they represent a good starting point. And if you are collector, definitely a must-have.

Friday, 29 November 2013

Angel Box


Update 23 October 2017 - Dear Reader, please check out my new puzzle blog and e-store at http://mechanical-puzzles.com

Name
Angel Box

Designer
Wil Strijbos. For a list of Wil's puzzle designs, click here.


Angel peeking out of the window


Manufacturer
Wil Strijbos. As far as I am aware, still available in a limited edition series of 99 units at 390 Euros each (excl S&H). Please PM me via my Profile email if you wish to contact Wil to buy one.


Type & Classification
Sequential Discovery.


Dimensions
15.8 cm (Length) x 7 cm (Width) and 11 cm (Height) 


Materials & Construction
Aluminium, steel, plastic and acrylic. The entire puzzle box is made out of polished aluminium and inside there are some other bits and parts made from plastic, steel and acrylic

This is a behemoth of a puzzle weighing more than 2kg. Quality of construction, fit and finish is excellent. The individual parts and pieces are all CNC machined to very high standards and exact tolerances.


Overview
This is Wil Strijbos' third sequential discovery puzzle, after the First Box and Lotus, both reviewed earlier in this blog. It is also his most ambitious puzzle to-date; far surpassing the First Box and Lotus both in terms of physical complexity and level of difficulty. For those not familiar, a "sequential discovery" puzzle is one where you execute a series of steps in a particular order with the aid of "tools" found within the puzzle in order to solve the puzzle. No external tools are needed (or permitted).

There is some history of how Wil came to design the Angel Box and this usually accompanies the puzzle's instructions on what to do (and not to do) while solving the Angel Box. A couple of the earliest puzzle solvers had used unauthorised tools, although these did come with the puzzle! After some clarification from Wil, all was understood.

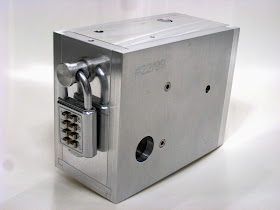
The object of the Angel Box is to free the cute little Angel inside the box. And to do so, one must first open up the box. As you can tell from the photo above, the Box is a rather industrial looking rectangular metal object secured by a combination padlock. The beginning step is to unlock the padlock. The padlock comes with a number code plate, but Wil will have swapped your code plate with someone else's so the code you have doesn't work for your padlock; its there only for show. 

You may not believe this, but unlocking the padlock is actually the easiest step in the entire solving process! No worries, its quite doable; you do not need any lock-picking or locksmith skills.

After the padlock is removed, the sequential discovery part(s) come into play. The next step requires you to search for tools hidden within the box which you will need to proceed. And upon finding the tool(s), the rest of the (very challenging) puzzling journey continues to figure out how to take apart the box.


Based on my own personal count, there are a total of 25 steps/moves (excluding any trial and error, assuming every step/move is correct) broadly covering three groups of tasks/challenges before arriving at the angel. And this is only AFTER the padlock has been removed, which itself is a puzzle! Not quite a simple affair of opening a lid or two; you literally need to dissect the box to solve this one.

The Angel Box truly epitomises what is a really good sequential discovery puzzle. There are many steps to "conquer" and some are more difficult than others but as you successfully solve each step along the way, you are rewarded with a "a-ha" moment. Because of this, the Angel Box is one of those puzzles that will allow you to feel satisfied just solving one part at a time; to put it away and continue the next day. "No rush, just enjoy", as Wil mentioned in his email to me. However, impatient as I usually am, I went non-stop and solved the box in a single sitting, in just under two hours. I was very impressed with the insides of the box; quite a mechanical marvel in terms of the design and manufacture.

Freeing the Angel is not the final step...there is one last challenge still...but I will leave it to Angel Box owners to discover this for themselves without saying more. 

Just as there are many challenging steps, there are just as many if not more, bits and pieces one would accumulate (some very small) as the solving progresses. Owners of the Angel Box would do well to be careful when handling these small items. Losing the most critical parts within the puzzle (which is very possible in this case if one is careless) would mean getting stuck indefinitely until (external) help arrives!

Difficulty Rating
Very challenging at every stage but not a puzzle that you will frustrate you out of your wits. As I have mentioned, the interim successes you find along the way as you go through the solving journey will keep you confident and motivated to the end. 

Summary
A very expensive puzzle no doubt, but the quality of the Angel Box and the puzzling experience makes it a worthwhile purchase. And with a limited production of just 99 units, definitely a collector's item. Get one before they run out!

Monday, 25 November 2013

Noncsi

Name
Noncsi

Designer
Tamas Vanyo.


Manufacturer
Eric Fuller. Website www.cubicdissection.com. 44 copies were made, each priced at US$79, currently sold out.

Type & Classification
3D packing; sequential movement

Dimensions
8.5cm (Length) x 8.5cm (Width) x  4.7cm (Height). Very nice size and comfortable for puzzling.

Materials & Construction
Two versions were offered. Caroline Ash with either Peruvian Walnut or Bubinga. From Eric Fuller, so quality and finish is top notch. Construction is very solid. Fit is snug but not tight; pieces move smoothly, but those in high humidity countries would no doubt want to "dry out" their puzzle if possible before playing. 

Overview
This is one of the more unusual 3D "packing" puzzle designs I have come across. The object is to remove the 8 pieces (comprising of just 3 different shapes) and then place them back into the frame.

The frame itself is pretty odd as you can tell from the photo below. A smaller hollow frame fills a larger one, together forming "rails" for the pieces to slide in and out through a single entrance, almost like a maze.


The Noncsi has a level 2.3.9.7.5.6.6.7 solution, meaning that it takes 2 moves to free the first piece, another 3 for the second, then 9 for the third and so on.

There is only one direction for the pieces to slide out and I found a number of twist and turns (no pun intended) as I puzzled along. And their movements must follow a specific order otherwise things would get jammed up.

As in puzzles of this nature where it already comes in the solved state, I typically remove the pieces slowly and lay them out properly in the correct order, so that reassembly later becomes easier. For the Noncsi, I even numbered and tagged the pieces just in case there happens to be an inadvertent mix up. Suffice to say, I enjoyed the process of disassembly and reassembly, which didn't take too long.

Tagging and numbering helps! Saves a lot of headaches later
Difficulty Level
Not difficult (if you follow the way I did it :-). But I think it would be very challenging if the pieces are fully jumbled up after removal, unless you have a damn good memory, even though only three different shapes are present.

Summary
A different kind of packing puzzle indeed! As Eric commented on his website; "a very unique concept from a new designer...". I fully agree. A handsome looking one too I might add.

And if you are wondering what "Noncsi" means? Well, its the name of designer Tamas Vanyo's middle daughter; click here to read Saul Symond's interview with Tamas Vanyo. 

Monday, 18 November 2013

Convolution Ball

Name
Convolution Ball

Designer
Stewart Coffin. The Convolution Ball is based on Coffin's Convolution. For a list of his puzzle designs, click here.


Manufacturer
Pelikan. For their website (which you will probably require Google Translate), click here. Mr Puzzle of Australia also retails the Convolution Ball on behalf of Pelikan for A$135/-.

Type & Classification
Interlocking.

Dimensions
8.5cm (diameter) x 10.5cm (Height with stand)

Materials & Construction
The puzzle comes in different wood combinations which include exotic woods from the following; maple, walnut, birch, ash, apple, pear, cherry, oak, beech, plum, acacia, mahogany, ebony, wenge, walnut, paduak, rosewood, amaranth, bubinga, owango, jarah, meranti, and iroko. Pelikan is well known for their solid craftsmanship and the Ball is no exception; really excellent quality. Fit and finish is snug without being too tight and pieces move smoothly against each other. 

Overview
The Convolution Ball consist of seven interlocking pieces forming a perfect sphere. Each of the seven pieces comprise of different smaller pieces glued together. The object is firstly to disengage the pieces and thereafter, reassemble them. As the puzzle is very well made, all the joint lines are virtually invisible. I spent a fair amount of time figuring out how to get the first piece loose. It was all trial and error pushing at various points of the sphere to see what could or could not move.

Once the first piece slid out, the rest came out pretty naturally. Just to be sure, I rested my Convolution Ball in my camera dry box for a couple of days to ensure there was no lock-up.


Reassembly was just as challenging. The pieces are all of varying shapes and sizes. Everything now had to go back in reverse order. I had taken the liberty of arranging all the pieces nicely on my desk in the same order which they were disengaged, so that I would have a easier time assembling. This plus photo documentation, just to play it safe. 

The first three pieces came back together quite nicely and easily. However, I took much longer with the subsequent four. But since every piece had curved edges, this helped since I was trying to form back a sphere which can only take place if the pieces were in their general right orientation. Still I had to refer to my photos for assistance for one or two of the pieces.

One point to note about the Ball; be very carefully while you are handling it. All the pieces have been cut to very exacting tolerances and have sharp corners. One accidental drop would almost certainly twist off or blunt a corner and damage the puzzle for good. Worse still if you dropped the whole ball or it rolled off your table...


The Convolution Ball right with the Pelikan Egg
Difficulty Rating
Difficult overall. Finding that one first piece that moves is the key to "unlocking" the Ball. For those living in high humidity countries, find a way to "dehumidify" the Ball first before playing. Otherwise if the pieces are too tightly pressed together, you may end up not finding the first piece that is intended to move.

Summary
Aside from being a challenging interlocking puzzle, the Convolution Ball, with its multi-coloured exterior, is also really a handsome work of wood art that would stand out well amongst your multitude of similar/same looking burrs. A must-have indeed!

Sunday, 10 November 2013

Framework II

Name
Framework II

Designer
Markus Gotz. For a brief history of how Eric came to produce the Framework II, click here.


Manufacturer
Eric Fuller. Website www.cubicdissection.com. 38 copies were made, each priced at US$69, currently all sold out.

Type & Classification
3D packing puzzle; sequential movement

Dimensions
14.3 cm (Width) x 1.9 cm (Depth) x 16.2 cm (Height)

Materials & Construction
The thing that attracted me to this puzzle was the beauty of the multi-coloured display employing the different exotic woods. It really looks like a work of abstract art on a stand.

This Framework II comes in a combination of 11 different hardwoods. The stand is made of either Cherry or Walnut while the individual pieces are constructed from Walnut, Sapele, Yellowheart, Wenge, Maple, Bloodwood, Paduak, Rosewood, Holly and Purpleheart. Construction, fit and finish is excellent and the tolerances between the internal pieces are very precise and tight. Again, like The Decoy I have to rest the puzzle in my camera drybox to reduce the humidity to the level where the pieces are loose enough move. 

Overview
The Framework II came assembled (thank goodness and Eric.) The object is to remove the seven pieces from the frame and re-assemble them back into frame. This is one of the more unusual packing puzzle designs as one will discover from the way the internal pieces fit within the frame. Each of the pieces have "extra" coloured squares and/or rectangles stuck to on both sides. In the assembled state, the extra pieces overlap and "hug" the frame.

The myriad of colours and their diagonal orientation relative to the frame also make the pieces visually confusing. And there is only one solution here.


Removing the pieces was actually not too difficult; after you remove the one "locking" piece that holds the puzzle together, the rest consist of a combination of sliding moves and extracting the pieces from the frame in a particular order.

I am lousy with high-level packing puzzles. So in order to ensure that I would not have too much trouble later on fitting the pieces back, I documented the sequence of moves with photos taken with my cell phone camera. This was to be my safety net in the event I got stuck later on (which I did).

After all the pieces came out, true enough trouble started when I tried to put the pieces back in the same order. While I could get the first two or three pieces in correctly, I got stuck subsequently. As mentioned, the multi-coloured extra squares and rectangles found on the internal pieces are diagonally glued, so this adds tremendously to confuse the orientation of as as well as making it very difficult to remember the shape of the pieces and where they are to go. Pieces would simply not fit or be jammed against each other or the sides of the frame.

But with the help of my photos, I followed the reverse sequence and got each piece back into the frame, With a bit more practice, I managed to memorise the order the pieces came out and went in, so after some time, I could actually do it without any external help.

Difficulty Rating
Very difficult without a solution I would imagine! I wouldn't have been able to solve it if I were not able to rely on the photos I took. As quoted from Eric's site, Markus Gotz remarks:-

There are many different ways to assemble the seven pieces of the puzzle outside of the frame to a square. But only one of these options can actually be built into the frame. This puzzle's really not for beginners!"

Summary
A rather unique design for a packing puzzle. Very challenging indeed but once you study and memorise the moves, can be solved repeatedly. But constant practice here would be needed. I don't think its a puzzle you can tuck away for a few months and expect to be able to re-solve easily when you bring it out again.

Notwithstanding, a damn attractive standing piece of puzzle art that displays really well!

Thursday, 7 November 2013

Cast Coaster

Name
Cast Coaster

Designer
Serhiy Grabarchuk; who is very well known for a number of sliding puzzle designs including One Fish Another Fish reviewed here in this blog. To see his many puzzle designs, some which have been commercialised, click here. If you wish to play his sliding puzzles digitally, click here.


Manufacturer
Hanayama. Launched back in 2006, the Cast Coaster is available from various online retailers and Ebay.

Type & Classification
Take-part; disentanglement

Dimensions
6.5cm (Length) x 6.5cm (Width) and 0.5cm (Thickness)

Materials & Construction
Made of zinc alloy (I think) covered in shiny chrome. Quality of construction, finish and fit is very decent. Again I would have personally preferred a matt surface.

Overview
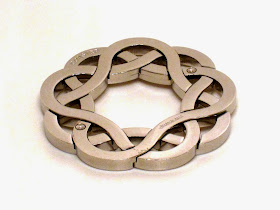
Its obvious why the puzzle is called "coaster". It fully resembles one (even looks like one of those Celtic designs). From a practical standpoint, not that useful as a coaster especially for cold drinks since the condensation will go through the cracks and gaps.

The object is to "break" apart the Coaster and reassemble it. The Coaster consists of three interlocked triangular shaped "rings" giving the Coaster its round shape.


Disassembly was simple enough, easily done in seconds. The reassembly is where the real challenge is. On each of the triangular rings are grooves which allow the rings to intersect and fit within each other. All three rings are non-identical in the sense that the grooves are all in different positions on each ring and the number of grooves are also different for each ring.

I went through a good couple of hours trying to fit the pieces back together but somehow the solution just eluded me. Whenever I thought I could fit two and get the third on, I'll be stuck. Not easy to solve by trial and error since the tolerances are tight and leaves little room for chance solutions.

Eventually I lost patience and went for the solution. There are about half a dozen videos on YouTube on the Coaster. But only one or maybe two of the videos are easy to follow for the solution. I will leave readers to figure out which ones.

Difficulty Level
Hanayama rates the Coaster at 4-stars (out of 6). I am more inclined to give it a 4.5 or even a 5 instead.

Summary
This is one of those puzzles very hard to figure out, but once you do, easily repeatable solving. After I learnt the solution and memorised the few necessary steps, I could re-fix the Coaster in under thirty seconds. Visually its aesthetically pleasing given its charming pattern. Certainly something you can leave on your coffee table for show!

Monday, 4 November 2013

The Decoy

Name
The Decoy

Designer
Stewart Coffin (Design #187-A). To-date he has done 258 puzzle designs. For a list of his designs, click here.


Manufacturer
Eric Fuller. Website www.cubicdissection.com. 42 copies were made, each priced at US$59, but all have been sold out.

Type & Classification
3D packing puzzle (with a twist)

Dimensions
9.5 cm (Length) x 9.5 cm (Width) x 2.8 cm (Height)

Materials & Construction
The puzzle comes in a several wood combinations. The box frame is made of Sapele with a laser-cut acrylic transparent top. The bottom is made of either Spalted Wormy Holly or Canarywood. The six loose pieces are either Cocobolo or Ebony. Construction fit and finish is excellent and all the edges well cut. Tolerances between the pieces are tight; in fact a little too tight in the case of my copy. The high humidity in Singapore doesn't help either.


Overview
The Decoy was shipped to me in the solved state. So the object is to first remove all the six irregular-shaped individual pieces up through the similarly irregular-shaped cut-outs in the acrylic cover, and then to re-pack them back into the box frame. Looking at the shapes of the cut-outs on the acrylic cover, it is obvious the pieces can only come out after being orientated in a certain way. This is a packing puzzle with a slight difference here compared to the traditional "open-top" ones. And in some ways similar to The Rattle reviewed earlier in this blog.

Removal of the first three pieces was a cinch. After taking out the first one, it was just a simple matter of sliding the other two into position and removing them through the cut-out on the cover. Then comes the real challenge. So challenging indeed that I was stuck in the same position for a couple of days. Extraction of the 4th to 6th pieces by way of simple (linear) sliding would not do. I experimented with rotations. One piece could be turned in a certain direction while the other two wouldn't budge. I tried all sorts of ways but no avail.


I wondered if the tolerances were too tight so in went the puzzle into my camera dry box overnight. Eric crafts his puzzles at around 55-58% humidity, so I set my dry box to 42% humidity which I thought would do the trick. Alas, even after over 18 hours of de-humidification, there was no still improvement, so I assumed (wrongly here) that perhaps the puzzle was just too difficult for me. In situations like that, normally I would ask for help (after all, is there any point in trying to be a hero and frustrate myself indefinitely?). I emailed Eric and he promptly replied with a solution PDF.

Now here is the clincher...after studying the solution, I discovered that one of the pieces that I tried to rotate but could not, IS actually suppose to rotate....no wonder I was stuck for so many days. The problem was the tolerances were indeed too tight. I emailed Eric again about this and he gave me some information about compression shrinkage; basically it may take a while for wood to expand and then take just as long for the wood to shrink. Here's the excerpt from a post on a woodworking forum Eric had contributed to:-

"I've read several posts lately about wood movement and thought I would post this up in case anyone didn't know about it. It's near and dear to my heart because I work to stupidly tight tolerances when I make my puzzles, and my work gets shipped all over the world (i.e. different climates).

Compression shrinkage occurs when wood tries to expand but is constrained by its surroundings (i.e. locked into a puzzle or a drawer inside a frame). When that happens the wood absorbs moisture but cannot expand. The cells then take on an oval shape, and when the wood dries, it is permanently smaller then before it tried to expand. So, if you make something a little too tight when it's dry and you find it has locked up in humid weather, best thing to do is store it somewhere for a few dry/humid cycles. It might surprise you by working itself out via compression shrinkage!

As far as movement in general, I keep a close eye on humidity in my shop and adjust my work accordingly. If it's super humid I'll make the puzzle as tight as possible while still being assembled. If it's dry I'll make sure key joints or places where pieces will interact have a few extra thousandths to move around. I recommend putting a decent hygrometer in your shop and getting into the habit of checking it if you do any precision work. I bought mine at a cigar shop for $20 and calibrated it using a zip-loc bag and some damp salt in a soda pop cap."

In went the The Decoy into my camera dry box for a second time but this round, I kept it inside for a full week. Yes, when the seven days were up, compression shrinkage had taken place; this time when I tried to solve it, all the pieces slid and rotated smoothly and I got every piece out of the box.

Difficulty Rating
Tough! As quoted from Eric's site, Stewart Coffin says:

"The Decoy (#187-A) is by far the most difficult and my favourite. It is the only one that requires a slightly loose tray or rounding of corners to solve."

However, it is not so unduly difficult that you can't repeat solving it. As I mentioned above the first three pieces come out quite easily, its the next three that will pose the challenge. But you will only be working with three pieces. With some practice, the moves can be memorised and you will be familiar with the sequence after a while.

Summary
The Decoy starts off easy and gives you the impression that you are doing well. But along the way, the trickiness comes into play and here's where the difficulty begins. That's why its called the "Decoy". If you like packing puzzles (with a twist), this one is a real gem!

Tuesday, 29 October 2013

Conjuring Conundrum

Name
Conjuring Conundrum

Designers
Allard Walker and Louis Coolen. Allard runs his own puzzle blog Puzzling Times.


Manufacturer
Allard Walker and Louis Coolen. Available now only from Wil Strijbos for 48 Euros. Please PM me via my blog profile email if you do not have Wil's contact details.

Type & Classification
Sequential Discovery; 2D Assembly

Dimensions
10cm (length) x 7cm (Width) x 1.8cm (Height)

Materials & Construction
The puzzle is made up of a combination of materials including aluminium, steel, fabric and acrylic. The miniature briefcase (for business cards) is commercially available. The insides are actually very decently "modded" by hand, considering there is a fair amount of cutting and glueing. Comes packaged in a cardboard box with the IPP33 logo and text bearing both designers' names. Accompanied by a sealed solution sheet. For a very interesting account of how Allard and Louis created and produced the Conjuring Conundrum, click here.

IPP
The Conjuring Conundrum was Allard's Exchange Puzzle at IPP33 in Tokyo, Japan just this past August.

The briefcase with all its contents out (well, almost all)
Overview
I met puzzle collector and blogger Allard Walker the first time in person at IPP33 outside the lobby of the hotel where event was held. He looks better in person than the photograph on his blog profile. I had corresponded with Allard from time to time via email over the last couple of years (usually asking him for his opinion on a certain puzzle or for help in solving etc) prior to our meeting. We were both part of a group that took a trip into Tokyo city to look for some Karakuri puzzles. I have never met Louis but from what I have heard, he is a master solver, solving puzzles sometimes in minutes when others may take hours, days or months.

I was an Exchange Assistant (to puzzle collector Diniar Namdarian) at IPP33 and assistants typically only assist and do not get any exchange puzzles. Nonetheless Allard was very kind to give me a copy of his Conjuring Conundrum as a gift (thank you Allard). He told me a story of how Peter Wiltshire had given him (Allard) an exchange puzzle when Allard himself was an exchange assistant, and encouraged me to pass on this tradition when I myself one day become a puzzle exchanger, which hopefully will be soon.

The Conjuring Conundrum is actually two puzzles in one. The first puzzle is to open the briefcase. Step one is very easy...just undo the latches like any other normal briefcase as you would. Then the tough part comes. The lid of the case can only open a little bit enough for you to take a peek inside. There are things inside that look rather confusing and messy.

This is a sequential discovery puzzle so Allard and Louis have provided certain "tools" for use in opening the case. I fiddled with the case and studied whatever I could see inside. I was surprise to find myself quite quick to figure the way to opening the case lid. Very good use of the tools provided and clever execution of the mechanism I might add. Actually just opening the lid of the briefcase itself would already have made a pretty good puzzle, but Allard and Louis went further...

Having opened up the case, I found a fabric cloth bag containing a number of irregular shaped pieces of white acrylic. A little instruction card came with it; the object (of this second puzzle) is to form a shape of some sort using the pieces provided, on the back cover of the briefcase as a working surface. ie 2D assembly.

While Allard later told me that opening the brief case was the hard part, I have to disagree. Arranging the acrylic pieces to form the intended shape was to me the more difficult of the two. In fact so difficult for me that I had to ask Allard for help.

I got nowhere with his initial clues and after a long time trying, my patience ran out and I checked the solution. The solution was just as cryptic as Allard's clues and again I emailed Allard for help. Finally he gave me the intended position of two of the pieces and I was on my way again. After some more pushing the pieces around, I eventually solved the second puzzle and got the shape required, well more or less at least, although not fully complete...whew! I am glad that I was not the only one who had problems with the second puzzle. Apparently puzzle blogger Kevin Sadler was also stumped by the pieces in the bag.

Update 1 Nov 2013 - I was encouraged by Allard and Louis to try to (fully) complete the 2D assembly (packing) puzzle so I took it out of my puzzle cabinet to have another go at it...discovered the final solution after 10mins. All the time it was actually there "staring" at me in the face! Really unexpected trick...unusual twist for a 2D packing puzzle!!

Difficulty Level
Overall a difficult puzzle in my opinion, both the first and second parts, especially for those who have not much experience with sequential discovery type puzzles. Personally I found the second challenge far more difficult than the first, maybe because I am much better at sequential discovery puzzles as opposed to packing ones which I am crap at.

Summary
Great puzzle and certainly good value for money since you are getting two puzzles in one. For a sequential discovery puzzle, a rather unique and very clever trick incorporated within. And something for those who also happen to like packing puzzles.