Friday, 29 November 2013

Angel Box


Update 23 October 2017 - Dear Reader, please check out my new puzzle blog and e-store at http://mechanical-puzzles.com

Name
Angel Box

Designer
Wil Strijbos. For a list of Wil's puzzle designs, click here.


Angel peeking out of the window


Manufacturer
Wil Strijbos. As far as I am aware, still available in a limited edition series of 99 units at 390 Euros each (excl S&H). Please PM me via my Profile email if you wish to contact Wil to buy one.


Type & Classification
Sequential Discovery.


Dimensions
15.8 cm (Length) x 7 cm (Width) and 11 cm (Height) 


Materials & Construction
Aluminium, steel, plastic and acrylic. The entire puzzle box is made out of polished aluminium and inside there are some other bits and parts made from plastic, steel and acrylic

This is a behemoth of a puzzle weighing more than 2kg. Quality of construction, fit and finish is excellent. The individual parts and pieces are all CNC machined to very high standards and exact tolerances.


Overview
This is Wil Strijbos' third sequential discovery puzzle, after the First Box and Lotus, both reviewed earlier in this blog. It is also his most ambitious puzzle to-date; far surpassing the First Box and Lotus both in terms of physical complexity and level of difficulty. For those not familiar, a "sequential discovery" puzzle is one where you execute a series of steps in a particular order with the aid of "tools" found within the puzzle in order to solve the puzzle. No external tools are needed (or permitted).

There is some history of how Wil came to design the Angel Box and this usually accompanies the puzzle's instructions on what to do (and not to do) while solving the Angel Box. A couple of the earliest puzzle solvers had used unauthorised tools, although these did come with the puzzle! After some clarification from Wil, all was understood.

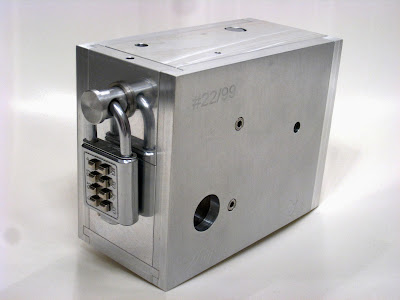
The object of the Angel Box is to free the cute little Angel inside the box. And to do so, one must first open up the box. As you can tell from the photo above, the Box is a rather industrial looking rectangular metal object secured by a combination padlock. The beginning step is to unlock the padlock. The padlock comes with a number code plate, but Wil will have swapped your code plate with someone else's so the code you have doesn't work for your padlock; its there only for show. 

You may not believe this, but unlocking the padlock is actually the easiest step in the entire solving process! No worries, its quite doable; you do not need any lock-picking or locksmith skills.

After the padlock is removed, the sequential discovery part(s) come into play. The next step requires you to search for tools hidden within the box which you will need to proceed. And upon finding the tool(s), the rest of the (very challenging) puzzling journey continues to figure out how to take apart the box.


Based on my own personal count, there are a total of 25 steps/moves (excluding any trial and error, assuming every step/move is correct) broadly covering three groups of tasks/challenges before arriving at the angel. And this is only AFTER the padlock has been removed, which itself is a puzzle! Not quite a simple affair of opening a lid or two; you literally need to dissect the box to solve this one.

The Angel Box truly epitomises what is a really good sequential discovery puzzle. There are many steps to "conquer" and some are more difficult than others but as you successfully solve each step along the way, you are rewarded with a "a-ha" moment. Because of this, the Angel Box is one of those puzzles that will allow you to feel satisfied just solving one part at a time; to put it away and continue the next day. "No rush, just enjoy", as Wil mentioned in his email to me. However, impatient as I usually am, I went non-stop and solved the box in a single sitting, in just under two hours. I was very impressed with the insides of the box; quite a mechanical marvel in terms of the design and manufacture.

Freeing the Angel is not the final step...there is one last challenge still...but I will leave it to Angel Box owners to discover this for themselves without saying more. 

Just as there are many challenging steps, there are just as many if not more, bits and pieces one would accumulate (some very small) as the solving progresses. Owners of the Angel Box would do well to be careful when handling these small items. Losing the most critical parts within the puzzle (which is very possible in this case if one is careless) would mean getting stuck indefinitely until (external) help arrives!

Difficulty Rating
Very challenging at every stage but not a puzzle that you will frustrate you out of your wits. As I have mentioned, the interim successes you find along the way as you go through the solving journey will keep you confident and motivated to the end. 

Summary
A very expensive puzzle no doubt, but the quality of the Angel Box and the puzzling experience makes it a worthwhile purchase. And with a limited production of just 99 units, definitely a collector's item. Get one before they run out!
Monday, 25 November 2013

Noncsi

Name
Noncsi

Designer
Tamas Vanyo.


Manufacturer
Eric Fuller. Website www.cubicdissection.com. 44 copies were made, each priced at US$79, currently sold out.

Type & Classification
3D packing; sequential movement

Dimensions
8.5cm (Length) x 8.5cm (Width) x  4.7cm (Height). Very nice size and comfortable for puzzling.

Materials & Construction
Two versions were offered. Caroline Ash with either Peruvian Walnut or Bubinga. From Eric Fuller, so quality and finish is top notch. Construction is very solid. Fit is snug but not tight; pieces move smoothly, but those in high humidity countries would no doubt want to "dry out" their puzzle if possible before playing. 

Overview
This is one of the more unusual 3D "packing" puzzle designs I have come across. The object is to remove the 8 pieces (comprising of just 3 different shapes) and then place them back into the frame.

The frame itself is pretty odd as you can tell from the photo below. A smaller hollow frame fills a larger one, together forming "rails" for the pieces to slide in and out through a single entrance, almost like a maze.


The Noncsi has a level 2.3.9.7.5.6.6.7 solution, meaning that it takes 2 moves to free the first piece, another 3 for the second, then 9 for the third and so on.

There is only one direction for the pieces to slide out and I found a number of twist and turns (no pun intended) as I puzzled along. And their movements must follow a specific order otherwise things would get jammed up.

As in puzzles of this nature where it already comes in the solved state, I typically remove the pieces slowly and lay them out properly in the correct order, so that reassembly later becomes easier. For the Noncsi, I even numbered and tagged the pieces just in case there happens to be an inadvertent mix up. Suffice to say, I enjoyed the process of disassembly and reassembly, which didn't take too long.

Tagging and numbering helps! Saves a lot of headaches later
Difficulty Level
Not difficult (if you follow the way I did it :-). But I think it would be very challenging if the pieces are fully jumbled up after removal, unless you have a damn good memory, even though only three different shapes are present.

Summary
A different kind of packing puzzle indeed! As Eric commented on his website; "a very unique concept from a new designer...". I fully agree. A handsome looking one too I might add.

And if you are wondering what "Noncsi" means? Well, its the name of designer Tamas Vanyo's middle daughter; click here to read Saul Symond's interview with Tamas Vanyo. 

Monday, 18 November 2013

Convolution Ball

Name
Convolution Ball

Designer
Stewart Coffin. The Convolution Ball is based on Coffin's Convolution. For a list of his puzzle designs, click here.


Manufacturer
Pelikan. For their website (which you will probably require Google Translate), click here. Mr Puzzle of Australia also retails the Convolution Ball on behalf of Pelikan for A$135/-.

Type & Classification
Interlocking.

Dimensions
8.5cm (diameter) x 10.5cm (Height with stand)

Materials & Construction
The puzzle comes in different wood combinations which include exotic woods from the following; maple, walnut, birch, ash, apple, pear, cherry, oak, beech, plum, acacia, mahogany, ebony, wenge, walnut, paduak, rosewood, amaranth, bubinga, owango, jarah, meranti, and iroko. Pelikan is well known for their solid craftsmanship and the Ball is no exception; really excellent quality. Fit and finish is snug without being too tight and pieces move smoothly against each other. 

Overview
The Convolution Ball consist of seven interlocking pieces forming a perfect sphere. Each of the seven pieces comprise of different smaller pieces glued together. The object is firstly to disengage the pieces and thereafter, reassemble them. As the puzzle is very well made, all the joint lines are virtually invisible. I spent a fair amount of time figuring out how to get the first piece loose. It was all trial and error pushing at various points of the sphere to see what could or could not move.

Once the first piece slid out, the rest came out pretty naturally. Just to be sure, I rested my Convolution Ball in my camera dry box for a couple of days to ensure there was no lock-up.


Reassembly was just as challenging. The pieces are all of varying shapes and sizes. Everything now had to go back in reverse order. I had taken the liberty of arranging all the pieces nicely on my desk in the same order which they were disengaged, so that I would have a easier time assembling. This plus photo documentation, just to play it safe. 

The first three pieces came back together quite nicely and easily. However, I took much longer with the subsequent four. But since every piece had curved edges, this helped since I was trying to form back a sphere which can only take place if the pieces were in their general right orientation. Still I had to refer to my photos for assistance for one or two of the pieces.

One point to note about the Ball; be very carefully while you are handling it. All the pieces have been cut to very exacting tolerances and have sharp corners. One accidental drop would almost certainly twist off or blunt a corner and damage the puzzle for good. Worse still if you dropped the whole ball or it rolled off your table...


The Convolution Ball right with the Pelikan Egg
Difficulty Rating
Difficult overall. Finding that one first piece that moves is the key to "unlocking" the Ball. For those living in high humidity countries, find a way to "dehumidify" the Ball first before playing. Otherwise if the pieces are too tightly pressed together, you may end up not finding the first piece that is intended to move.

Summary
Aside from being a challenging interlocking puzzle, the Convolution Ball, with its multi-coloured exterior, is also really a handsome work of wood art that would stand out well amongst your multitude of similar/same looking burrs. A must-have indeed!

Sunday, 10 November 2013

Framework II

Name
Framework II

Designer
Markus Gotz. For a brief history of how Eric came to produce the Framework II, click here.


Manufacturer
Eric Fuller. Website www.cubicdissection.com. 38 copies were made, each priced at US$69, currently all sold out.

Type & Classification
3D packing puzzle; sequential movement

Dimensions
14.3 cm (Width) x 1.9 cm (Depth) x 16.2 cm (Height)

Materials & Construction
The thing that attracted me to this puzzle was the beauty of the multi-coloured display employing the different exotic woods. It really looks like a work of abstract art on a stand.

This Framework II comes in a combination of 11 different hardwoods. The stand is made of either Cherry or Walnut while the individual pieces are constructed from Walnut, Sapele, Yellowheart, Wenge, Maple, Bloodwood, Paduak, Rosewood, Holly and Purpleheart. Construction, fit and finish is excellent and the tolerances between the internal pieces are very precise and tight. Again, like The Decoy I have to rest the puzzle in my camera drybox to reduce the humidity to the level where the pieces are loose enough move. 

Overview
The Framework II came assembled (thank goodness and Eric.) The object is to remove the seven pieces from the frame and re-assemble them back into frame. This is one of the more unusual packing puzzle designs as one will discover from the way the internal pieces fit within the frame. Each of the pieces have "extra" coloured squares and/or rectangles stuck to on both sides. In the assembled state, the extra pieces overlap and "hug" the frame.

The myriad of colours and their diagonal orientation relative to the frame also make the pieces visually confusing. And there is only one solution here.


Removing the pieces was actually not too difficult; after you remove the one "locking" piece that holds the puzzle together, the rest consist of a combination of sliding moves and extracting the pieces from the frame in a particular order.

I am lousy with high-level packing puzzles. So in order to ensure that I would not have too much trouble later on fitting the pieces back, I documented the sequence of moves with photos taken with my cell phone camera. This was to be my safety net in the event I got stuck later on (which I did).

After all the pieces came out, true enough trouble started when I tried to put the pieces back in the same order. While I could get the first two or three pieces in correctly, I got stuck subsequently. As mentioned, the multi-coloured extra squares and rectangles found on the internal pieces are diagonally glued, so this adds tremendously to confuse the orientation of as as well as making it very difficult to remember the shape of the pieces and where they are to go. Pieces would simply not fit or be jammed against each other or the sides of the frame.

But with the help of my photos, I followed the reverse sequence and got each piece back into the frame, With a bit more practice, I managed to memorise the order the pieces came out and went in, so after some time, I could actually do it without any external help.

Difficulty Rating
Very difficult without a solution I would imagine! I wouldn't have been able to solve it if I were not able to rely on the photos I took. As quoted from Eric's site, Markus Gotz remarks:-

There are many different ways to assemble the seven pieces of the puzzle outside of the frame to a square. But only one of these options can actually be built into the frame. This puzzle's really not for beginners!"

Summary
A rather unique design for a packing puzzle. Very challenging indeed but once you study and memorise the moves, can be solved repeatedly. But constant practice here would be needed. I don't think its a puzzle you can tuck away for a few months and expect to be able to re-solve easily when you bring it out again.

Notwithstanding, a damn attractive standing piece of puzzle art that displays really well!

Thursday, 7 November 2013

Cast Coaster

Name
Cast Coaster

Designer
Serhiy Grabarchuk; who is very well known for a number of sliding puzzle designs including One Fish Another Fish reviewed here in this blog. To see his many puzzle designs, some which have been commercialised, click here. If you wish to play his sliding puzzles digitally, click here.


Manufacturer
Hanayama. Launched back in 2006, the Cast Coaster is available from various online retailers and Ebay.

Type & Classification
Take-part; disentanglement

Dimensions
6.5cm (Length) x 6.5cm (Width) and 0.5cm (Thickness)

Materials & Construction
Made of zinc alloy (I think) covered in shiny chrome. Quality of construction, finish and fit is very decent. Again I would have personally preferred a matt surface.

Overview
Its obvious why the puzzle is called "coaster". It fully resembles one (even looks like one of those Celtic designs). From a practical standpoint, not that useful as a coaster especially for cold drinks since the condensation will go through the cracks and gaps.

The object is to "break" apart the Coaster and reassemble it. The Coaster consists of three interlocked triangular shaped "rings" giving the Coaster its round shape.


Disassembly was simple enough, easily done in seconds. The reassembly is where the real challenge is. On each of the triangular rings are grooves which allow the rings to intersect and fit within each other. All three rings are non-identical in the sense that the grooves are all in different positions on each ring and the number of grooves are also different for each ring.

I went through a good couple of hours trying to fit the pieces back together but somehow the solution just eluded me. Whenever I thought I could fit two and get the third on, I'll be stuck. Not easy to solve by trial and error since the tolerances are tight and leaves little room for chance solutions.

Eventually I lost patience and went for the solution. There are about half a dozen videos on YouTube on the Coaster. But only one or maybe two of the videos are easy to follow for the solution. I will leave readers to figure out which ones.

Difficulty Level
Hanayama rates the Coaster at 4-stars (out of 6). I am more inclined to give it a 4.5 or even a 5 instead.

Summary
This is one of those puzzles very hard to figure out, but once you do, easily repeatable solving. After I learnt the solution and memorised the few necessary steps, I could re-fix the Coaster in under thirty seconds. Visually its aesthetically pleasing given its charming pattern. Certainly something you can leave on your coffee table for show!

Monday, 4 November 2013

The Decoy

Name
The Decoy

Designer
Stewart Coffin (Design #187-A). To-date he has done 258 puzzle designs. For a list of his designs, click here.


Manufacturer
Eric Fuller. Website www.cubicdissection.com. 42 copies were made, each priced at US$59, but all have been sold out.

Type & Classification
3D packing puzzle (with a twist)

Dimensions
9.5 cm (Length) x 9.5 cm (Width) x 2.8 cm (Height)

Materials & Construction
The puzzle comes in a several wood combinations. The box frame is made of Sapele with a laser-cut acrylic transparent top. The bottom is made of either Spalted Wormy Holly or Canarywood. The six loose pieces are either Cocobolo or Ebony. Construction fit and finish is excellent and all the edges well cut. Tolerances between the pieces are tight; in fact a little too tight in the case of my copy. The high humidity in Singapore doesn't help either.


Overview
The Decoy was shipped to me in the solved state. So the object is to first remove all the six irregular-shaped individual pieces up through the similarly irregular-shaped cut-outs in the acrylic cover, and then to re-pack them back into the box frame. Looking at the shapes of the cut-outs on the acrylic cover, it is obvious the pieces can only come out after being orientated in a certain way. This is a packing puzzle with a slight difference here compared to the traditional "open-top" ones. And in some ways similar to The Rattle reviewed earlier in this blog.

Removal of the first three pieces was a cinch. After taking out the first one, it was just a simple matter of sliding the other two into position and removing them through the cut-out on the cover. Then comes the real challenge. So challenging indeed that I was stuck in the same position for a couple of days. Extraction of the 4th to 6th pieces by way of simple (linear) sliding would not do. I experimented with rotations. One piece could be turned in a certain direction while the other two wouldn't budge. I tried all sorts of ways but no avail.


I wondered if the tolerances were too tight so in went the puzzle into my camera dry box overnight. Eric crafts his puzzles at around 55-58% humidity, so I set my dry box to 42% humidity which I thought would do the trick. Alas, even after over 18 hours of de-humidification, there was no still improvement, so I assumed (wrongly here) that perhaps the puzzle was just too difficult for me. In situations like that, normally I would ask for help (after all, is there any point in trying to be a hero and frustrate myself indefinitely?). I emailed Eric and he promptly replied with a solution PDF.

Now here is the clincher...after studying the solution, I discovered that one of the pieces that I tried to rotate but could not, IS actually suppose to rotate....no wonder I was stuck for so many days. The problem was the tolerances were indeed too tight. I emailed Eric again about this and he gave me some information about compression shrinkage; basically it may take a while for wood to expand and then take just as long for the wood to shrink. Here's the excerpt from a post on a woodworking forum Eric had contributed to:-

"I've read several posts lately about wood movement and thought I would post this up in case anyone didn't know about it. It's near and dear to my heart because I work to stupidly tight tolerances when I make my puzzles, and my work gets shipped all over the world (i.e. different climates).

Compression shrinkage occurs when wood tries to expand but is constrained by its surroundings (i.e. locked into a puzzle or a drawer inside a frame). When that happens the wood absorbs moisture but cannot expand. The cells then take on an oval shape, and when the wood dries, it is permanently smaller then before it tried to expand. So, if you make something a little too tight when it's dry and you find it has locked up in humid weather, best thing to do is store it somewhere for a few dry/humid cycles. It might surprise you by working itself out via compression shrinkage!

As far as movement in general, I keep a close eye on humidity in my shop and adjust my work accordingly. If it's super humid I'll make the puzzle as tight as possible while still being assembled. If it's dry I'll make sure key joints or places where pieces will interact have a few extra thousandths to move around. I recommend putting a decent hygrometer in your shop and getting into the habit of checking it if you do any precision work. I bought mine at a cigar shop for $20 and calibrated it using a zip-loc bag and some damp salt in a soda pop cap."

In went the The Decoy into my camera dry box for a second time but this round, I kept it inside for a full week. Yes, when the seven days were up, compression shrinkage had taken place; this time when I tried to solve it, all the pieces slid and rotated smoothly and I got every piece out of the box.

Difficulty Rating
Tough! As quoted from Eric's site, Stewart Coffin says:

"The Decoy (#187-A) is by far the most difficult and my favourite. It is the only one that requires a slightly loose tray or rounding of corners to solve."

However, it is not so unduly difficult that you can't repeat solving it. As I mentioned above the first three pieces come out quite easily, its the next three that will pose the challenge. But you will only be working with three pieces. With some practice, the moves can be memorised and you will be familiar with the sequence after a while.

Summary
The Decoy starts off easy and gives you the impression that you are doing well. But along the way, the trickiness comes into play and here's where the difficulty begins. That's why its called the "Decoy". If you like packing puzzles (with a twist), this one is a real gem!