
Showing posts with label ABS. Show all posts
Showing posts with label ABS. Show all posts
Sunday, 23 September 2018
Sewing Box
Here's a rather unusual and (very colourful) disassembly puzzle designed by Diniar Namdarian. Click the link below to read more.


Tuesday, 30 August 2016
Vapors
The label on the packaging reads "Design from the twisted mind of Derek Bosch"...hmm, I wonder if there was an intentional pun here. Well, Vapors is a "twist" puzzle...of sorts.

Vapors is Steve Nicholls IPP36 Exchange Puzzle. Conceptually it is similar to his Pole Dancers where the goal here is to twist the two spirally interlocking pieces out of the cube. However, physically there is little similarity to Pole Dancers. Instead of the cylindrical "burr" style design like the latter or others in the "Helical" range, Steve has chosen to encase the red spiral pieces inside a square white cube. Which leads me to conclude that the exterior design and colours were deliberate, to match those of the Japanese flag (since IPP36 was held in Kyoto early this August). I say it looks rather eye-catching and unique. However, I am not sure why it's called Vapors?

The puzzle was 3D printed by Steve (mostly Steve fabricates all his puzzles using 3D printing) and measures 5.8cm all round. Its the same size as that of a standard Rubik's Cube. The cube itself is textured on four sides not only to make gripping easy but to give the puzzle some pattern. There is sufficient tolerance to allow the pieces to "twist" reasonably smoothly without jamming nor it being too loose.
Like burr pieces, the spiral pieces contain various protrusions and notches and they interact with other protrusions on the inside hollow of the cube. To extract the said pieces, you have to pull, push and twist one or the other of the pieces or sometimes even both at the same time in particular (sequential) manner. Similar to how you would solve a burr, but now, the pieces go up, down and round, instead of up, down, left and right. Vapors is not easy and I found it harder than Pole Dancers from last year. Removal was not too difficult and done within minutes. But it took me several sessions of play over the course of one and half days to re-assemble everything back to its original state. My poor memory of how I took it apart didn't help either. I might have taken less time, but during the putting together stage, I accidentally broke one of the pieces and had to use epoxy glue to join the broken halves and wait a good eight hours for the glue to set completely before resuming assembly.

For puzzlers who like cylindrical "burrs", this is a must have to add to any collection. A couple of puzzlers have lamented the fact that these puzzles are not made of wood....Don't we all wish they can be made of exotic woods. However, I am not sure if wood turning (or other methods of wood-working) can produce such designs into actual working copies. Granted 3D printed ones can't compare with the quality of their wooden counter-parts, but at least these designs have been realised into functioning copies for puzzlers to enjoy. And as far as I can tell, so far Derek has designed and Steve produced, everyone of this type of puzzle that have come onto the market.
Those interested to get a copy of Vapors can contact Steve Nicholls via his website here.


The puzzle was 3D printed by Steve (mostly Steve fabricates all his puzzles using 3D printing) and measures 5.8cm all round. Its the same size as that of a standard Rubik's Cube. The cube itself is textured on four sides not only to make gripping easy but to give the puzzle some pattern. There is sufficient tolerance to allow the pieces to "twist" reasonably smoothly without jamming nor it being too loose.

For puzzlers who like cylindrical "burrs", this is a must have to add to any collection. A couple of puzzlers have lamented the fact that these puzzles are not made of wood....Don't we all wish they can be made of exotic woods. However, I am not sure if wood turning (or other methods of wood-working) can produce such designs into actual working copies. Granted 3D printed ones can't compare with the quality of their wooden counter-parts, but at least these designs have been realised into functioning copies for puzzlers to enjoy. And as far as I can tell, so far Derek has designed and Steve produced, everyone of this type of puzzle that have come onto the market.
Those interested to get a copy of Vapors can contact Steve Nicholls via his website here.
Tuesday, 5 January 2016
4 Ducks & A Duckling
Name
4 Ducks & A Duckling
Designer
Jerry Loo

Manufacturer & Availability
My prototype and competition copies were 3D printed by Steve Nicholls. John Hache licensed my design for his IPP35 Exchange Puzzle and his version is laser cut 0.5in thick acrylic. You may wish to contact either Steve or John for availability.
Type & Classification
2D Packing
Dimensions
12.5 cm x 12.5 cm x 2cm (John's version is 10cm x 10cm x 1.25cm)
Materials & Construction
3D printed using ABS resin
Overview
4 Ducks was the second of my two entries for the IPP35 Nob Yoshigahara Puzzle Design Competition at Ottawa, Canada last August. There are 3 challenges for this puzzle:
WARNING: The link here shows the solutions. Password - duckling
DO NOT click on the link if you do not wish to see it.
Difficulty Level
The first challenge is very easy, while the second is moderate. The last is pretty hard; there are 144 ways to fit the 4 ducks into the tray but only ONE will form a symmetrical pattern. Based on feedback, most puzzlers can solve the first two challenges quite quickly but take a while to figure out the third.
Summary
Prior to designing 4 ducks, I have been toying around with designing puzzles using the triangular format. While there are some instances where the format is suitable for 3D interlocking burr style puzzles, but for 2D packing puzzles, the format enables more thematic shapes and design options (like the 4 ducks here). I think it also generally makes a puzzle using triangular lines somewhat harder, since most of us are used to and always seeing and playing with vertical/horizontal format puzzle designs.
4 Ducks & A Duckling
Designer
Jerry Loo

Manufacturer & Availability
My prototype and competition copies were 3D printed by Steve Nicholls. John Hache licensed my design for his IPP35 Exchange Puzzle and his version is laser cut 0.5in thick acrylic. You may wish to contact either Steve or John for availability.
2D Packing
Dimensions
12.5 cm x 12.5 cm x 2cm (John's version is 10cm x 10cm x 1.25cm)
 |
| John Hache's IPP35 Exchange Puzzle (made from laser cut acrylic) |
Materials & Construction
3D printed using ABS resin
Overview
4 Ducks was the second of my two entries for the IPP35 Nob Yoshigahara Puzzle Design Competition at Ottawa, Canada last August. There are 3 challenges for this puzzle:
- Fit all 4 ducks into the pond (tray)
- Fit all 4 ducks and the duckling into the pond
- Fit all 4 ducks into the pond to form a symmetrical shape
WARNING: The link here shows the solutions. Password - duckling
DO NOT click on the link if you do not wish to see it.
The first challenge is very easy, while the second is moderate. The last is pretty hard; there are 144 ways to fit the 4 ducks into the tray but only ONE will form a symmetrical pattern. Based on feedback, most puzzlers can solve the first two challenges quite quickly but take a while to figure out the third.
Summary
Prior to designing 4 ducks, I have been toying around with designing puzzles using the triangular format. While there are some instances where the format is suitable for 3D interlocking burr style puzzles, but for 2D packing puzzles, the format enables more thematic shapes and design options (like the 4 ducks here). I think it also generally makes a puzzle using triangular lines somewhat harder, since most of us are used to and always seeing and playing with vertical/horizontal format puzzle designs.
Wednesday, 9 December 2015
The Moose Ball
The Moose Ball was the second puzzle I brought along on my present business trip, together with the Cubic Burr.
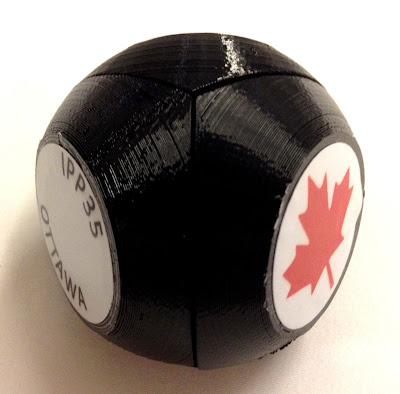
This is a "tetrahedrally based puzzle with only four pieces"...according to the instructions which came with the puzzle. If you are stumped by the technical term (like I was, click here), And if you are wondering what's a moose, click here.
This puzzle was Simon Bexfield's IPP35 Exchange Puzzle and Simon 3D printed the puzzle himself. Nicely done and quality and fit is good.
The puzzle consists of 4 pieces and the object is to take it apart and put the pieces back together again. When I first handled it I thought it was some sort of co-ordinate motion puzzle and tried to pull all 4 pieces apart together. Not really so, as I played with it and figured what needed to be done since the 4 pieces are "locked" together.

Its not a difficult puzzle and most experienced puzzlers would be able to solve it quite quickly. Putting it back together is a slight tad harder but with only 4 pieces and single solution, not hard to figure out either.
I believe Simon has the Moose Ball available for sale (and not only in black) but in a variety of colours as well. If you would like want, you can contact Simon via his website.

This is a "tetrahedrally based puzzle with only four pieces"...according to the instructions which came with the puzzle. If you are stumped by the technical term (like I was, click here), And if you are wondering what's a moose, click here.
This puzzle was Simon Bexfield's IPP35 Exchange Puzzle and Simon 3D printed the puzzle himself. Nicely done and quality and fit is good.
The puzzle consists of 4 pieces and the object is to take it apart and put the pieces back together again. When I first handled it I thought it was some sort of co-ordinate motion puzzle and tried to pull all 4 pieces apart together. Not really so, as I played with it and figured what needed to be done since the 4 pieces are "locked" together.

Its not a difficult puzzle and most experienced puzzlers would be able to solve it quite quickly. Putting it back together is a slight tad harder but with only 4 pieces and single solution, not hard to figure out either.
I believe Simon has the Moose Ball available for sale (and not only in black) but in a variety of colours as well. If you would like want, you can contact Simon via his website.
Wednesday, 11 November 2015
Triburrlism
Triburrlism is my second Steve Nicholls designed puzzle. My first was the Kray Twins, his IPP34 Exchange Puzzle to me which I had no success because it was tough. But for this second puzzle, I had much better luck.

Triburrlism, like the Kray Twins is a "diagonal" burr. Consisting of three pieces, it was made by Steve from 3D printing out of ABS resin. My copy (which I acquired from Steve during the IPP35 Puzzle Party) came in three colours with a slightly textured surface. The printing and finishing is very good and the puzzle has a smooth snug fit with nice clean edges. Dimensionally its around 4cm x 4cm x 3cm thick; not a large puzzle by any means, but easy enough handle comfortably.

The Triburrlism came un-assembled and the object is to get the three pieces together to form a symmetrical shape. which must fit inside the tin it came in. While the final shape is not stated, you can roughly tell by examining the pieces and their notches what the solved state is supposed to end up looking like.
Unlike the Kray Twins which I needed Burr Tools help from Steve, I managed to solve the Triburrlism with a bit of persistence and experimentation. From a design standpoint, the Triburrlism, by nature of having just three pieces is a lot easier than the Kray Twins which has six. With just only three pieces, its not too difficult to figure out how the pieces will interlock together in its final shape but getting the moves right for the pieces to mesh properly is the challenging part. Half the number of pieces versus the Kray Twins but IMHO less than half the difficulty. But nonetheless still fairly challenging and this one has a twist to it; two in fact :-). It takes approximately ten moves to fully assemble the puzzle.

Once solved, repeat solving is pretty easy with a bit of practice. If diagonal burrs is what you like, the Triburrlism is a great little puzzle and a good lead up to the Kray Twins! Its available from Steve by request.

Triburrlism, like the Kray Twins is a "diagonal" burr. Consisting of three pieces, it was made by Steve from 3D printing out of ABS resin. My copy (which I acquired from Steve during the IPP35 Puzzle Party) came in three colours with a slightly textured surface. The printing and finishing is very good and the puzzle has a smooth snug fit with nice clean edges. Dimensionally its around 4cm x 4cm x 3cm thick; not a large puzzle by any means, but easy enough handle comfortably.

The Triburrlism came un-assembled and the object is to get the three pieces together to form a symmetrical shape. which must fit inside the tin it came in. While the final shape is not stated, you can roughly tell by examining the pieces and their notches what the solved state is supposed to end up looking like.
Unlike the Kray Twins which I needed Burr Tools help from Steve, I managed to solve the Triburrlism with a bit of persistence and experimentation. From a design standpoint, the Triburrlism, by nature of having just three pieces is a lot easier than the Kray Twins which has six. With just only three pieces, its not too difficult to figure out how the pieces will interlock together in its final shape but getting the moves right for the pieces to mesh properly is the challenging part. Half the number of pieces versus the Kray Twins but IMHO less than half the difficulty. But nonetheless still fairly challenging and this one has a twist to it; two in fact :-). It takes approximately ten moves to fully assemble the puzzle.

Once solved, repeat solving is pretty easy with a bit of practice. If diagonal burrs is what you like, the Triburrlism is a great little puzzle and a good lead up to the Kray Twins! Its available from Steve by request.
Tuesday, 22 September 2015
CCC-1 & Diamond Engagement
Over the weekend, I played with another two IPP35 Exchange Puzzles, of which only one I was able to solve.
Well I will start with the unsuccessful one first, which was the CCC-1 ("Coffin-Cutler Collaboration"). This was Bill Cutler's exchange puzzle and it was designed in collaboration with Stewart Coffin and based on Coffin's Design #177A. The CCC-1 was made by Coffin.

It's a packing puzzle and the object is to fit the 5 polyminoes (ranging from 4 to 6 units) into the tray. The puzzle came with its accompanying literature/explanation. I think both Cutler and Coffin knew that this was no easy puzzle so they also including a note containing a clue on how to solve it. But even with the clue, I was hopelessly lost and had to asked fellow Sinaporean puzzle collector/designer Goh Pit Khiam for help.
Goh is quite an expert on these sort of packing puzzles having designed many of them himself including the IPP33 award winning Dancing Shoes. Goh had earlier borrowed the CCC-1 from me and solved it rather quickly.
Like always, only with the benefit of hindsight after seeing the solution, I felt perhaps I could have done better with the CCC-1. Very difficult puzzle indeed (at least for me) and I think the solving aid provided is probably quite necessary. Definitely would be of much interest to packing puzzle enthusiasts, and since its a Coffin/Cutler puzzle, a great addition to any puzzle collection. If the CCC-1 could be made with exotic woods, even better still. As far as I can tell, the CCC-1 is not available commercially so the only source is from Bill Cutler.
Diamond Engagement
I had much better luck with the Scott Elliot's Diamond Engagement Exchange Puzzle. Last year his exchange puzzle was "Join The Club". This year his exchange puzzle borrows the same theme as Join The Club with a similar solving method. Scott produced his puzzle via 3D printing.

Although the puzzle consists of only 2 pieces, getting them together still required some effort and experimentation. But once you find the correct " entry" point, the pieces slide themselves nicely into each other. The solution is actually quite easy once you figure out what to do and the solving becomes very repeatable; ust a couple of seconds is all it takes.

Diamond Engagement is one of those highly pocketable puzzles that you can easily take with you anywhere and have a play while waiting for someone, travelling on public transport etc to keep your fingers occupied. it is available for sale by PuzzleMaster of Canada for CA$24.99.
Diamond Engagement solving bears similarities to the Hanayama Cast Dot. The Cast Dot came out mid 2016.
Well I will start with the unsuccessful one first, which was the CCC-1 ("Coffin-Cutler Collaboration"). This was Bill Cutler's exchange puzzle and it was designed in collaboration with Stewart Coffin and based on Coffin's Design #177A. The CCC-1 was made by Coffin.

It's a packing puzzle and the object is to fit the 5 polyminoes (ranging from 4 to 6 units) into the tray. The puzzle came with its accompanying literature/explanation. I think both Cutler and Coffin knew that this was no easy puzzle so they also including a note containing a clue on how to solve it. But even with the clue, I was hopelessly lost and had to asked fellow Sinaporean puzzle collector/designer Goh Pit Khiam for help.
Goh is quite an expert on these sort of packing puzzles having designed many of them himself including the IPP33 award winning Dancing Shoes. Goh had earlier borrowed the CCC-1 from me and solved it rather quickly.
Like always, only with the benefit of hindsight after seeing the solution, I felt perhaps I could have done better with the CCC-1. Very difficult puzzle indeed (at least for me) and I think the solving aid provided is probably quite necessary. Definitely would be of much interest to packing puzzle enthusiasts, and since its a Coffin/Cutler puzzle, a great addition to any puzzle collection. If the CCC-1 could be made with exotic woods, even better still. As far as I can tell, the CCC-1 is not available commercially so the only source is from Bill Cutler.
Diamond Engagement
I had much better luck with the Scott Elliot's Diamond Engagement Exchange Puzzle. Last year his exchange puzzle was "Join The Club". This year his exchange puzzle borrows the same theme as Join The Club with a similar solving method. Scott produced his puzzle via 3D printing.

Although the puzzle consists of only 2 pieces, getting them together still required some effort and experimentation. But once you find the correct " entry" point, the pieces slide themselves nicely into each other. The solution is actually quite easy once you figure out what to do and the solving becomes very repeatable; ust a couple of seconds is all it takes.

Diamond Engagement is one of those highly pocketable puzzles that you can easily take with you anywhere and have a play while waiting for someone, travelling on public transport etc to keep your fingers occupied. it is available for sale by PuzzleMaster of Canada for CA$24.99.
Diamond Engagement solving bears similarities to the Hanayama Cast Dot. The Cast Dot came out mid 2016.
Sunday, 13 September 2015
Helical Burr
The Helical Burr was Derek Bosch's second "cylindrical" burr design. Prior to the Helical, he had the Tubular Burr. Subsequent to it, he came up with the Hellical Burr which by various accounts is horrendously difficult and his fourth design, the W(h)orl(e)d Burr. Being in the puzzle community I was aware when each of them hit the market. I am lousy at burrs and since I am not even good at the normal square ones, I gave the miss on these cylindrical burrs at that time. But when I saw several of them being displayed for sale on Steve Nicholls' table during the IPP35 Puzzle Party and how beautiful and colourful they looked, I just had to go for one and chose the easiest of the lot, the Helical Burr.

Derek's Helical Burr also won him the Jury's Grand Prize at IPP33 in Japan in 2013. At that time, the competition puzzle was in prototype form made of SLS nylon and didn't look that great. But the copy that I have today was 3D printed by Steve and looks gorgeous in red and black. Not only that, its larger than the prototype, well made and feels very solid with a textured finish for better grip. In fact while playing with it, once I dropped it several feet onto my tiled balcony floor but nothing cracked or broke; 3D plastic is pretty tough! In terms of the movement of the pieces, while the sliding is not as smooth as wood for sure, the puzzle functions very well and I did not experience any jamming of any sort.


The Helical Burr comprises of four pieces. Two of the larger "spiraling" pieces (if this is the correct term) wrap around two internal "cock-screw" shaped pieces. Like a normal burr puzzle, you need to manipulate the various pieces to extract the first piece. And like a normal burr, you need to push and pull the different pieces to find out which piece makes the opening move. In this case, because its cylindrical, the pushing, pulling and twisting move the pieces up and down, instead of up/down and left/right. And because the Helical Burr does not behave like the latter, with spirals and rotations, it makes it even more confusing.

Is it difficult? Of course! But I tackled the Helical Burr by slowly studying the moves and trying to see how the four pieces interact with each other. My method was to use the ends, "notches" and various parts of both the larger outer pieces and internal pieces as reference points ie at which point the twisting should stop, where the ends of the pieces meet at which stage, how the first piece goes out/in first etc There is a sequence here. This is important especially during the reassembly which is in the reverse order. Without careful observation initially, chances are putting the pieces back together will really be very painful. Careful play at the take-apart stage will yield dividends later on.
By my count, it takes about eleven moves (assuming one continuous rotation is one move) to remove the first piece. After that the rest comes out fairly easily. It is fortunate that Steve did not print all the pieces in a single colour otherwise I think the Helical Burr would have been an even more difficult puzzle. The two-tone colours not only add to the overall aesthetics but actually aids in the solving as well. There is also an alternative solution which is easier and I stumbled upon it half way, but I didn't try to experiment further with that path; the intended solution here is already tough enough to figure out.
An awesome puzzle I would say; incredible how Derek designed it cylinder shaped to function like a burr with multiple movements and dead ends if you get the sequence of the moves wrong. From Kevin Sadler's review of the other two later designs, and the Hellical Burr which takes over forty moves, I am not sure I want to try those anytime soon.
To get a copy of the Helical, Hellical or W(h)orl(e)d Burrs, you may wish to contact Steve through his site. Each puzzle being individually printed, he may be able to provide custom colours for you as well.
Saturday, 29 August 2015
Flower String Puzzle
I got this puzzle from Henry Strout at IPP35 in Canada early this month. Not sure what is the name and should have asked but I didn't. I am terrible at string/wire puzzles and I am not sure why I even bought this but I guess the magenta flower-shaped piece attracted me. Its really thick, hefty and solid plastic (ABS resin?). If I couldn't solve it, I can always cut away the string and use the flower for something else right?


The goal of this flower string puzzle is to remove the wooden stick from the flower. Anyway it didn't look that complicated and it was very inexpensively priced so I picked up what appeared to be the last one on Henry's table. he had a few others but they looked much tougher, so I left them alone.

Last evening, I gave it a go while watching TV. I fumbled with this puzzle for a while trying to understand where the loops went. Even tho' at first glance, it looked impossible (like most string/wire puzzles), I knew there was a trick to it. I thought about it in a logical fashion and determined there was really only one way to untangle the lot...and it worked. Got it apart and even managed to get it back to together pretty fast. Finished my TV show and went to bed feeling satisfied.
Tuesday, 31 March 2015
Cross Bones
This little black puzzle is Englishman Frank Potts' Exchange Puzzle at IPP34 in London last year.

 |
| Can you spot the skull? |
And unless I am way off tangent here or doing something wrong, the Cross Bones is one of the very few burr puzzles that I actually found easy to solve!
Physically Cross Bones looks similar to Frank's Level 24 Burr Bones sold a while back by Eric Fuller. Unlike its wooden cousin which comprises three pieces, the Exchange version is only two, interlocked together. And a lot easier! Frank has done a number of designs in the past, favouring in particular, three-piece burrs.
Cross Bones is 3D printed in ABS resin by Scott Elliot and the puzzle is rather diminutive, measuring about 4.5 cm across. Fit and quality is good. The two pieces are able to "lock" nicely without any free play. There is even a motif of a skull printed on one of the ends for added effect!
This puzzle is a level 6.1 puzzle and because its only two pieces, its a pretty easy solve. The moves are sequential with only one solution. The blackness of the puzzle also makes it a bit tricky to see the openings where the pieces can untangle themselves.
Easily pocket-able, the Cross Bones is a nice little puzzle good for passing to non-puzzling friends, who perhaps may require more than a little effort to solve it. Oh, and I forgot to mention, no burr tools needed here!
Wednesday, 4 February 2015
The Dot Box
This strange and baffling puzzle came to me courtesy of James Dalgety during the IPP34 Puzzle Exchange in London last year. James owns the largest known collection of puzzles in the world!
I had played with the Dot Box on and off for several weeks now and was only just able to solve it this evening. That being said, it was solved more through trial and error with hints from James' webpage dedicated to the Dot Box (Warning; spoilers therein)

The Dot Box consists of a pentagonal box which sits into a base (called a plinth). The puzzle is 3D printed in ABS resin by Simon Bexfield and Steve Nicolls, the duo from Threedy 3D Printers. Quality is very good for a 3D creation and everything fits well together.
There are four challenges indicated on the puzzle:-
1. Open the box
2. Close the box
3. Understand it
4. Explain it.
My early attempts without resorting to the hints was to try to decipher the rattling noises inside the box. Couldn't really tell what was going on inside but the plinth and box were attracted to each other so I knew that there had to be some magnet(s) inside.
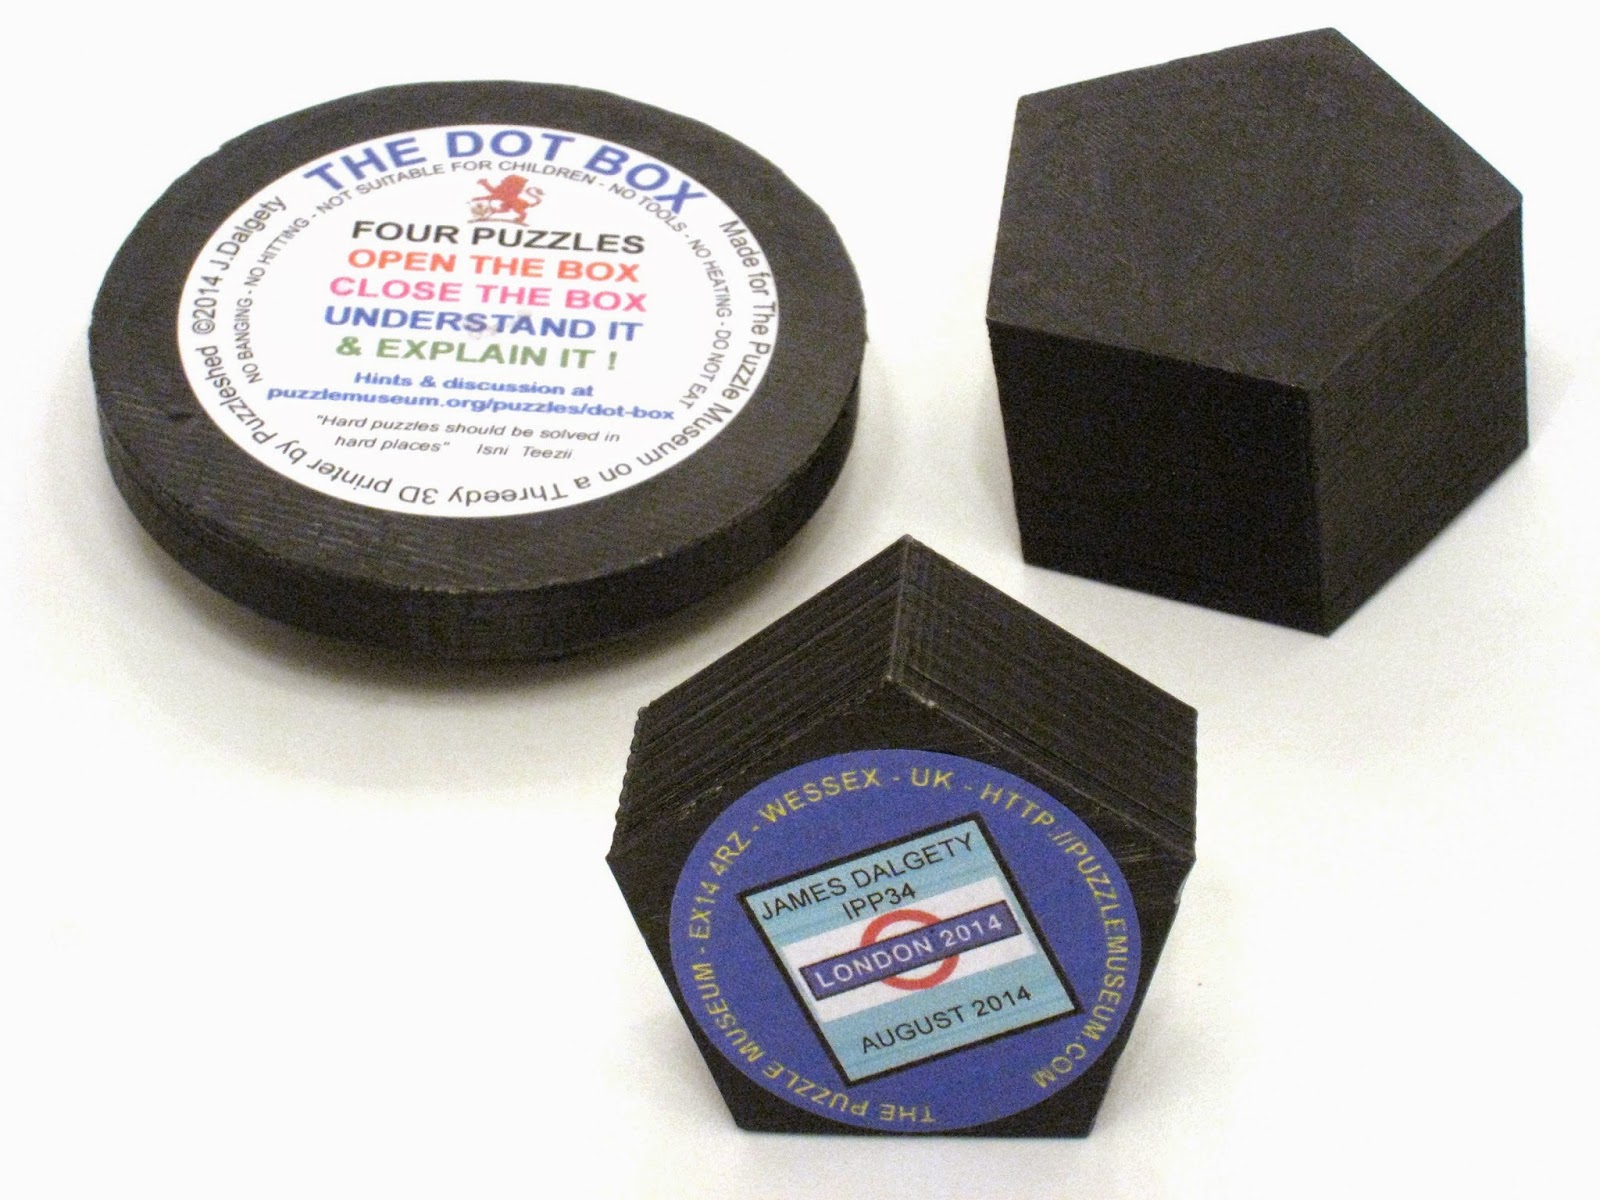
For the weeks that followed, I tried various means of opening but nothing work. All along I thought the magnets had something to do with the solve and tried to interact the plinth and the box but this was not to be the case. Eventually I went to the website for clues.
I somehow finally managed to solve challenge #1 (through my own unorthodox method), #2 and #3 (after looking at the hints and after the puzzle was opened). And well, sort of #4, although I still can't quite figure out the scientific basis of the solution. The "trick" used in the Dot Box is the first time I have come across. And I can't really explain it or understand fully how it works.
James mentions on his site that the full solution (and explanation) will only appear when the IPP34 booklet is out, which is probably the end of this year or early next year, so I guess I will have to wait until then.
For those that have solved or not solved the Dot Box, please feel free to leave your comments!
I had played with the Dot Box on and off for several weeks now and was only just able to solve it this evening. That being said, it was solved more through trial and error with hints from James' webpage dedicated to the Dot Box (Warning; spoilers therein)
The Dot Box consists of a pentagonal box which sits into a base (called a plinth). The puzzle is 3D printed in ABS resin by Simon Bexfield and Steve Nicolls, the duo from Threedy 3D Printers. Quality is very good for a 3D creation and everything fits well together.
There are four challenges indicated on the puzzle:-
1. Open the box
2. Close the box
3. Understand it
4. Explain it.
My early attempts without resorting to the hints was to try to decipher the rattling noises inside the box. Couldn't really tell what was going on inside but the plinth and box were attracted to each other so I knew that there had to be some magnet(s) inside.
For the weeks that followed, I tried various means of opening but nothing work. All along I thought the magnets had something to do with the solve and tried to interact the plinth and the box but this was not to be the case. Eventually I went to the website for clues.
I somehow finally managed to solve challenge #1 (through my own unorthodox method), #2 and #3 (after looking at the hints and after the puzzle was opened). And well, sort of #4, although I still can't quite figure out the scientific basis of the solution. The "trick" used in the Dot Box is the first time I have come across. And I can't really explain it or understand fully how it works.
James mentions on his site that the full solution (and explanation) will only appear when the IPP34 booklet is out, which is probably the end of this year or early next year, so I guess I will have to wait until then.
For those that have solved or not solved the Dot Box, please feel free to leave your comments!
Sunday, 30 November 2014
The Kray Twins
The Kray Twins, designed by Steve Nicholls was also his Exchange Puzzle during IPP34 in London this past August. For those of you non-English folks who may not know who the Kray Twins were, they were notorious gangsters that were responsible for much of the organised crime in London during the 1950s and 1960s.

The puzzle is 3D printed in ABS resin and has six pieces comprising three congruent pairs in three colours. The puzzle holds itself together pretty well with tolerance between the pieces just right. This allows the pieces to slide pretty smoothly and no force whatsoever was needed for my copy.
This one is a "diagonal" burr with sixty degree angles; thereby making it much more confusing and harder to solve than a traditional rectilinear burr, the latter, depending on the number of moves, is already by no means easy.
This notoriously difficult puzzle has a level 6.10.6.12.6 solution (total 40 moves), meaning it takes 6 moves to remove the first piece, followed by 10 for the second and so on. Once you get past the first six moves, you will understand why its called the Kray Twins. This one really stumped me for a long time. I just could not get past move six for some reason.
I contacted Steve for the solution and after studying the Burr Tools file; I realized where I had gone wrong. It was unlikely I could have solved this one on my own without help. Even with Burr Tools, focus and concentration was needed to get the moves right. I found the re-assembly even harder than the taking apart. The angles just seem to make it so much harder!
Overall IMHO, a very difficult puzzle, but I am lousy at burrs anyhow. Experienced burrists may probably find it a less of a challenge perhaps.
Steve runs a 3D printing website (www.threedyprinters.com) so if you would like a copy of the Kray Twins, I am sure he would be most happy to make you a one...and possibly with the colours of your choice too!
The puzzle is 3D printed in ABS resin and has six pieces comprising three congruent pairs in three colours. The puzzle holds itself together pretty well with tolerance between the pieces just right. This allows the pieces to slide pretty smoothly and no force whatsoever was needed for my copy.
This one is a "diagonal" burr with sixty degree angles; thereby making it much more confusing and harder to solve than a traditional rectilinear burr, the latter, depending on the number of moves, is already by no means easy.
 |
| 6 pieces all with diagonal cuts and 3D printed in red, white and blue, representing the colours of the Union Jack :-) |
This notoriously difficult puzzle has a level 6.10.6.12.6 solution (total 40 moves), meaning it takes 6 moves to remove the first piece, followed by 10 for the second and so on. Once you get past the first six moves, you will understand why its called the Kray Twins. This one really stumped me for a long time. I just could not get past move six for some reason.
I contacted Steve for the solution and after studying the Burr Tools file; I realized where I had gone wrong. It was unlikely I could have solved this one on my own without help. Even with Burr Tools, focus and concentration was needed to get the moves right. I found the re-assembly even harder than the taking apart. The angles just seem to make it so much harder!
Overall IMHO, a very difficult puzzle, but I am lousy at burrs anyhow. Experienced burrists may probably find it a less of a challenge perhaps.
Steve runs a 3D printing website (www.threedyprinters.com) so if you would like a copy of the Kray Twins, I am sure he would be most happy to make you a one...and possibly with the colours of your choice too!
Wednesday, 15 October 2014
Join The Club
Join The Club was Scott Elliot's Exchange Puzzle at IPP34 this year. Scott designs and makes his own puzzles using his 3D printer, For more about how he produced The Club and other puzzles, you can read more about it here.

The Club is "printed" out of ABS resin and quality and fit is very good and precise. Scott coloured the puzzle black with red trim, something likely possible only with 3D printing, nice! (thanks to George Bell for highlighting this). It's solid, can flex a bit and won't break unless real brute force is used. But there is a bit of a stickiness to the puzzle (probably due to the type of material used) and being a glossy finish, finger prints will start to appear after a while of play.
Like Scott's IPP33 Exchange Puzzle, the Peppermint, the object is to "weave", if this is the right word to use, the two pieces together to form the shape of the club. Not that simple as I found myself trying all manner of orientations on the two pieces to get them to "intertwine".

However, IMO,it is still not as difficult as the Peppermint (which I still have not put back together). After several minutes, I found the "trick" and the two pieces slid nicely into place. Pretty elegant and no force whatsoever needed.
The Club reminds me of a well known Hanayama Cast puzzle designed by a well known European designer which works quite on the same principle. Can you guess which one?
This is the sort of puzzle you can easily pocket around and astound your non-puzzling (or puzzling) friends. Contact Scott via his blog if you wish to purchase one.
The Club is "printed" out of ABS resin and quality and fit is very good and precise. Scott coloured the puzzle black with red trim, something likely possible only with 3D printing, nice! (thanks to George Bell for highlighting this). It's solid, can flex a bit and won't break unless real brute force is used. But there is a bit of a stickiness to the puzzle (probably due to the type of material used) and being a glossy finish, finger prints will start to appear after a while of play.
Like Scott's IPP33 Exchange Puzzle, the Peppermint, the object is to "weave", if this is the right word to use, the two pieces together to form the shape of the club. Not that simple as I found myself trying all manner of orientations on the two pieces to get them to "intertwine".
However, IMO,it is still not as difficult as the Peppermint (which I still have not put back together). After several minutes, I found the "trick" and the two pieces slid nicely into place. Pretty elegant and no force whatsoever needed.
The Club reminds me of a well known Hanayama Cast puzzle designed by a well known European designer which works quite on the same principle. Can you guess which one?
This is the sort of puzzle you can easily pocket around and astound your non-puzzling (or puzzling) friends. Contact Scott via his blog if you wish to purchase one.
Wednesday, 16 July 2014
Ice Pillar
I bought the Ice Pillar from Pelikan well over a year ago and promptly forgot about it until I recently found it in the deep recesses of my puzzle cupboard.
I had even forgotten what the name of this puzzle was and who designed it, and had to trace my emails with Pelikan way back to early 2013.

Ice Pillar is constructed from Bubinga for the frame and Zebrano for the 4 burr pieces. Quality of build is top-notch. Surprisingly, the pieces have a very loose fit in the frame, even after a few days out of my de-humidified cupboard. This is the first time I have a wooden puzzle that didn't lock up due to the humidity. Shape-wise, Ice Pillar is like a short Tall Joe. Similar with a "+" cross-section sort of shape, very different from the typical cuboid burrs.
Ice Pillar is from Osanori Yamamoto and I am not sure if its just me lousy, or this one is really tough....well, its both! The Ice Pillar requires nearly 40 moves to completely disassemble. With some of Yamamoto designs, usually I can make some sort of progress but for this puzzle, I just couldn't find my way anywhere.

Being of such loose fit, all the pieces could slide left right up down too easily...nothing was ever stuck, but nothing ever came out of the frame either. Tried as I did, I made no headway and had to resort to the solution provided by Pelikan. At least Allard managed to take it apart without any help.
I didn't bother to try reassembly, knowing full well it would be futile; instead I generated a Burr Tools solution to see how the puzzle worked. Amazing, and just as fun, as always!
I had even forgotten what the name of this puzzle was and who designed it, and had to trace my emails with Pelikan way back to early 2013.
Ice Pillar is constructed from Bubinga for the frame and Zebrano for the 4 burr pieces. Quality of build is top-notch. Surprisingly, the pieces have a very loose fit in the frame, even after a few days out of my de-humidified cupboard. This is the first time I have a wooden puzzle that didn't lock up due to the humidity. Shape-wise, Ice Pillar is like a short Tall Joe. Similar with a "+" cross-section sort of shape, very different from the typical cuboid burrs.
Ice Pillar is from Osanori Yamamoto and I am not sure if its just me lousy, or this one is really tough....well, its both! The Ice Pillar requires nearly 40 moves to completely disassemble. With some of Yamamoto designs, usually I can make some sort of progress but for this puzzle, I just couldn't find my way anywhere.
Being of such loose fit, all the pieces could slide left right up down too easily...nothing was ever stuck, but nothing ever came out of the frame either. Tried as I did, I made no headway and had to resort to the solution provided by Pelikan. At least Allard managed to take it apart without any help.
I didn't bother to try reassembly, knowing full well it would be futile; instead I generated a Burr Tools solution to see how the puzzle worked. Amazing, and just as fun, as always!
Monday, 26 August 2013
Peppermint
Name
Peppermint
Designer
Scott Elliot. Scott also runs his own 3D printing/puzzle blog.

Manufacturer
Scott Elliot. PM Scott via his blog for availability of the Peppermint. He may still have copies left over from IPP33.
Type & Classification
Take apart; disentanglement
Dimensions
6cm (Diameter) x 4.5cm (Thickness). Nice good size for the hands.
Materials & Construction
ABS resin. Construction, fit and finish is very good and all the parts are manufactured to pretty tight tolerances. The surface of the puzzle does have some texture and this aids in the gripping. Although plastic looking, the pieces are surprisingly solid and can take abuse.
IPP
The Peppermint was Scott's exhange puzzle at IPP33 held in Tokyo, Japan at the beginning of this August.
Overview
Scott had blogged about the preparation of his Peppermint as an IPP33 exchange puzzle at the beginning of this year. It looked rather interesting and when IPP33 came around, I emailed Scott to say I wanted a copy of both his Peppermint as well as his Moire Maze puzzle. He kindly reserved one of each during the Puzzle Party for me before they were all sold out. He also had one or two other puzzles on sale and I bought his Puckup puzzle as well. (see below).
The Peppermint has two tone colours of red and white and at first glance, it appears to be like a white ball surrounded by a thick red ring. The puzzle consist of four "interlocked" (or rather intertwined) pieces and the object is to separate them (without the need for any force). I have been told that the Peppermint bears some similarity to Hanayama's Cast Marble but as I have never played with the latter, I can't really compare the Peppermint against the Cast Marble.

Although it consist of only four pieces, the Peppermint is no walk in the park. It took me a good half hour of fiddling and twisting before I managed to separate the pieces. Re-assembly is a whole different ball game! As of this blog post, I have still not succeeded in getting the pieces back together. I have emailed Scott for some help and waiting to hear from him.
Difficulty Level
Fairly challenging to take apart (without the right technique, which I am sure there is one) but much much more difficult it seems to put back together; again there must be some technique to be applied. His Puckup puzzle (below) is a simpler 2-piece put-together puzzle that is also dimensionally smaller (4.0cm in diameter). This one is made of nylon and came separated. The object is to join the two pieces. May be quite tricky for the inexperienced puzzler but I got the pieces to form a disc in a jiffy.


Peppermint
Designer
Scott Elliot. Scott also runs his own 3D printing/puzzle blog.

Scott Elliot. PM Scott via his blog for availability of the Peppermint. He may still have copies left over from IPP33.
Take apart; disentanglement
Dimensions
6cm (Diameter) x 4.5cm (Thickness). Nice good size for the hands.
Materials & Construction
ABS resin. Construction, fit and finish is very good and all the parts are manufactured to pretty tight tolerances. The surface of the puzzle does have some texture and this aids in the gripping. Although plastic looking, the pieces are surprisingly solid and can take abuse.
IPP
The Peppermint was Scott's exhange puzzle at IPP33 held in Tokyo, Japan at the beginning of this August.
Overview
Scott had blogged about the preparation of his Peppermint as an IPP33 exchange puzzle at the beginning of this year. It looked rather interesting and when IPP33 came around, I emailed Scott to say I wanted a copy of both his Peppermint as well as his Moire Maze puzzle. He kindly reserved one of each during the Puzzle Party for me before they were all sold out. He also had one or two other puzzles on sale and I bought his Puckup puzzle as well. (see below).
The Peppermint has two tone colours of red and white and at first glance, it appears to be like a white ball surrounded by a thick red ring. The puzzle consist of four "interlocked" (or rather intertwined) pieces and the object is to separate them (without the need for any force). I have been told that the Peppermint bears some similarity to Hanayama's Cast Marble but as I have never played with the latter, I can't really compare the Peppermint against the Cast Marble.

Although it consist of only four pieces, the Peppermint is no walk in the park. It took me a good half hour of fiddling and twisting before I managed to separate the pieces. Re-assembly is a whole different ball game! As of this blog post, I have still not succeeded in getting the pieces back together. I have emailed Scott for some help and waiting to hear from him.
Difficulty Level
Fairly challenging to take apart (without the right technique, which I am sure there is one) but much much more difficult it seems to put back together; again there must be some technique to be applied. His Puckup puzzle (below) is a simpler 2-piece put-together puzzle that is also dimensionally smaller (4.0cm in diameter). This one is made of nylon and came separated. The object is to join the two pieces. May be quite tricky for the inexperienced puzzler but I got the pieces to form a disc in a jiffy.


Summary
I felt the Peppermint's a bit different from the usual genre of mechanical puzzles. Tough and (almost) unbreakable; worth acquiring in my opinion. Throw in the Puckup while you are at it as well.
Subscribe to:
Posts (Atom)