Sunday, 10 November 2013

Framework II

Name
Framework II

Designer
Markus Gotz. For a brief history of how Eric came to produce the Framework II, click here.


Manufacturer
Eric Fuller. Website www.cubicdissection.com. 38 copies were made, each priced at US$69, currently all sold out.

Type & Classification
3D packing puzzle; sequential movement

Dimensions
14.3 cm (Width) x 1.9 cm (Depth) x 16.2 cm (Height)

Materials & Construction
The thing that attracted me to this puzzle was the beauty of the multi-coloured display employing the different exotic woods. It really looks like a work of abstract art on a stand.

This Framework II comes in a combination of 11 different hardwoods. The stand is made of either Cherry or Walnut while the individual pieces are constructed from Walnut, Sapele, Yellowheart, Wenge, Maple, Bloodwood, Paduak, Rosewood, Holly and Purpleheart. Construction, fit and finish is excellent and the tolerances between the internal pieces are very precise and tight. Again, like The Decoy I have to rest the puzzle in my camera drybox to reduce the humidity to the level where the pieces are loose enough move. 

Overview
The Framework II came assembled (thank goodness and Eric.) The object is to remove the seven pieces from the frame and re-assemble them back into frame. This is one of the more unusual packing puzzle designs as one will discover from the way the internal pieces fit within the frame. Each of the pieces have "extra" coloured squares and/or rectangles stuck to on both sides. In the assembled state, the extra pieces overlap and "hug" the frame.

The myriad of colours and their diagonal orientation relative to the frame also make the pieces visually confusing. And there is only one solution here.


Removing the pieces was actually not too difficult; after you remove the one "locking" piece that holds the puzzle together, the rest consist of a combination of sliding moves and extracting the pieces from the frame in a particular order.

I am lousy with high-level packing puzzles. So in order to ensure that I would not have too much trouble later on fitting the pieces back, I documented the sequence of moves with photos taken with my cell phone camera. This was to be my safety net in the event I got stuck later on (which I did).

After all the pieces came out, true enough trouble started when I tried to put the pieces back in the same order. While I could get the first two or three pieces in correctly, I got stuck subsequently. As mentioned, the multi-coloured extra squares and rectangles found on the internal pieces are diagonally glued, so this adds tremendously to confuse the orientation of as as well as making it very difficult to remember the shape of the pieces and where they are to go. Pieces would simply not fit or be jammed against each other or the sides of the frame.

But with the help of my photos, I followed the reverse sequence and got each piece back into the frame, With a bit more practice, I managed to memorise the order the pieces came out and went in, so after some time, I could actually do it without any external help.

Difficulty Rating
Very difficult without a solution I would imagine! I wouldn't have been able to solve it if I were not able to rely on the photos I took. As quoted from Eric's site, Markus Gotz remarks:-

There are many different ways to assemble the seven pieces of the puzzle outside of the frame to a square. But only one of these options can actually be built into the frame. This puzzle's really not for beginners!"

Summary
A rather unique design for a packing puzzle. Very challenging indeed but once you study and memorise the moves, can be solved repeatedly. But constant practice here would be needed. I don't think its a puzzle you can tuck away for a few months and expect to be able to re-solve easily when you bring it out again.

Notwithstanding, a damn attractive standing piece of puzzle art that displays really well!

Thursday, 7 November 2013

Cast Coaster

Name
Cast Coaster

Designer
Serhiy Grabarchuk; who is very well known for a number of sliding puzzle designs including One Fish Another Fish reviewed here in this blog. To see his many puzzle designs, some which have been commercialised, click here. If you wish to play his sliding puzzles digitally, click here.


Manufacturer
Hanayama. Launched back in 2006, the Cast Coaster is available from various online retailers and Ebay.

Type & Classification
Take-part; disentanglement

Dimensions
6.5cm (Length) x 6.5cm (Width) and 0.5cm (Thickness)

Materials & Construction
Made of zinc alloy (I think) covered in shiny chrome. Quality of construction, finish and fit is very decent. Again I would have personally preferred a matt surface.

Overview
Its obvious why the puzzle is called "coaster". It fully resembles one (even looks like one of those Celtic designs). From a practical standpoint, not that useful as a coaster especially for cold drinks since the condensation will go through the cracks and gaps.

The object is to "break" apart the Coaster and reassemble it. The Coaster consists of three interlocked triangular shaped "rings" giving the Coaster its round shape.


Disassembly was simple enough, easily done in seconds. The reassembly is where the real challenge is. On each of the triangular rings are grooves which allow the rings to intersect and fit within each other. All three rings are non-identical in the sense that the grooves are all in different positions on each ring and the number of grooves are also different for each ring.

I went through a good couple of hours trying to fit the pieces back together but somehow the solution just eluded me. Whenever I thought I could fit two and get the third on, I'll be stuck. Not easy to solve by trial and error since the tolerances are tight and leaves little room for chance solutions.

Eventually I lost patience and went for the solution. There are about half a dozen videos on YouTube on the Coaster. But only one or maybe two of the videos are easy to follow for the solution. I will leave readers to figure out which ones.

Difficulty Level
Hanayama rates the Coaster at 4-stars (out of 6). I am more inclined to give it a 4.5 or even a 5 instead.

Summary
This is one of those puzzles very hard to figure out, but once you do, easily repeatable solving. After I learnt the solution and memorised the few necessary steps, I could re-fix the Coaster in under thirty seconds. Visually its aesthetically pleasing given its charming pattern. Certainly something you can leave on your coffee table for show!

Monday, 4 November 2013

The Decoy

Name
The Decoy

Designer
Stewart Coffin (Design #187-A). To-date he has done 258 puzzle designs. For a list of his designs, click here.


Manufacturer
Eric Fuller. Website www.cubicdissection.com. 42 copies were made, each priced at US$59, but all have been sold out.

Type & Classification
3D packing puzzle (with a twist)

Dimensions
9.5 cm (Length) x 9.5 cm (Width) x 2.8 cm (Height)

Materials & Construction
The puzzle comes in a several wood combinations. The box frame is made of Sapele with a laser-cut acrylic transparent top. The bottom is made of either Spalted Wormy Holly or Canarywood. The six loose pieces are either Cocobolo or Ebony. Construction fit and finish is excellent and all the edges well cut. Tolerances between the pieces are tight; in fact a little too tight in the case of my copy. The high humidity in Singapore doesn't help either.


Overview
The Decoy was shipped to me in the solved state. So the object is to first remove all the six irregular-shaped individual pieces up through the similarly irregular-shaped cut-outs in the acrylic cover, and then to re-pack them back into the box frame. Looking at the shapes of the cut-outs on the acrylic cover, it is obvious the pieces can only come out after being orientated in a certain way. This is a packing puzzle with a slight difference here compared to the traditional "open-top" ones. And in some ways similar to The Rattle reviewed earlier in this blog.

Removal of the first three pieces was a cinch. After taking out the first one, it was just a simple matter of sliding the other two into position and removing them through the cut-out on the cover. Then comes the real challenge. So challenging indeed that I was stuck in the same position for a couple of days. Extraction of the 4th to 6th pieces by way of simple (linear) sliding would not do. I experimented with rotations. One piece could be turned in a certain direction while the other two wouldn't budge. I tried all sorts of ways but no avail.


I wondered if the tolerances were too tight so in went the puzzle into my camera dry box overnight. Eric crafts his puzzles at around 55-58% humidity, so I set my dry box to 42% humidity which I thought would do the trick. Alas, even after over 18 hours of de-humidification, there was no still improvement, so I assumed (wrongly here) that perhaps the puzzle was just too difficult for me. In situations like that, normally I would ask for help (after all, is there any point in trying to be a hero and frustrate myself indefinitely?). I emailed Eric and he promptly replied with a solution PDF.

Now here is the clincher...after studying the solution, I discovered that one of the pieces that I tried to rotate but could not, IS actually suppose to rotate....no wonder I was stuck for so many days. The problem was the tolerances were indeed too tight. I emailed Eric again about this and he gave me some information about compression shrinkage; basically it may take a while for wood to expand and then take just as long for the wood to shrink. Here's the excerpt from a post on a woodworking forum Eric had contributed to:-

"I've read several posts lately about wood movement and thought I would post this up in case anyone didn't know about it. It's near and dear to my heart because I work to stupidly tight tolerances when I make my puzzles, and my work gets shipped all over the world (i.e. different climates).

Compression shrinkage occurs when wood tries to expand but is constrained by its surroundings (i.e. locked into a puzzle or a drawer inside a frame). When that happens the wood absorbs moisture but cannot expand. The cells then take on an oval shape, and when the wood dries, it is permanently smaller then before it tried to expand. So, if you make something a little too tight when it's dry and you find it has locked up in humid weather, best thing to do is store it somewhere for a few dry/humid cycles. It might surprise you by working itself out via compression shrinkage!

As far as movement in general, I keep a close eye on humidity in my shop and adjust my work accordingly. If it's super humid I'll make the puzzle as tight as possible while still being assembled. If it's dry I'll make sure key joints or places where pieces will interact have a few extra thousandths to move around. I recommend putting a decent hygrometer in your shop and getting into the habit of checking it if you do any precision work. I bought mine at a cigar shop for $20 and calibrated it using a zip-loc bag and some damp salt in a soda pop cap."

In went the The Decoy into my camera dry box for a second time but this round, I kept it inside for a full week. Yes, when the seven days were up, compression shrinkage had taken place; this time when I tried to solve it, all the pieces slid and rotated smoothly and I got every piece out of the box.

Difficulty Rating
Tough! As quoted from Eric's site, Stewart Coffin says:

"The Decoy (#187-A) is by far the most difficult and my favourite. It is the only one that requires a slightly loose tray or rounding of corners to solve."

However, it is not so unduly difficult that you can't repeat solving it. As I mentioned above the first three pieces come out quite easily, its the next three that will pose the challenge. But you will only be working with three pieces. With some practice, the moves can be memorised and you will be familiar with the sequence after a while.

Summary
The Decoy starts off easy and gives you the impression that you are doing well. But along the way, the trickiness comes into play and here's where the difficulty begins. That's why its called the "Decoy". If you like packing puzzles (with a twist), this one is a real gem!

Tuesday, 29 October 2013

Conjuring Conundrum

Name
Conjuring Conundrum

Designers
Allard Walker and Louis Coolen. Allard runs his own puzzle blog Puzzling Times.


Manufacturer
Allard Walker and Louis Coolen. Available now only from Wil Strijbos for 48 Euros. Please PM me via my blog profile email if you do not have Wil's contact details.

Type & Classification
Sequential Discovery; 2D Assembly

Dimensions
10cm (length) x 7cm (Width) x 1.8cm (Height)

Materials & Construction
The puzzle is made up of a combination of materials including aluminium, steel, fabric and acrylic. The miniature briefcase (for business cards) is commercially available. The insides are actually very decently "modded" by hand, considering there is a fair amount of cutting and glueing. Comes packaged in a cardboard box with the IPP33 logo and text bearing both designers' names. Accompanied by a sealed solution sheet. For a very interesting account of how Allard and Louis created and produced the Conjuring Conundrum, click here.

IPP
The Conjuring Conundrum was Allard's Exchange Puzzle at IPP33 in Tokyo, Japan just this past August.

The briefcase with all its contents out (well, almost all)
Overview
I met puzzle collector and blogger Allard Walker the first time in person at IPP33 outside the lobby of the hotel where event was held. He looks better in person than the photograph on his blog profile. I had corresponded with Allard from time to time via email over the last couple of years (usually asking him for his opinion on a certain puzzle or for help in solving etc) prior to our meeting. We were both part of a group that took a trip into Tokyo city to look for some Karakuri puzzles. I have never met Louis but from what I have heard, he is a master solver, solving puzzles sometimes in minutes when others may take hours, days or months.

I was an Exchange Assistant (to puzzle collector Diniar Namdarian) at IPP33 and assistants typically only assist and do not get any exchange puzzles. Nonetheless Allard was very kind to give me a copy of his Conjuring Conundrum as a gift (thank you Allard). He told me a story of how Peter Wiltshire had given him (Allard) an exchange puzzle when Allard himself was an exchange assistant, and encouraged me to pass on this tradition when I myself one day become a puzzle exchanger, which hopefully will be soon.

The Conjuring Conundrum is actually two puzzles in one. The first puzzle is to open the briefcase. Step one is very easy...just undo the latches like any other normal briefcase as you would. Then the tough part comes. The lid of the case can only open a little bit enough for you to take a peek inside. There are things inside that look rather confusing and messy.

This is a sequential discovery puzzle so Allard and Louis have provided certain "tools" for use in opening the case. I fiddled with the case and studied whatever I could see inside. I was surprise to find myself quite quick to figure the way to opening the case lid. Very good use of the tools provided and clever execution of the mechanism I might add. Actually just opening the lid of the briefcase itself would already have made a pretty good puzzle, but Allard and Louis went further...

Having opened up the case, I found a fabric cloth bag containing a number of irregular shaped pieces of white acrylic. A little instruction card came with it; the object (of this second puzzle) is to form a shape of some sort using the pieces provided, on the back cover of the briefcase as a working surface. ie 2D assembly.

While Allard later told me that opening the brief case was the hard part, I have to disagree. Arranging the acrylic pieces to form the intended shape was to me the more difficult of the two. In fact so difficult for me that I had to ask Allard for help.

I got nowhere with his initial clues and after a long time trying, my patience ran out and I checked the solution. The solution was just as cryptic as Allard's clues and again I emailed Allard for help. Finally he gave me the intended position of two of the pieces and I was on my way again. After some more pushing the pieces around, I eventually solved the second puzzle and got the shape required, well more or less at least, although not fully complete...whew! I am glad that I was not the only one who had problems with the second puzzle. Apparently puzzle blogger Kevin Sadler was also stumped by the pieces in the bag.

Update 1 Nov 2013 - I was encouraged by Allard and Louis to try to (fully) complete the 2D assembly (packing) puzzle so I took it out of my puzzle cabinet to have another go at it...discovered the final solution after 10mins. All the time it was actually there "staring" at me in the face! Really unexpected trick...unusual twist for a 2D packing puzzle!!

Difficulty Level
Overall a difficult puzzle in my opinion, both the first and second parts, especially for those who have not much experience with sequential discovery type puzzles. Personally I found the second challenge far more difficult than the first, maybe because I am much better at sequential discovery puzzles as opposed to packing ones which I am crap at.

Summary
Great puzzle and certainly good value for money since you are getting two puzzles in one. For a sequential discovery puzzle, a rather unique and very clever trick incorporated within. And something for those who also happen to like packing puzzles.

Saturday, 19 October 2013

Cast G & G

Name
Cast G & G

Designer
Jin-Hoo Ahn, of South Korea.


Manufacturer
Hanayama. Launched in June 2013, the G&G is available from the usual online retailers including Sloyd of Finland and PuzzleMaster of Canada.

Type & Classification
Take-part; disentanglement.

Dimensions
6cm (Height) x 2.5cm (Width)

Materials & Construction
Made of zinc alloy (I think) and brass. Quality of construction here is generally good. One G is finished in chrome while the other is shiny brass.

IPP
The Cast G&G (also known as the Double G) won the 2012 Jury Grand Prize at IPP32 in Washington, USA

Overview
I sat next to G&G designer Jin-Hoo Ahn at dinner during IPP33 in Japan this year. A nice young man (just about twenty years old I estimated) heading for university to earn his degree. I wonder what new puzzles will emerge from him in the years to come. Over dinner he let me try out a cardboard puzzle (similar to the G&G), to which I couldn't figure out of course; at least not for the duration of the dinner.


The aim is to separate the two Gs. The G&G if I may say so, is in some ways similar to Hanayama's Cast Coil. You need to do a series of twist and turns to disentangle the two Gs. While the Cast Coil has grooves to allow the pieces to rotate against each other, the G&G has little "bumps" instead, strategically placed on the corners and edges of both Gs. This has the opposite effect of preventing or limiting movement and rotation of the two Gs which makes the puzzle challenging.

While it didn't take me long to split the two pieces, some time early on was spent studying how the two Gs interacted with each other. And of course the usual trial and error of going through the different movements of the Gs. I went through a number of dead ends. After a while, I sort of figured out how each G could move against the other and eventually solved the puzzle. Reassembly here was much easier; slide the Gs together, twist it a bit here and there and somehow it locks itself again.

Difficulty Level
Hanayama rates it at 3 out of 6 stars and I think the rating is about right. Random manipulation is unlikely to help you solve the puzzle, other than by sheer chance. As I mentioned, careful observation would serve you better.

Summary
Not a difficult puzzle by any means, but no walk in the park either. If you are the sort that is hung up about keeping your puzzles new and pristine, I think you can forget it with the G&G. The shiny surfaces of the Gs will be scratched invariably as mine was. Fellow puzzle blogger Gabriel Fernandes' copy was also similarly scratched after the solve; seems like his was worse than mine! And remember, there is no force needed here. If the pieces cannot move, its because its intended that way. Be gentle with the pieces and this will preserve the shine better.
_____________________________________________________________
For photos of my other puzzles please click here.

Thursday, 10 October 2013

Popplock T8

Update 26 October 2017 - Dear Reader, please check out my new puzzle blog and e-store at http://mechanical-puzzles.com

Name
Popplock T8

Designer
Rainer Popp, who is perhaps the undisputed master of trick/puzzle lock design. Since his first lock the T1, Rainer has come up with a new puzzle lock virtually every year.


For all my reviews of Popplocks from T2 to T7 in this blog, please click below:-
1. T2
2. T3
3. T4
4. T5
5. T6
6. T7

Manufacturer
Rainer Popp. Unfortunately no longer available from the usual online retailers such as Puzzlemaster and Grand Illusions. May be available from Rainer direct or possibly Wil Strijbos.

Type & Classification
Trick/puzzle lock.

Dimensions
14cm (Length) x 3cm (Width) and 8.5cm (Height). Very heavy!

Materials & Construction
Lock body and shackle are both made of stainless steel, with some brass bits. In the tradition of Popplocks, supreme quality and manufacture with a very high price to match.

Overview
After the somewhat less than positive (and in some quarters very critical) reaction to the earlier T7 by puzzlers, many of whom had felt let down by the puzzling experience, I think Rainer has been able to regain and dominate the high ground in puzzle lock design with the T8.

The T7 is water under the bridge. As far as I can tell, every puzzler that I have been in contact with, and from what I can glean from the Internet, Facebook, puzzle forums etc, the T8 appears to be getting a standing ovation. Hence the quick sell-out by puzzle retailers, notwithstanding the very high price tag.


The T8 breaks away from the traditional "padlock look" and instead adopts a contemporary, clean and very modern styling I am add. At first glance, the uninitiated may not even think its a lock. The T8 has a stainless steel body, as opposed to the usual brass. This is only the second time Rainer has chosen to use steel; the first being the limited edition T2 (or T2VA).

The shackle runs through the cylindrical lock body which at one end sticks out a brass knob with a protruding red dot. The other end is engraved with Rainer's Popplock logo. The T8 comes without a key, so obviously it is intended that you can open the lock without one.

Rainer usually has a number of tricks up his sleeve when it comes to the Popplocks so I was trying to use all my experience with the previous six Popplocks to figure out what possible mechanism might there be which is holding the shackle in place. The T8 took me a long time; over several days of intermittent puzzling before I came upon the solution. And even here, it was not a case of logical deduction or analysis but more through trial and error (read "random trying this and that").

In the end, after I had unshackled the T8, I could only marvel at the ingenuity of the design. The solution is really so simple and elegant; but of course only after having figured it out and with hindsight.

Difficulty Level
Very difficult when you are struggling to find out the solution. Most puzzlers are stuck after the first one or two steps. Some very experienced puzzlers have taken days to solve.  But simple to execute once you know how to. Very easy (and fun) repeatable solving.

From Left: T2, T3, T4, T5, T6, T7 & T8
Only the T3, T7 & T8 do not have keys or key holes
Summary
The T8 scores top marks in my book not only for quality and design (very unique and unusual mechanism/trick), but also for the puzzling experience. Expensive but well worth it. As I mentioned in a Facebook post, I think from a practical standpoint given the way the T8 is solved, it can also actually be used like a real lock, tho' I doubt if anyone would!

Sunday, 6 October 2013

Cast Coil

Name
Cast Coil

Designer
Edi Nagata, who is also well known for a number of puzzle designs including the famous Polo Shirt and Arrow Case packing puzzles.


Manufacturer
Hanayama. Launched back in 2011, the Cast Coil is available from various online retailers including PuzzleMaster of Canada and Ebay.

Type & Classification
Take-part; disentanglement

Dimensions
3.3cm (Length) x 3.3cm (Width) and 2.5cm (Height)

Materials & Construction
Made of zinc alloy and brass. Quality of construction, finish and fit is generally good. Both pieces have a matt patina surface (which is what I like). Not a large puzzle by any means but very weighty in the hands.

IPP
Edi's Twin Snake puzzle, the wooden version of which the Cast Coil is based on, was his competition entry for IPP29 at San Francisco, USA in 2009.

Overview
The Cast Coil is not new, having been around commercially since 2011. I have had it for quite a while and recently got round to it. The object is to dis-entangle/separate the two interlocking pieces that have been "coiled" together. Initially when I started puzzling with it, I found myself getting stuck. Firstly the two pieces are pretty tight (and this seems to be the general consensus amongst several other puzzlers). Secondly, trying to get the right orientation with the puzzle was also not easy as both pieces look almost identical, but not quite (thanks to puzzler George Bell for pointing this out to me).


On closer examination, one would discover there are grooves cut into each of the pieces and here is where they allow for rotation of the two pieces against each other. For the initial several minutes, I found the pieces locked in a dead end which ever way I tried. But eventually once I figured out the twist and turns, and how the two pieces interacted with each other, things became easier as I went along.

Re-assembly took me a whole lot longer to "twine" the two pieces back to the original state. I had to once again figure out how to orientate the pieces correctly and then to twist and slide the pieces back into position. The two pieces fit well and snug with relatively tight tolerances, so once in a while, even though the pieces seem stuck, rotation may actually be possible. Just be more gentle and persist.

Difficulty Level
Hanayama rates the Coil at 3-stars (out of 6). About there, I guess.

Summary
Not overly difficult but provides a decent challenge. A well constructed (and very pocket-able) puzzle that can be solved repeatedly once you have remembered the sequence of moves. And yes, after some time puzzling, the two pieces do become looser and you can move the pieces more easily.

Wednesday, 2 October 2013

Choreographed Motion

Name
Choreographed Motion

Designer
Andreas Rover. For those of you who do not know, Andreas is the developer of BurrTools, the wonderful saviour programme that allows users to solve mechanical puzzles, mainly those consisting of square, prism or sphere shaped units, including high level burrs.

Manufacturer
Andreas Rover. Currently still available via his website for 17 Euros.

Type & Classification
Interlocking; Take-Apart.

Dimensions
6.4cm (length) x 6.4cm (Width) x 2.7cm (Height)

Materials & Construction
Acrylic (perspex). Overall good quality of build with the moving pieces nicely cut to tight tolerances. There is glueing of pieces involved here. As the acrylic is transparent, there are some areas where you do see the dried glue between the joined surfaces and a couple of small stains here and there. But this can't be helped since Andreas did it all manually by hand, 140 copies in all! Check out how he did it from his site.
IPP
Choreographed Motion was Andreas' Exchange Puzzle at IPP29 at San Francisco, USA in 2009.


Overview
I first saw the Choreographed Motion from fellow puzzle blogger Oli Sovary-Soos' Flickr album that accompanies his Hotmail. I asked Oli where he had got his copy from and he promptly directed me to Andrea's puzzle website. After exchanging email with Andreas and several days later, the Choreographed Motion, along with two of his other puzzle designs were on their way to me.

The Choreographed Motion consists of an acrylic box "frame" within which sit four interlocking pieces. Each of the pieces have notches and grooves formed by different shaped black acrylic pieces glued to the transparent ones. Physically, the Choreographed Motion does bear a certain resemblance to the Internal Combustion puzzle, except here you can see the insides.


The object of the puzzle is of course to remove the four individual pieces. However, unlike the Internal Combustion which is more a sequential movement puzzle, the Choreographed Motion requires (as the cleverly chosen name does suggest) certain coordinated moves to disassemble the puzzle.

I tried the traditional one-piece-at-a-time approach but from very early on, discovered that this wasn't going to work. More than one, two or even three of the pieces have to be manipulated, all at the same time, to slowly manoeuvre each piece away from the frame. While disassembly was fairly challenging, surprisingly I found the assembly easier (strange!) and was able to get the pieces back into place quite a bit faster than I had taken them apart.


Difficulty Level
A nice challenge but not too difficult, given its only two dimensional. The pieces may squeak a bit here and there at first and you will experience some tightness, but after some playing, they will be "seasoned" and loosen up slightly so that movement becomes smoother. With some practice, I actually could solve it repeatedly quite easily.

Summary
For 17 Euros, very good value for money both from a quality and puzzling standpoint. Nice design of a "framed burr" puzzle using transparent acrylic (instead of the usual wood). I am wondering how much more difficult it would be if the frame is not transparent. Highly recommended and do approach Andreas before he runs out.

Tuesday, 24 September 2013

CorRECTly In The Bag

Update 23 October 2017 - Dear Reader, please check out my new puzzle blog and e-store at http://mechanical-puzzles.com

Name
CorRECTly In The Bag

Designer
Hirokazu Iwasawa

Manufacturer
Mineyuki Uyematsu. Not available currently.

Type & Classification
Put-Together; 3D assembly

Dimensions
Bag - 18.5cm (Length) x 7.8cm (width)
Rectangle - 12cm (Length) x 9 (width)

Materials & Construction
Bag is made of a high quality cloth adorned with a dragonfly motif with a red inner lining. The rectangle is cut from a cross-section of four different woods joined together giving it a very nice checker board finish.

IPP
CorRECTly In The Bag is a variation of Iwasawa's earlier design, the Square In The Bag which won the Puzzlers' Award at IPP32 in Washington, USA last year.


Overview
I like Hirokazu Iwasawa's puzzle designs very much and in fact own two of his metal puzzles, the Alcyl and Tritalon, both reviewed earlier in this blog. I also had the opporunity to meet him at IPP33 in Tokyo, Japan just this August where he was Chairman of the IPP33 Organising Committee.

This CorRECTly In The Bag was kindly loaned to me by puzzle collector Lee Yee Dian of Malaysia, who happened to be in Singapore recently. Yee Dian had come with Maki Kaji (the Godfather of Sudoku) who was in town to meet some of the local Mensa club members. It was at this Mensa gathering (no, I am not a member cos I am not that smart!) that I first handled the puzzle. Puzzle designer Goh Pit Khiam was also present and had a bash at the puzzle. At IPP33 I had missed out on buying the puzzle sold by Mineyuki Uyematsu which were all snapped up almost immediately once the Puzzle Party began.

The object of the puzzle is to cover fully the entire rectangle with the cloth bag, leaving no gaps. No force is needed, otherwise the cloth bag may tear. Impossible you might say...and this is what I though too when I first looked at the puzzle. It looked like an impossible object at first glance.

I fiddled with the puzzle for quite a while before stumbling on the solution. This is one of those puzzles that give you the A-ha rush feeling once you solve it. The bag can and does cover the whole rectangle; really quite amazing! Even a few of the Mensa members couldn't quite figure out the solution. And these are folks that have an IQ of above 148.

What was even more surprising was that when I got home and showed my wife the puzzle and asked her to try it, she solved it in under five minutes while I went to take a shower. When I got out of the bath, the rectangle was all covered up sitting on the coffee table, with my wife giving me that nonchalant "its-really-no-big-deal" look. Or is it because women know some things about fabric while we men don't. Maybe we puzzlers just think too much while puzzling, that's why some of us (like moi) take ages to solve puzzles, or worse still, need to refer to the solution.

Difficulty Level
Not unduly difficult but provides a very good challenge. Given enough time, however you will eventually figure it out.

Summary
Whether its the CorRECTly In The Bag or Square In The Bag, it really is a very clever design, using non-traditional materials. The very fact that it looks so innocuously simple and the solution is so elegant truly makes this a very unique and wonderful puzzle.

I have heard that people who can't get their hands on this puzzle have resorted to making it themselves. Not difficult I would imagine so long as you have the right dimensions (see mine above but don't blame me if it doesn't turn out right). Also, access to a good seamstress. And for the rectangle (which can be substituted with acrylic or some other easily obtainable material). You may want to contact fellow blogger Roxanne Wong who has blogged about the Square version and has the specs for you to self-make one.

Personally I am considering making myself one as well since I would have to return the puzzle to Yee Dian the next time we meet. Hmm...let me see, how about 6061 Aluminium for the rectangle and calf leather for the bag...now wouldn't that be quite cool!

Wednesday, 18 September 2013

Loris

Name
Loris. The Loris is actually a nocturnal primate found in the forests of India, Sri Lanka and parts of South East Asia.

Designer
Dave Rossetti, the late Frank Chambers & K. Stevens

Manufacturer
The late Frank Chambers & K. Stevens. Not available commercially

Type & Classification
Trick/Puzzle box

Dimensions
12.8cm (Length) x 7.4cm (width) x 5.1cm (Height)

Materials & Construction
Body of the box is made of Corian (the material used for kitchen counter tops) while the white sliding lid is made of Velstone, a polyester resin similar to plastic. Construction is very good and built to close tolerances with fine edges, although the corners of my copy were very slightly blunt due to handling and wear over time.

IPP
The Loris was Dave's IPP23 Exchange Puzzle in Chicago, USA in 2003, so this box is now 10 years old.


Overview
I met Dave at IPP33 in Tokyo, Japan just this August during the Puzzle Party. He was in front of Wil Strijbos table and pondering if he should purchase Wil's Lotus puzzle that was on sale. I told him how good the Lotus was and we started a conversation.

I mentioned to him I owned one of his past exchange puzzles, the Oriental Toothpick Safe and asked if he had any other similar puzzle boxes made of Corian available. He said he would check when he got home from IPP33. True to his word, a week later he emailed to say he had a Loris box and asked if I wanted to purchase it from him. A couple of emails thereafter and several days later, the Loris was on its way to me.

What struck me when I first opened the packaging was the size of the Loris. This is a relatively large and hefty box and made my Oriental Toothpick Safe look diminutive. Like the Toothpick Safe, the object is to slide the lid off the box (without the need for banging or shaking).


Having puzzled over the Toothpick Safe (which I then needed help from fellow puzzle blogger Brian Pletcher), I knew the Loris would not be easy. And indeed it was not. I tried out the methods I had used on the Toothpick Safe, hoping for some similarities, but there was none. Since no tapping, banging or shaking was necessary, I orientated the Loris is various ways, upside down, sideways, rotating, checking for gravity and dowel pins etc to see if I could gain some clue how to open the box. But nothing worked.

Then I remembered one of my emails to Dave to ask what does "Loris" mean and he replied it is a "slow animal - a hint". I even thought Loris was a brand for wrist watches (the brand is actually Lorus). Suffice to say, Dave's reply gave me a an idea about how to go about solving.

With Dave's "slow animal" clue, I tried something (no spoilers here) and lo and behold, I got the lid to slide open after a while. What I saw inside the box totally flipped me out; a most unusual and unique mechanism locking the lid in place. No gravity pins but certainly gravity plays a part (hint!)

Difficulty Level
Very difficult! If not for Dave's clue, I would not have managed to solve the box on my own. The insides are totally invisible from the outside and one can do nothing but only guess what could be going on inside.

Summary
A very nice, well-made and aesthetically pleasing puzzle/trick box with a good use of alternative materials (other than the usual exotic or hard woods). Given its rarity and unavailability, the Loris is a real puzzle collector's gem!

Sunday, 15 September 2013

Hanayama Cast Box

Name
Cast Box.

Designer
Yuta Akira.

Yoshiaki Hirano also made an Impossible Object out of 4 Cast Boxes which was exhibited at IPP33 in Tokyo, Japan in August this year, as shown below.

4 Cast Boxes linked together by their rings...impossible?

Manufacturer
Hanayama. Released exactly a year ago in September 2012, the Cast Cylinder is currently available from the usual online retailers including Puzzlemaster of Canada as well as several sellers from Ebay.

Type & Classification
Take-part; disentanglement

Dimensions
3.5cm square

Materials & Construction
The box frame is made of brass and the ring steel. Very well made and solid. The patina finish with eight screws at the corners give this cast puzzle a look and feel of quality.


Overview
The object is to remove the ring from the box frame. It's like a 3D version of the Cast Duet. The box frame has got grooves cut into the individual sides where one end of the ring (which is split) can pass through.

Puzzling involves manoeuvring the ring through the different edges of the box where eventually, one side would allow the ring to disengage. I found it rather difficult at first and kept getting stuck in a couple of the same positions. But I soon realised that not only the box but the ring itself should also be orientated on its different axes around the box frame to allow for greater movement. Took me longer than expected but I freed the ring eventually. I think the engraved "START" and "Box" must have something to do with the puzzle but I am not sure how they help in the solving.

Difficulty Level
Hanayama rates the Cylinder at 2-stars out of 6. Agreed. Relatively easy but it may be rather confusing and dis-orientating at first and rushing to try to solve won't help. Be patient and soon you will get there. Re-assembly is easy. Some practice and one gets the hang of repeated solving it pretty quickly. I am very tempted to buy three more copies to try the Impossible Object shown above.


Monday, 9 September 2013

Hanayama Cast Cylinder

Update 23 October 2017 - Dear Reader, please check out my new puzzle blog and e-store at http://mechanical-puzzles.com

Name
Cast Cylinder

Designer
Vesa Timonen. A prolific puzzle designer with a number of well known designs including the popular (and wearable) Cast Loop. A number of Vesa's designs have been adopted and manufactured into cast puzzles by Hanayama.

Manufacturer
Hanayama. Launched in August 2013, the Cast Cylinder is currently available in Japanese puzzle shops including Torito but it should hit shops (including online retailers) outside of Japan soon. As of this blog post, the Cast Cylinder is the latest cast puzzle release from Hanayama.

Type & Classification
Take-part; disentanglement

Dimensions
3.6cm (diameter) and 3.5cm (Height)

Materials & Construction
Made of zinc alloy coated with chrome. Quality of construction, finish and fit is very good. Personally I would have preferred the puzzle in a matt finish (like Vesa's early prototypes) rather than the shiny chrome look, but I guess this would have been prohibitively expensive in terms of manufacture.


Overview
I first saw (and played with) the Cast Cylinder at IPP33 in Tokyo. During one of the evenings, Vesa had taken out several Cast Cylinders including his prototypes and spread them on the coffee table in front of us. I had a good fifteen minutes or so with one of the prototypes but got nowhere; maybe too much pressure being around other puzzlers I guess :-). I duly picked up one (together with the Cast G&G and some other puzzles) at the Torito stand during the Puzzle Party on the last day of IPP33.

You can certainly tell why its called the Cast Cylinder. It has got two knurled rings forming an external circular "shell" which surrounds and holds in place three other triangular-shaped pieces. The object is to unlock and separate the pieces.


The two rings can rotate freely in both the same and opposite directions. As you spin them around, now and again, there would be some resistance. At certain points, they can be even pulled slightly apart. I had a vague idea of how the inside pieces are kept in place and so began the usual manipulation of turning, pulling and tugging. Very soon one of the pieces began to "drop" out from the bottom a bit and with some more turning, the second  followed suit. After a bit more fiddling, finally the last piece released itself.

Difficulty Level
Hanayama rates the Cylinder at 4-stars and I think this is about right. Taking the Cylinder apart is tricky but not overly difficult. Putting the thing back together is where the real challenge is. Despite the rather long time I spent with it, I was unable to re-assemble the Cylinder into its original state. I contacted Vesa for help and he was very quick to reply with email instructions (which came "straight from his head", as he puts it) since there is no formal text solution or diagrams (Thanks Vesa!). There is a method to it which takes about six steps to getting the puzzle back together.

Summary
A good looking, well-made (and pocket-able) puzzle that can be solved repeatedly once you grasp the right technique. Practice is needed for this puzzle, otherwise you will be fiddling to no end dropping pieces everywhere. A must-have for any Hanayama Cast Puzzle fan!

UPDATE 24 OCT 2013 - I have received numerous queries from puzzlers, who like me have got stuck trying to reassemble the puzzle. You don't need to get frustrated over this and suffer in silence. Drop me a PM via my Profile email and I will get the re-assembly instructions to you.

Sunday, 1 September 2013

Manholes 55

Name
Manholes 55

Designer
Frederic Boucher.


Manufacturer
Frederic Boucher. Only two copies of the puzzle were made by Frederic for the IPP33 Nob Yoshigahara Puzzle Design Competition. One has been donated to the Lilly Library Jerry Slocum Mechanical Puzzle Collection. I have the other, hence none currently available; unless Frederic decides to make more.

Type & Classification
Dexterity

Dimensions
8.2cm (Length) x 8.2cm (Width) x 3.6cm (Height)

Materials & Construction
Wood, glass, aluminium, felt, brass, steel, coins. Very well constructed and put together. Despite repeated handling by more than 170 participants during the 3 days judging process at IPP33, the puzzle withstood whatever abuse and did not appear to show any signs of wear at all. Nice size and feels very hefty in the palm.

As you can see from the photos, the puzzle consists of a wooden box topped with a glass cover (which makes the puzzle more classy than if perspex had been used) held in place by aluminium plates. Within the box is a "street" with two manholes, covered by a 50 yen coin and a 5 yen coin (ie 50+5 = Manholes 55). Also inside the box are brass and steel ball bearings.

IPP
Apart from Manholes 55, Frederic's Elle interlocking puzzle was also a design entry for IPP33.

Overview
I came upon the Manholes 55 when I was playing with the various competition entries. What intrigued and drew my interest was this very nice looking box with an unusual combination of different materials used, including glass for the construction of the puzzle. The odd thing was that both Frederic and I attended IPP33; I played with his Manholes 55 and Elle and he tried his hand at my own competition entry Ball In Cylinder No1. Yet we did not meet each other in person the entire 3-4 days while we were both there! I still do not know what he looks like!

After I returned from IPP33, I emailed Frederic to ask if he could sell a copy to me. After a couple of emails, we eventually did an exchange; my new Ball In Cylinder No.2 for his Manholes 55. Frederic had also mentioned that he made the two Manholes 55s from left over parts from his Pyramida Puzzles; no wastage of anything here which has resulted in a beautiful and attractive puzzle.

There are 3 challenges to this puzzle:-

1. Hide each ball underneath the coin (manhole cover) of the same colour.
2. Place each ball on top of the coin (manhole cover) of the same colour.
3. Without spinning the puzzle, move the balls to the green areas on each side of the street.


Challenge 2 solution
Difficulty Level
Challenges 1 and 2 are not difficult. The manhole covers (coins) and ball bearings move into place nicely with the required dexterity. A gentle touch will aid more in the solving than hard shaking. Challenge 3 is the tough one. I tried for a rather long time but could not seem to get the balls onto the felt on opposite sides. I just can't seem to get one ball to stay put while trying to manipulate the second ball to the opposite felt. Frederic provided me with the 3 solutions; there is a certain technique to solve Challenge 3 which I will attempt to try.

Summary
A well made puzzle that is fun to play with, not only for adults but also for kids (I let a friend's 8 year old have a go at it and he got through Challenge 1 without any help). With its glass, metal and wood construction, the Manholes 55 also makes a really nice display item. And if there will only be two copies (or perhaps a few more in time to come?) well,... its certainly going to be a very rare collector's puzzle.

Monday, 26 August 2013

Peppermint

Name
Peppermint

Designer
Scott Elliot. Scott also runs his own 3D printing/puzzle blog.


Manufacturer
Scott Elliot. PM Scott via his blog for availability of the Peppermint. He may still have copies left over from IPP33.

Type & Classification
Take apart; disentanglement

Dimensions
6cm (Diameter) x 4.5cm (Thickness). Nice good size for the hands.

Materials & Construction
ABS resin. Construction, fit and finish is very good and all the parts are manufactured to pretty tight tolerances. The surface of the puzzle does have some texture and this aids in the gripping. Although plastic looking, the pieces are surprisingly solid and can take abuse.

IPP
The Peppermint was Scott's exhange puzzle at IPP33 held in Tokyo, Japan at the beginning of this August.

Overview

Scott had blogged about the preparation of his Peppermint as an IPP33 exchange puzzle at the beginning of this year. It looked rather interesting and when IPP33 came around, I emailed Scott to say I wanted a copy of both his Peppermint as well as his Moire Maze puzzle. He kindly reserved one of each during the Puzzle Party for me before they were all sold out. He also had one or two other puzzles on sale and I bought his Puckup puzzle as well. (see below).

The Peppermint has two tone colours of red and white and at first glance, it appears to be like a white ball surrounded by a thick red ring. The puzzle consist of four "interlocked" (or rather intertwined) pieces and the object is to separate them (without the need for any force). I have been told that the Peppermint bears some similarity to Hanayama's Cast Marble but as I have never played with the latter, I can't really compare the Peppermint against the Cast Marble.


Although it consist of only four pieces, the Peppermint is no walk in the park. It took me a good half hour of fiddling and twisting before I managed to separate the pieces. Re-assembly is a whole different ball game! As of this blog post, I have still not succeeded in getting the pieces back together. I have emailed Scott for some help and waiting to hear from him.

Difficulty Level
Fairly challenging to take apart (without the right technique, which I am sure there is one) but much much more difficult  it seems to put back together; again there must be some technique to be applied. His Puckup puzzle (below) is a simpler 2-piece put-together puzzle that is also dimensionally smaller (4.0cm in diameter). This one is made of nylon and came separated. The object is to join the two pieces. May be quite tricky for the inexperienced puzzler but I got the pieces to form a disc in a jiffy.


Summary
I felt the Peppermint's a bit different from the usual genre of mechanical puzzles. Tough and (almost) unbreakable; worth acquiring in my opinion. Throw in the Puckup while you are at it as well.


Saturday, 24 August 2013

Chinese Cricket Box

Name
Chinese Cricket Box

Solved state deliberately not shown in photos here
Type & Classification
Puzzle Box; Trick Opening

Dimensions
8.9cm (Length) x 5.8cm (Width) x 1.8cm (Thick).

Materials & Construction
Wood, glass and plastic. The box is made of a type o exotic hardwood and overall, the box is very well made and feels sturdy and solid.

Overview
As the name implies, a cricket box is a box for keeping crickets. In ancient China, there was a tradition of keeping crickets as pets. This in turn spawned (no pun intended) a whole industry of making cricket boxes, containers and homes for cricket lovers. However not all cricket boxes (or cages) were puzzle boxes with trick openings. For more information on cricket keeping during early Chinese history, click here.

I obtained this nice little black cricket puzzle box from Wil Strijbos during the IPP33 Puzzle Party in early August this year. Wil had brought with him a whole shoe box size of cricket boxes which he had sourced from China, of varying shapes, colours and designs.

The box I have is essentially a wooden box with rounded and patterned edges. The top cover is made of glass and the bottom has a number of Chinese characters. There is also a rectangular air hole on one of the ends of the box. The object of the box is to figure out how to "open" the box. It took me a couple of minutes of fiddling before I got the box opened.


Difficulty Level
It is certainly not difficult by any means but because the box is well constructed with tight tolerances, it can make it a bit tricky to solve. Different boxes also have varying opening mechanisms. Frans de Vreugd has written an entire book on Chinese cricket boxes. I flipped through a sample copy at IPP33; very nice with loads of detailed photographs (please PM me via my Profile Email should you wish to contact Frans to purchase a copy). There is also a video on YouTube which shows the opening of a couple of cricket boxes but this video is a spoiler, so be warned.

Summary
If you like trick boxes, well this is something certainly to consider, given that the box is associated with an interesting history.

Saturday, 17 August 2013

Locked Drawer

Name
Sandfield's Locked Drawer Puzzle.

Designer
Robert E Sandfield and Kathleen Malcolmson.

This is the unsolved state!

Manufacturer
Kathleen Malcolmson

Type & Classification
Puzzle Box; Sequential Discovery

Dimensions
7.8cm (Length) x 6.5cm (Width) x 3.8cm (Height).

Materials & Construction
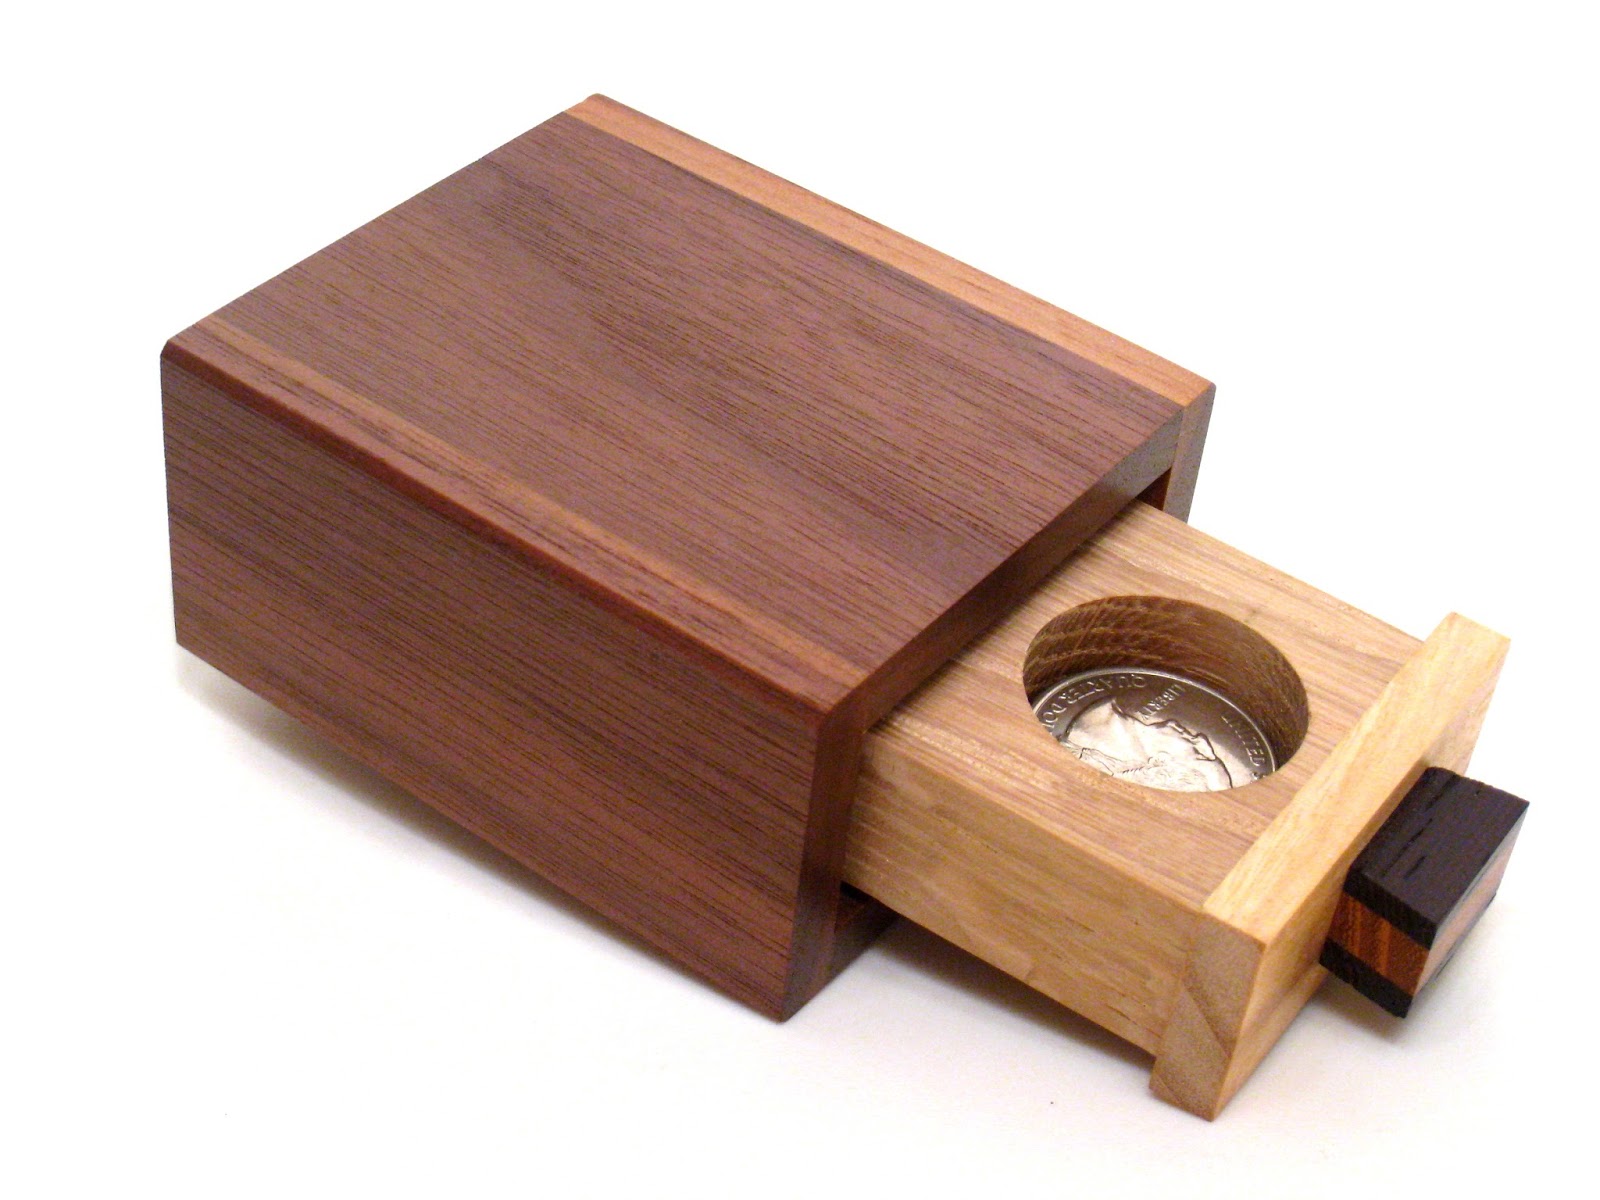
Walnut, Prima Vera and White Oak. Construction, fit and finish is excellent with slight bevelling on the exterior box to minimise sharp edges. Nice size with an attractive colour contrast between the handle, drawer and outer box. Overall, aesthetically very pleasing. It comes with its own drawstring pouch which is a nice touch.

IPP
The Locked Drawer was Robert Sandfield's Exchange Puzzle during IPP30 held at Hakone, Japan. in July 2010.

Overview

I had read Allard's review of this puzzle late last year and wanted one. The opportunity came along when I found Robert Sandfield selling several of these Locked Drawers during this year's IPP33 Puzzle Party. Although relatively expensive, I picked up one with little hesitation. This was also the first puzzle I bought during the Puzzle Party.

The Locked Draw is somewhat different from the Japanese style boxes with multiple sliding panels or other trick opening ones because it incorporates a sequential discovery aspect as well. Meaning that the puzzle has to be solved in a particular order of steps and using the tools that come together with the puzzle. No other external implements or tools are necessary.


The object of the Locked Drawer is NOT to open the drawer (as most people would assume looking at the box) but rather to figure out how to close the drawer once its been opened. To open is simple, nothing puzzling about it; just pull the drawer open normally and it will reveal a circular cavity that contains a US$0.25 coin. Pull the puzzle fully out and the drawer click locks. Here is where the puzzling begins; ie pushing the drawer back in again.

I took about six steps to get the drawer "unlocked" and then back into the closed position, which is the reset/ unsolved stage. There is no force whatsoever required to solve the Locked Drawer. A very clever and rather interesting trick to the whole mechanism.

Difficulty Level
For the total novice, he/she is likely to be stuck for quite a long time. But for the experienced puzzler, not overly difficult with enough challenge to make the puzzle fun and entertaining. This is the sort of puzzle that gives you mini "a-ha" moments to let you know you are on the right track until the final step when you know you have reached the goal. Easily solvable repeatedly once you know the solution. Nothing finicky about the Locked Drawer; everything works as intended.

Summary
For lovers of Sequential Discovery puzzles and/or puzzle boxes generally, a definite must-have for the collection.