Convolution's Cousin ("CC") designed by Stewart Coffin, was Dave Rossetti's IPP34 Exchange Puzzle. It's the "cousin" because it looks and behaves very similar to Coffin's Convolution. Except that this cousin is the smaller cousin, has only five pieces versus Convolution's seven. While I don't have a copy of the Convolution, I do have the Convolution Ball, which is spherical shaped and based on the former's cube design.
The CC is made from African Mahogany. Dave made the puzzle himself under the mentor-ship of Tom Lensch. The mentoring appears to have paid off as the CC is very well constructed with high quality fit and finish. In fact the fit is so good that the join lines of the separate pieces are very well hidden and pretty difficult to find.
This is an interlocking puzzle and the object is to disassemble and re-assemble the pieces. First task of course is to find the "locking" piece that keeps the rest together. Not too difficult as I pushed and prodded and after a short while, figured out how to move the first piece. Once the first piece is sorted out, its a matter of finding which piece comes next and so on. Despite the snug fit, all the pieces slide smoothly and no force is required.
The dis-assembly takes 6 steps and there are two ways to take the puzzle apart; so it would not really count as a sequential movement puzzle. A bit of rotation is also involved in the process. While dis-assembly is not hard, the re-assembly is, especially if you forget the order and orientation of the pieces and how they interact with each other. It can then pose a huge challenge to get it back to the solved state. That's why its always advisable to document the steps with photos as you play.
Wednesday, 28 January 2015
Thursday, 22 January 2015
The Rose Pennyhedron
Stephen Chin from Australia had named his IPP34 Exchange Puzzle the "Rose Pennyhedron", probably because it sounds better and also easier to pronounced than its scientific designation ie "Rhombic Dodecahedron". What a mouthful!
What is an "RD"? Well, you can check out its meaning here. You're not alone if you don't understand the explanation, I don't either.
The RD comprises three pieces, each of which is made up of several other triangular-shaped pieces glued together. The woods appear to be Maple and Cherry. Overall the construction fit and finish is very good and the tolerances are very tight. So tight at first that that I had to leave it in my dry-box for a couple of days to make sure the puzzle was dehumidified.
The object of the RD is to "open" it...separate the pieces. As I mentioned, the tolerances are very tight so it took me a while to find the join lines separating the three individual pieces; no easy task mind you.
Once I got past this bit, it was a matter of pressing and pulling to see how the three pieces would separate themselves. This is a co-ordinate motion puzzle and for most co-ordinate motion puzzles, generally no force is required, but for the RD, I did find that I needed to apply a tad more strength to split the pieces. When it opens, the puzzle does look like a flower opening, hence the name."Rose". But I am not sure what the "penny" refers to tho'.
While the pieces appear to be identical, I found that if I did not fit the pieces together as per their original positions relative to each other, the fit was not perfect and I could feel this in the join lines. Took me several tries before I got it right and the whole puzzle became smooth to the touch.
[Edit 26 Jan 2015: Lionel Depeux has written to me about the name Pennyhedron (Thank you Lionel). Here are his comments below-
What is an "RD"? Well, you can check out its meaning here. You're not alone if you don't understand the explanation, I don't either.
The RD comprises three pieces, each of which is made up of several other triangular-shaped pieces glued together. The woods appear to be Maple and Cherry. Overall the construction fit and finish is very good and the tolerances are very tight. So tight at first that that I had to leave it in my dry-box for a couple of days to make sure the puzzle was dehumidified.
The object of the RD is to "open" it...separate the pieces. As I mentioned, the tolerances are very tight so it took me a while to find the join lines separating the three individual pieces; no easy task mind you.
Once I got past this bit, it was a matter of pressing and pulling to see how the three pieces would separate themselves. This is a co-ordinate motion puzzle and for most co-ordinate motion puzzles, generally no force is required, but for the RD, I did find that I needed to apply a tad more strength to split the pieces. When it opens, the puzzle does look like a flower opening, hence the name."Rose". But I am not sure what the "penny" refers to tho'.
While the pieces appear to be identical, I found that if I did not fit the pieces together as per their original positions relative to each other, the fit was not perfect and I could feel this in the join lines. Took me several tries before I got it right and the whole puzzle became smooth to the touch.
[Edit 26 Jan 2015: Lionel Depeux has written to me about the name Pennyhedron (Thank you Lionel). Here are his comments below-
I believe there’s no hidden meaning to be found in the name: ‘Pennyhedron’ was the name for the original puzzle of that kind (designed and made Stewart Coffin), which was only a 2-piece puzzle.
As to where the original name came from, you’ll find an explanation on Eric Fuller’s website:
Tuesday, 20 January 2015
Rik's Tea Box Mod - T42
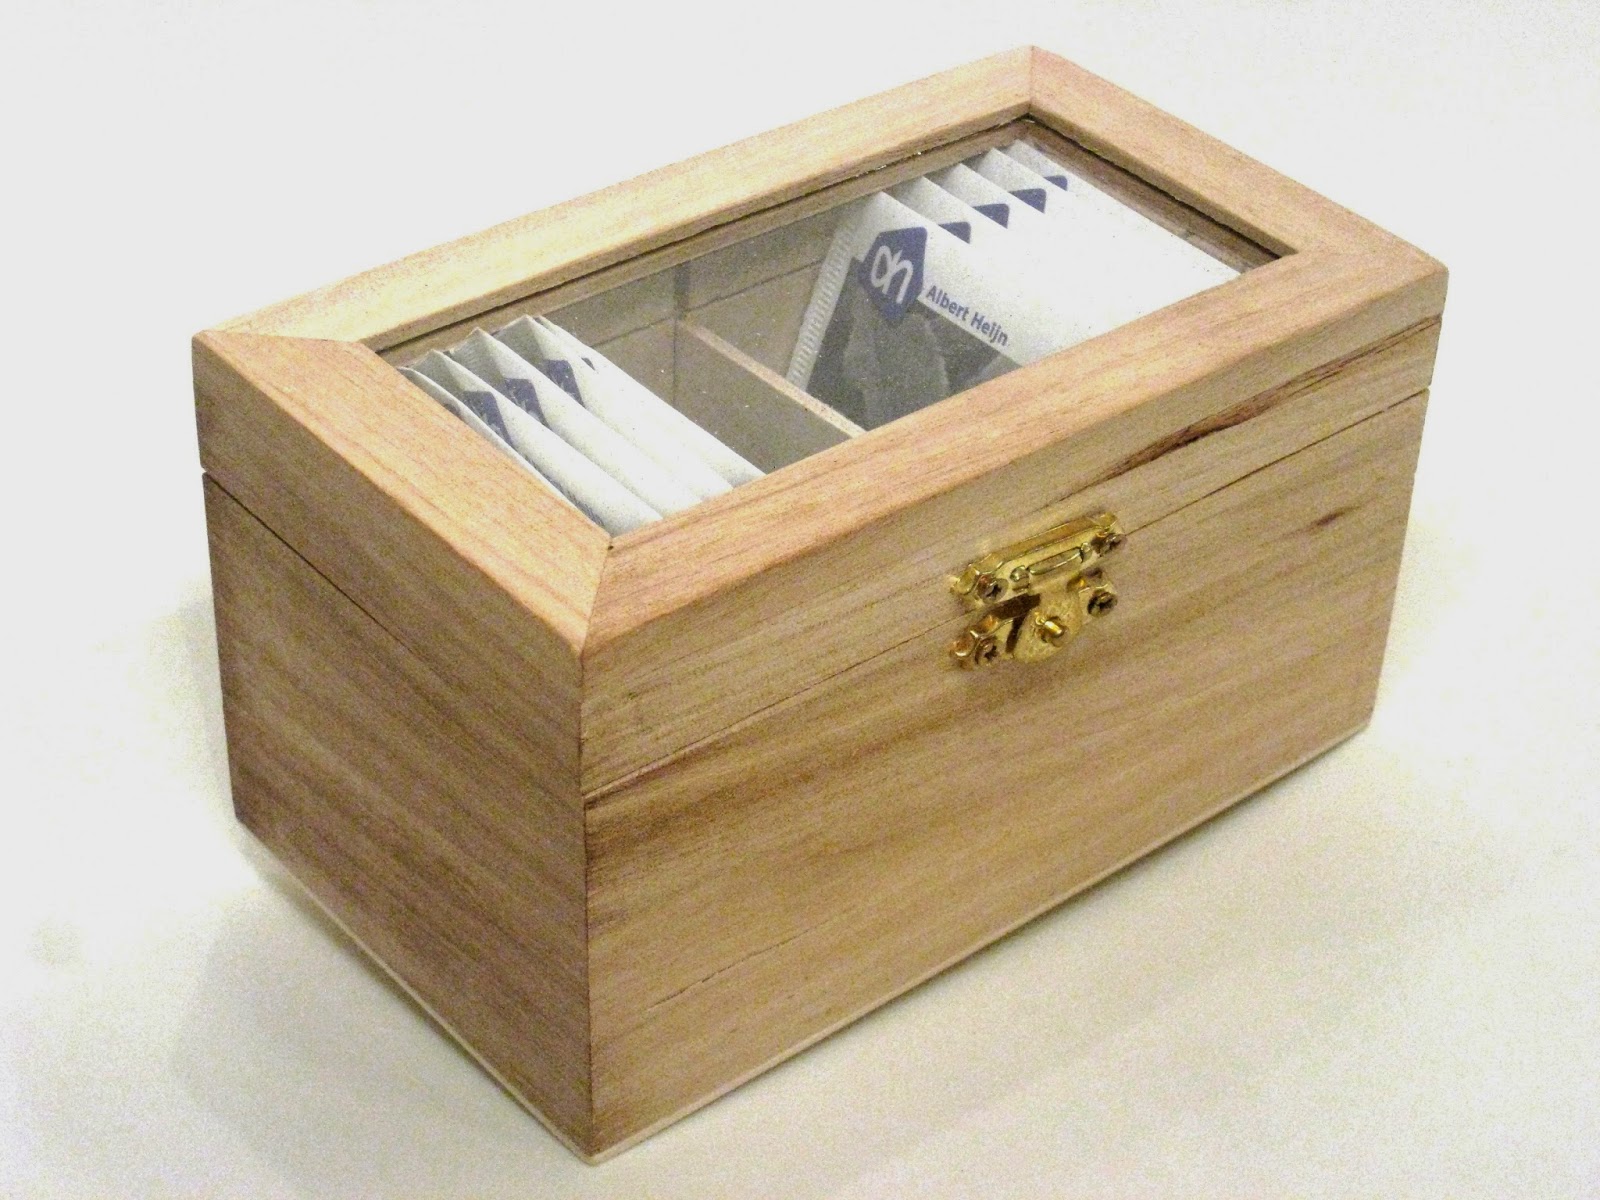
Rik's Tea Box was Rik Van Grol's IPP34 Exchange Puzzle in London last August.
Designed and made by Rik himself, the puzzle consists of a box containing 10 real tea bags; two varieties, English Breakfast and Earl Grey (hence T-42). The object of course is to "open the box and enjoy a cup of tea".
The name of the puzzle would suggest that the box is a real tea box. It certainly looks real enough since the tea bags all fit rather nicely inside. Made of wood, it has a real glass top which allows you to look inside.
As in most puzzle/trick opening boxes, the usual approach is to try to examine the outside of the box for clues but Rik's box didn't seem to shed any. I even tried to see if the metal latch and hinges yielded any luck, but none whatsoever. The usual trial and error prevails. Something kept the glass lid locked in its place. The accompanying instructions did contain a hint of sorts but it made no sense to me at the beginning (not until I finally opened the box later).
Nothing apart from the tea bags could be seen inside the box either...until I gave the box a shake and then I detected something inside which sort of gave me a vague clue as to how I might open the box. Let me state here that no force whatsoever is needed to solve this box. This box is a real tea box, and was not built to withstand the normal wear and tear associated with puzzling!
After this, within a jiffy I discovered the solution and was able to open the lid. Not a difficult puzzle by any means but the locking mechanism is pretty tricky. I was then able to see how Rik had "modded" the box to retrofit a locking mechanism for the glass lid.
As long as you keep the locking mechanism unlocked, Rik's Tea Box is actually very useful for storing tea bags. But even if its locked, its pretty easy to open the box (once you know the moves). Now here's a puzzle which serves another purpose!
Designed and made by Rik himself, the puzzle consists of a box containing 10 real tea bags; two varieties, English Breakfast and Earl Grey (hence T-42). The object of course is to "open the box and enjoy a cup of tea".
The name of the puzzle would suggest that the box is a real tea box. It certainly looks real enough since the tea bags all fit rather nicely inside. Made of wood, it has a real glass top which allows you to look inside.
As in most puzzle/trick opening boxes, the usual approach is to try to examine the outside of the box for clues but Rik's box didn't seem to shed any. I even tried to see if the metal latch and hinges yielded any luck, but none whatsoever. The usual trial and error prevails. Something kept the glass lid locked in its place. The accompanying instructions did contain a hint of sorts but it made no sense to me at the beginning (not until I finally opened the box later).
Nothing apart from the tea bags could be seen inside the box either...until I gave the box a shake and then I detected something inside which sort of gave me a vague clue as to how I might open the box. Let me state here that no force whatsoever is needed to solve this box. This box is a real tea box, and was not built to withstand the normal wear and tear associated with puzzling!
| I have kept the lid closed so as not to expose the locking mechanism |
As long as you keep the locking mechanism unlocked, Rik's Tea Box is actually very useful for storing tea bags. But even if its locked, its pretty easy to open the box (once you know the moves). Now here's a puzzle which serves another purpose!
Sunday, 18 January 2015
It's Decemburr (and my 250th Post!)
I wish it was still December (with Christmas and the New Year) but unfortunately it ain't!
But this is my 250th post, since I started this blog three and half years ago; how time has flown!
But my puzzle of choice over the weekend was Decemburr by Goh Pit Khiam. Designed over 15 years ago in 1999, it was the highest level solution burr (level 13 at that time) for a 12 piece burr configuration. The highest known solution level then for any burr puzzle was believed to be level 18, which was from the Lovely 18-piece Burr, designed by Bruce Love.
Goh named his burr Decemburr because it has 12 pieces and was designed sometime during December 1999. Mind you, the design was done solely by hand, not aided by any computer software. At that time Andreas Rover also hadn't come up with Burr Tools yet, so Goh used Bill Cutler's GENDA ("GENeral DisAssembly") programme to check his design to confirm a unique solution. Really quite a feat in those days!
My Decemburr came to me as a gift from Goh at the our first meeting several years back, after I found out he was a fellow Singaporean living just 14km away from me. It has been in my puzzle cupboard all this while. My copy was made by Mr Puzzle of Australia. Its from Mr Puzzle's higher end Craftsman range and constructed from Queensland Blackbean wood. Quality and finish is very good with nice detailing of the edges. And the pieces all slide smoothly (after a couple of days in my dehumidifying box).
The Decemburr has a total of 23 moves to fully disassemble and 13 to remove the first piece. The starting was straight forward enough and I got the first piece to move, then slowly the other pieces on the sides were also able to move which allowed the movement of their intersecting pieces. There appeared to be a sort of sequence to it but up to a certain point..and then I was stuck, nothing else seemed able to move. But after a bit more experimentation I finally was able to extract the first piece. In fact once the first piece was out, the rest was pretty straightforward.
However once the 12 pieces were all strewn over my table, that was it...I was totally lost, not knowing even where to start. Anyway I was very pleased just to have disassembled it, as with most of my other burr puzzles. I contacted Goh and he kindly sent over Burr Tools which saved the day. following the Burr Tool steps, I managed to get everything back into place again.
The Decemburr is rated 10/10 for difficulty by Mr Puzzle because its very difficult to put back together unless the correct sequential 13 steps (in reverse order) are taken. It has 5485 false solutions! It is considered by many to be a classic and a must-have for collectors. Unfortunately, its not commercially available at the moment and perhaps the only route to acquiring one is via auction
But this is my 250th post, since I started this blog three and half years ago; how time has flown!
Goh named his burr Decemburr because it has 12 pieces and was designed sometime during December 1999. Mind you, the design was done solely by hand, not aided by any computer software. At that time Andreas Rover also hadn't come up with Burr Tools yet, so Goh used Bill Cutler's GENDA ("GENeral DisAssembly") programme to check his design to confirm a unique solution. Really quite a feat in those days!
My Decemburr came to me as a gift from Goh at the our first meeting several years back, after I found out he was a fellow Singaporean living just 14km away from me. It has been in my puzzle cupboard all this while. My copy was made by Mr Puzzle of Australia. Its from Mr Puzzle's higher end Craftsman range and constructed from Queensland Blackbean wood. Quality and finish is very good with nice detailing of the edges. And the pieces all slide smoothly (after a couple of days in my dehumidifying box).
The Decemburr has a total of 23 moves to fully disassemble and 13 to remove the first piece. The starting was straight forward enough and I got the first piece to move, then slowly the other pieces on the sides were also able to move which allowed the movement of their intersecting pieces. There appeared to be a sort of sequence to it but up to a certain point..and then I was stuck, nothing else seemed able to move. But after a bit more experimentation I finally was able to extract the first piece. In fact once the first piece was out, the rest was pretty straightforward.
However once the 12 pieces were all strewn over my table, that was it...I was totally lost, not knowing even where to start. Anyway I was very pleased just to have disassembled it, as with most of my other burr puzzles. I contacted Goh and he kindly sent over Burr Tools which saved the day. following the Burr Tool steps, I managed to get everything back into place again.
The Decemburr is rated 10/10 for difficulty by Mr Puzzle because its very difficult to put back together unless the correct sequential 13 steps (in reverse order) are taken. It has 5485 false solutions! It is considered by many to be a classic and a must-have for collectors. Unfortunately, its not commercially available at the moment and perhaps the only route to acquiring one is via auction
Tuesday, 13 January 2015
Secret Box
This Secret Box puzzle was a gift from Otis Cheng during IPP34 in London (thank you Otis). Otis is from Hong Kong and an avid twisties collector.
The box is made of wood and produced by Mi-Toys. The designer is unknown (perhaps someone in-house from Mi-toys). Externally its a regular looking rectangular box with a lid but has two knobs on top. Quality is decent; I would say above average, considering this is a mass produced product.
The object is to open the lid. Like most trick opening/puzzle boxes, the Secret Box requires a number of steps in the right sequence.It takes roughly five steps to fully remove the lid.
Not a very difficult puzzle so I am not sure why its been rated 4 out of 5 stars (graded as "Unbelievable") although the mechanism is pretty well disguised. A fun solve, nonetheless.
The box is functional and can actually store a number of small items. You will also notice it has two slits, one on either side of the box and this makes the Secret Box suitable as a piggy bank. The box would make a very good reasonably priced gift for someone or a novice puzzler.
The box is made of wood and produced by Mi-Toys. The designer is unknown (perhaps someone in-house from Mi-toys). Externally its a regular looking rectangular box with a lid but has two knobs on top. Quality is decent; I would say above average, considering this is a mass produced product.
The object is to open the lid. Like most trick opening/puzzle boxes, the Secret Box requires a number of steps in the right sequence.It takes roughly five steps to fully remove the lid.
Not a very difficult puzzle so I am not sure why its been rated 4 out of 5 stars (graded as "Unbelievable") although the mechanism is pretty well disguised. A fun solve, nonetheless.
The box is functional and can actually store a number of small items. You will also notice it has two slits, one on either side of the box and this makes the Secret Box suitable as a piggy bank. The box would make a very good reasonably priced gift for someone or a novice puzzler.
Saturday, 10 January 2015
Slide Blocked Sliding Block
The Slide Blocked Sliding Block puzzle ("SBSB") was designed by Bill Cutler in 1986 and won the Grand Prize at the 1988 Hikimi Wooden Puzzle Competition.
The original design is not the "two arrows" layout you see in these photos although the solving principle is the same.
The "two arrows" version here is from Tom Lensch. The puzzle is made of Walnut for the frame while the pieces are Maple, Bubinga, Indian Rosewood and Yellowheart. Very well constructed with a nice fit and finish. The SBSB is also not to be confused with Goh Pit Khiam's Arrow Blocks puzzle which tho' the latter has a similar external appearance to the SBSB, the solution and method of solving is totally different (and a lot more difficult).
The SBSB is a sliding block puzzle. Object is to slide the 5 pieces around to form a "complete arrow" on the left side, after removal of the Yellowheart start piece (which happens to be the only piece that can be removed from the frame).
But the SBSB has a "trick" to it....the pieces have been constructed in such a way that certain movements are restricted (hence "slide blocked"); making it much harder than it looks. A normal 5 piece sliding block puzzle would have been a pretty easy solve. But here, the SBSB requires a minimum of 41 moves to complete.
Notwithstanding the restriction of movements of the pieces, the SBSB, while challenging is still quite manageable as it consists of only 5 pieces moving in rectilinear fashion. But I did find myself hitting some dead ends here and there along the way and backtracking before getting the arrows to their correct positions. With some persistence, one can eventually get to the end point, but probably taking more than 41 moves. To complete the solution, the goal is to get back to the original start position. Unless your memory is superb, you'll probably have to go through some trial and error to get it solved.
The SBSB is a different take on the traditional sliding block puzzle. And with the arrows design, it also displays very well. Available from Tom Lensch for US$125. [Edit 12 Jan 2015 - Someone has written to me to say that Tom does not have any more available]
| Start Position |
The original design is not the "two arrows" layout you see in these photos although the solving principle is the same.
The "two arrows" version here is from Tom Lensch. The puzzle is made of Walnut for the frame while the pieces are Maple, Bubinga, Indian Rosewood and Yellowheart. Very well constructed with a nice fit and finish. The SBSB is also not to be confused with Goh Pit Khiam's Arrow Blocks puzzle which tho' the latter has a similar external appearance to the SBSB, the solution and method of solving is totally different (and a lot more difficult).
The SBSB is a sliding block puzzle. Object is to slide the 5 pieces around to form a "complete arrow" on the left side, after removal of the Yellowheart start piece (which happens to be the only piece that can be removed from the frame).
But the SBSB has a "trick" to it....the pieces have been constructed in such a way that certain movements are restricted (hence "slide blocked"); making it much harder than it looks. A normal 5 piece sliding block puzzle would have been a pretty easy solve. But here, the SBSB requires a minimum of 41 moves to complete.
| Solved Position |
The SBSB is a different take on the traditional sliding block puzzle. And with the arrows design, it also displays very well. Available from Tom Lensch for US$125. [Edit 12 Jan 2015 - Someone has written to me to say that Tom does not have any more available]
Wednesday, 7 January 2015
Popplock T9
Update 23 October 2017 - Dear Reader, please check out my new puzzle blog and e-store at http://mechanical-puzzles.com
The T9 from Rainer Popp came out sometime in the middle of last year. At a behemoth 11.5cm x 7cm x 2.4cm and weighing in at 1.052kg, this is one of the largest locks in the Popplock collection.
For previous reviews of Popplocks from T2 to T8, please click below:-
1. T2
2. T3
3. T4
4. T5
5. T6
6. T7
7. T8
Rainer manufactures and produces by hand a new model Popplock every year. I have had this lock since last August and its been in storage until several days ago. There have been two reviews of the T9 so far, from Allard and Kevin and both bloggers have sung high praises of the T9. Even though I only managed to solve mine with the help of the instruction manual, I have to agree with the two gents. It is really quite magnificent from a puzzling perspective.
There is really nothing more to be said about the T9's quality and finish. A real piece of superb craftsmanship with fine detailing. Damn expensive I might add. The body is made from a block of solid brass and the shackle is stainless steel. At first glance, it looks like a large garden variety padlock with an ordinary looking key...except the front of the T9 has, in addition to the a key hole, a circular looking dial with rivets on the front, three of them imbued with red paint.
To solve the T9, there are basically three main stages, each with a number of steps. In most sequential discovery puzzles, the first step is usually easier (not easy) than the rest, but in the case of the T9, I was actually stumped right from stage one. Took me a while to figure out what needed to be done. Yes, the key can go inside the hole and turn round and round, but that's all to it, nothing more. With my small victory at stage one, I moved on to stage two. I had a good idea what was going on and even made progress (mind you all the while not being able to see what's happening inside the lock). However, I never made it completely past stage two. Here is where I was stuck for good and finally resorted to the instructions.
Stage three is even harder than stage two. And as Kevin mentioned in his post, you need good lighting. I would also add a good eye and make sure you have your reading glasses on too for this stage. I recommend playing under white or tungsten lighting if possible. The crucial steps in stage three are so very subtle and the mechanism so well hidden (that's provided if you can reach this point) that I don't think I would have figured them out without the instructions. With the last move, the shackle suddenly springs springs open...and there you go, the T9 is solved! Resetting the T9 is surprisingly easy, given the many steps previously....just turn the key!
Once you know the moves, sequence and what to look out for, repeat solving is quite manageable and can be done reasonably quickly, within a couple of minutes even.
With the exception of the T7 and T8, Rainer Popp has made a return to the traditional Popplock style of puzzle locks with the T9. Those who have played with the earlier versions from T2 to T6 would know what I mean. Puzzle/trick locks don't show up very often, in fact since the T8 in 2013, the only other metal puzzle lock at this level of quality and manufacture that came to the market is the Swing Lock from Splinter Justus (which I do not own).
Very difficult yes, but overall the T9 is an excellent puzzle lock with multiple stages and steps to keep one well occupied with progress and a-ha moments along the way. Expensive also yes, but lots of puzzling value for money. The workings of the lock (from the internal diagrams in the manual) have to be seen to be believed.
As far as I can tell, unfortunately there are no T9s available commercially at the moment as all appear to have gone to private hands. Not surprising, since Rainer produces very limited units for each new model, just anywhere between fifty to less than a hundred.
[Edit 8 January 2015 - I have just been informed by Wil Strijbos that he still has one last copy of the T9 available for sale at 380 euros. If anyone is keen, please PM me via my blog email and I will put you in touch with Wil]
The T9 from Rainer Popp came out sometime in the middle of last year. At a behemoth 11.5cm x 7cm x 2.4cm and weighing in at 1.052kg, this is one of the largest locks in the Popplock collection.
For previous reviews of Popplocks from T2 to T8, please click below:-
1. T2
2. T3
3. T4
4. T5
5. T6
6. T7
7. T8
Rainer manufactures and produces by hand a new model Popplock every year. I have had this lock since last August and its been in storage until several days ago. There have been two reviews of the T9 so far, from Allard and Kevin and both bloggers have sung high praises of the T9. Even though I only managed to solve mine with the help of the instruction manual, I have to agree with the two gents. It is really quite magnificent from a puzzling perspective.
There is really nothing more to be said about the T9's quality and finish. A real piece of superb craftsmanship with fine detailing. Damn expensive I might add. The body is made from a block of solid brass and the shackle is stainless steel. At first glance, it looks like a large garden variety padlock with an ordinary looking key...except the front of the T9 has, in addition to the a key hole, a circular looking dial with rivets on the front, three of them imbued with red paint.
To solve the T9, there are basically three main stages, each with a number of steps. In most sequential discovery puzzles, the first step is usually easier (not easy) than the rest, but in the case of the T9, I was actually stumped right from stage one. Took me a while to figure out what needed to be done. Yes, the key can go inside the hole and turn round and round, but that's all to it, nothing more. With my small victory at stage one, I moved on to stage two. I had a good idea what was going on and even made progress (mind you all the while not being able to see what's happening inside the lock). However, I never made it completely past stage two. Here is where I was stuck for good and finally resorted to the instructions.
Stage three is even harder than stage two. And as Kevin mentioned in his post, you need good lighting. I would also add a good eye and make sure you have your reading glasses on too for this stage. I recommend playing under white or tungsten lighting if possible. The crucial steps in stage three are so very subtle and the mechanism so well hidden (that's provided if you can reach this point) that I don't think I would have figured them out without the instructions. With the last move, the shackle suddenly springs springs open...and there you go, the T9 is solved! Resetting the T9 is surprisingly easy, given the many steps previously....just turn the key!
Once you know the moves, sequence and what to look out for, repeat solving is quite manageable and can be done reasonably quickly, within a couple of minutes even.
With the exception of the T7 and T8, Rainer Popp has made a return to the traditional Popplock style of puzzle locks with the T9. Those who have played with the earlier versions from T2 to T6 would know what I mean. Puzzle/trick locks don't show up very often, in fact since the T8 in 2013, the only other metal puzzle lock at this level of quality and manufacture that came to the market is the Swing Lock from Splinter Justus (which I do not own).
Very difficult yes, but overall the T9 is an excellent puzzle lock with multiple stages and steps to keep one well occupied with progress and a-ha moments along the way. Expensive also yes, but lots of puzzling value for money. The workings of the lock (from the internal diagrams in the manual) have to be seen to be believed.
As far as I can tell, unfortunately there are no T9s available commercially at the moment as all appear to have gone to private hands. Not surprising, since Rainer produces very limited units for each new model, just anywhere between fifty to less than a hundred.
[Edit 8 January 2015 - I have just been informed by Wil Strijbos that he still has one last copy of the T9 available for sale at 380 euros. If anyone is keen, please PM me via my blog email and I will put you in touch with Wil]
Thursday, 1 January 2015
Karakuri Christmas Present #4 - Confetto Box 2
Update 23 October 2017 - Dear Reader, please check out my new puzzle blog and e-store at http://mechanical-puzzles.com
A Very Happy New Year everyone!
Here's my first post for 2015...on my fourth and last Karakuri Christmas present which I received a couple of weeks back last Christmas.
This puzzle box was designed and made by Hiroshi Iwahara from the Karakuri Creation Group.
This box is made (most likely) from Walnut with a different (unidentifiable) wood for the internals. There are also a number of steel parts (rods) inside the puzzle. Nothing more to add about its quality and construction other than its excellently made with very tight tolerances throughout. Everything moves and slides smoothly as intended.
This first three presents (see my last three blog posts) were very easy to solve, including #2 the "New Parcel Cube" from Akio Kamei, which was the hardest of the three. The Confetto Box here surpasses the previous three in terms of difficulty. In fact when I first played with it for the first few minutes...I said to myself...hmm, this one looks like a tough one!
The goal of this puzzle is to slide the side panels of the box (partially) open, as shown in the photo. To do this, the first moving panel needs to be found, which I did, after a bit of pushing here and there on all the sides. Thereafter I slowly discovered the rest, but not without some experimentation (and difficulty) especially for the first couple of panels.
In a way its similar to a traditional multiple-moves Japanese puzzle box. However, Iwahara's box is different in that there is greater (and more subtle) "interaction" between the panels, facilitated by the internal mechanism, which makes this puzzle not that easy. It takes a bit to understand how the puzzle is suppose to work. I am still not too sure how the internal mechanism functions (although I have a vague idea) as only a glimmer of the insides is visible. Peeking in, all I can tell is that it looks pretty intricate.
And unlike the more typical traditional box, there is also no internal space or cavity (for storage of small items) to be found as none of the panels on the Confetto box can slide more than a quarter open. It would appear the box was intended solely as a puzzle. Well, unless I am way off tangent here, the solved state of the puzzle is the one as shown in the photo above.
If anyone who owns this box knows otherwise and has managed to go beyond this stage, please PM me.
[Edit 1st Jan 2015 - Apparently what I have solved above is only half the solution to the Confetto Box 2. Peter Hajek had emailed me after reading my post to say he had reached the stage I was at and that he believed there was a hidden compartment in the Box. A short while later, he emailed again to let me know he had solved the Box fully. He very kindly gave me some instructions and following them, I also managed to solve it.
The Confetto Box 2 is much more difficult than anticipated and is definitely the hardest of my four presents. Just look at the intricate and complicated internals and you can see the work and craftsmanship that went into the puzzle. A really great puzzle box. For the price, also a lot of puzzling and value for money]
A Very Happy New Year everyone!
Here's my first post for 2015...on my fourth and last Karakuri Christmas present which I received a couple of weeks back last Christmas.
This puzzle box was designed and made by Hiroshi Iwahara from the Karakuri Creation Group.
This box is made (most likely) from Walnut with a different (unidentifiable) wood for the internals. There are also a number of steel parts (rods) inside the puzzle. Nothing more to add about its quality and construction other than its excellently made with very tight tolerances throughout. Everything moves and slides smoothly as intended.
This first three presents (see my last three blog posts) were very easy to solve, including #2 the "New Parcel Cube" from Akio Kamei, which was the hardest of the three. The Confetto Box here surpasses the previous three in terms of difficulty. In fact when I first played with it for the first few minutes...I said to myself...hmm, this one looks like a tough one!
The goal of this puzzle is to slide the side panels of the box (partially) open, as shown in the photo. To do this, the first moving panel needs to be found, which I did, after a bit of pushing here and there on all the sides. Thereafter I slowly discovered the rest, but not without some experimentation (and difficulty) especially for the first couple of panels.
In a way its similar to a traditional multiple-moves Japanese puzzle box. However, Iwahara's box is different in that there is greater (and more subtle) "interaction" between the panels, facilitated by the internal mechanism, which makes this puzzle not that easy. It takes a bit to understand how the puzzle is suppose to work. I am still not too sure how the internal mechanism functions (although I have a vague idea) as only a glimmer of the insides is visible. Peeking in, all I can tell is that it looks pretty intricate.
And unlike the more typical traditional box, there is also no internal space or cavity (for storage of small items) to be found as none of the panels on the Confetto box can slide more than a quarter open. It would appear the box was intended solely as a puzzle. Well, unless I am way off tangent here, the solved state of the puzzle is the one as shown in the photo above.
If anyone who owns this box knows otherwise and has managed to go beyond this stage, please PM me.
[Edit 1st Jan 2015 - Apparently what I have solved above is only half the solution to the Confetto Box 2. Peter Hajek had emailed me after reading my post to say he had reached the stage I was at and that he believed there was a hidden compartment in the Box. A short while later, he emailed again to let me know he had solved the Box fully. He very kindly gave me some instructions and following them, I also managed to solve it.
The Confetto Box 2 is much more difficult than anticipated and is definitely the hardest of my four presents. Just look at the intricate and complicated internals and you can see the work and craftsmanship that went into the puzzle. A really great puzzle box. For the price, also a lot of puzzling and value for money]
Tuesday, 30 December 2014
Karakuri Christmas Present #3 - The Owl Shocked
Present #3 from the Karakrui Creation Group is "The Owl Shocked". No need to guess the name of the puzzle; its written on the packaging. And no need to guess the designer also; its a bird puzzle, an owl to be specific...and can only come from...yes, Yun Kakuda.
What I am not certain is the wood that was used to make the puzzle; guess I will have to wait until more owl information reaches me early next year. What about quality and construction? No guesses needed. It is very well made with fine finishing and attention to detail.
I was wondering if the object was to open the top or release a drawer... but nothing of either sort. After some fiddling with the puzzle, the goal as I discovered, is to get the owl's head (which appears half-recessed into its body) to extend fully.upwards. As though something had caught the owl's attention! I played with it some more but there appears nothing more to solve. [Please see edit below]
Like my earlier Kakuda puzzle, the Skunk Attack, this one takes just 2-3 moves to solve and very easy too! Notwithstanding, I still like the owl which is really high on the cute factor, with nice eyes and a beak.
[Edit 1st Jan 2015 - Two well known puzzlers in the community (Louis Coolen and Peter Hajek) contacted me to let me know there's one more step to go for the Owl to reveal a secret compartment. I went back to the Owl and lo and behold, I found it...well hidden. I should have looked at the Owl more carefully during play...silly of me to have missed it]
What I am not certain is the wood that was used to make the puzzle; guess I will have to wait until more owl information reaches me early next year. What about quality and construction? No guesses needed. It is very well made with fine finishing and attention to detail.
I was wondering if the object was to open the top or release a drawer... but nothing of either sort. After some fiddling with the puzzle, the goal as I discovered, is to get the owl's head (which appears half-recessed into its body) to extend fully.upwards. As though something had caught the owl's attention! I played with it some more but there appears nothing more to solve. [Please see edit below]
Like my earlier Kakuda puzzle, the Skunk Attack, this one takes just 2-3 moves to solve and very easy too! Notwithstanding, I still like the owl which is really high on the cute factor, with nice eyes and a beak.
[Edit 1st Jan 2015 - Two well known puzzlers in the community (Louis Coolen and Peter Hajek) contacted me to let me know there's one more step to go for the Owl to reveal a secret compartment. I went back to the Owl and lo and behold, I found it...well hidden. I should have looked at the Owl more carefully during play...silly of me to have missed it]
Friday, 26 December 2014
Karakuri Christmas Present #2 - New Parcel Cube
Merry Christmas to all my readers! Hope everyone is having a great holiday and puzzling time!
This is my Karakuri Christmas present #2. My guess is that this puzzle box was designed and made by Hiroshi Iwahara. How come I don't know the designer/maker? Well you can read a bit about the annual Karakuri Christmas Presents here. Again, if anyone knows to the contrary, please PM me, thanks. [Edit 27 Dec 2014 :- it's been confirmed to me that this box is from Akio Kamei, not Iwahara. Tell tale signs are the external cardboard box packaging as well as the Chinese character inside the box which means "peace", both hallmarks of Kamei].
I have called this one the "checkered" box for now. [Edit: 10 Jan 2015 - its called the New Parcel Cube] Its got two solid stripes running across the six sides of the box. Not merely for decorative purposes, but they serve a function too.
Like all Karakrui puzzles, the "checkered box" is extremely well made and finished to very tight tolerances, yet everything moves and slides smoothly. It looks to me like Yellowheart and Walnut [Edit 10 Jan 2015 - its made of Walnut and Japanese Torreya] has been used for its construction, but I can't be sure. I will update this post once more information on the puzzle has been sent to me early next year in 2015.
The fine craftsmanship and attention to detail is really incredible. And you need to handle this one with care too; any undue force and you may end up with a cracked or damaged puzzle. Not something you want happen during the Christmas holidays, or at any other time for that matter.
This one takes quite a few more steps more than my Christmas Present #1 to open. While its not difficult (but certainly more difficult than #1), the mechanism is tricky and again very well concealed by the fine construction. What you see in the photo is only a partially opened box. Fully solved, the box can be dismantled even further.
Monday, 22 December 2014
Karakuri Christmas Present #1 - "Lock"
This is the first of my four Karakuri 2014 Christmas presents from the Karakuri Creation Group of Hakone, Japan.
Like all Karakuri Christmas presents for the year, the puzzle comes packaged in a box....and that is all there is to it. It does not mention the designer and many don't even state the puzzle's name. You won't know who designed which puzzle in the series, unless of course you only ordered one puzzle from a particular designer (or perhaps two) or you are very familiar with a certain designer's style. For most part, if you had ordered multiple items like me, you may have some difficulty identifying the puzzle's designer. It is only during the early part of the following year when the Karakuri Group sends to all recipients information and solutions for the Christmas present puzzles that all is revealed.
For now, I am calling this puzzle "Antique Lock" because it does resemble one of those antique Chinese locks. My guess is also that this puzzle has been designed and made by Tatsuo Miyamoto. If anyone knows to the contrary, please drop me a PM, thanks. (Edit 10 Jan 2015: Yes, it's been confirmed that it's Miyamoto and the official name is "Lock")
This one appears to be made of walnut throughout and workmanship is superb with etched lines on the body and fine detailing. Its a fairly large lock at 12cm x 9cm x 3.4cm. It even has a key hole on the front side but this as I discovered, is carved and non-functional.
The goal is to "open" the lock. When I solved the puzzle, I literally opened a drawer which is released from the bottom. Although the puzzle is very easy to solve (2-3 steps), the mechanism is very well hidden owing to the fine craftsmanship. The drawer is large enough for small items like rings, jewelry and other keepsakes. Simple puzzle yes...but looks great and displays very well.
Like all Karakuri Christmas presents for the year, the puzzle comes packaged in a box....and that is all there is to it. It does not mention the designer and many don't even state the puzzle's name. You won't know who designed which puzzle in the series, unless of course you only ordered one puzzle from a particular designer (or perhaps two) or you are very familiar with a certain designer's style. For most part, if you had ordered multiple items like me, you may have some difficulty identifying the puzzle's designer. It is only during the early part of the following year when the Karakuri Group sends to all recipients information and solutions for the Christmas present puzzles that all is revealed.
For now, I am calling this puzzle "Antique Lock" because it does resemble one of those antique Chinese locks. My guess is also that this puzzle has been designed and made by Tatsuo Miyamoto. If anyone knows to the contrary, please drop me a PM, thanks. (Edit 10 Jan 2015: Yes, it's been confirmed that it's Miyamoto and the official name is "Lock")
This one appears to be made of walnut throughout and workmanship is superb with etched lines on the body and fine detailing. Its a fairly large lock at 12cm x 9cm x 3.4cm. It even has a key hole on the front side but this as I discovered, is carved and non-functional.
The goal is to "open" the lock. When I solved the puzzle, I literally opened a drawer which is released from the bottom. Although the puzzle is very easy to solve (2-3 steps), the mechanism is very well hidden owing to the fine craftsmanship. The drawer is large enough for small items like rings, jewelry and other keepsakes. Simple puzzle yes...but looks great and displays very well.
Friday, 19 December 2014
TrEGGony
I had some success with my Dinosaur Egg puzzle, so I thought I would try another "egg" puzzle again.
This time it was the "TrEGGony", the Exchange Puzzle of Juozas Granskas at IPP34. It's a 7-piece packing puzzle comprising six triangles of various shapes and sizes and....an egg, all laser cut from (cherry) wood I think. Fit of the pieces is perfect and quality is very good.
TrEGGony is a word play on Tregony, a village in Cornwall, England. The photo on the packaging shows a picture of the Tregony Gallery, which is an art gallery in Tregony. There must have been a reason why Juozas chose Tregony for the name of his puzzle, aside from the pun...but I am not sure what it is.
Object of course is to get all the seven pieces into the tray flush. Unlike the previous Dinosaur Egg, I had absolutely no luck with TrEGGony. But luckily the solution came with the puzzle. One look and I knew I was way off base.
I am not that good at packing puzzles, so I found it very difficult, especially with seven pieces.
This time it was the "TrEGGony", the Exchange Puzzle of Juozas Granskas at IPP34. It's a 7-piece packing puzzle comprising six triangles of various shapes and sizes and....an egg, all laser cut from (cherry) wood I think. Fit of the pieces is perfect and quality is very good.
TrEGGony is a word play on Tregony, a village in Cornwall, England. The photo on the packaging shows a picture of the Tregony Gallery, which is an art gallery in Tregony. There must have been a reason why Juozas chose Tregony for the name of his puzzle, aside from the pun...but I am not sure what it is.
Object of course is to get all the seven pieces into the tray flush. Unlike the previous Dinosaur Egg, I had absolutely no luck with TrEGGony. But luckily the solution came with the puzzle. One look and I knew I was way off base.
I am not that good at packing puzzles, so I found it very difficult, especially with seven pieces.
Tuesday, 16 December 2014
Dinosaur Egg
The name of this puzzle, originally in Japanese, "Kyoryu No Tamago" translated means "Is It A Dinosaur Egg?". Its from Japanese designer Minoru Abe, renowned for his colourful, cute, whimsical and many very challenging sliding block puzzles. This one is no different and was designed 28 years ago, one of his earliest. The Dinosaur Egg today is rather hard to find (no pun intended) and I was very lucky to get my copy courtesy of my puzzling friend, Frederic Boucher who lives in Japan.
The object is to slide the pieces within the irregular shaped tray, (rectilinear moves only) from the given START position to the FINISH, which resembles a (dinosaur) egg. There are four pieces each piece forming a quarter of the egg. Three of the pieces have notches which are able to interact with the protrusions within the tray.
The instructions are in Japanese but the accompanying diagrams are pretty clear on what must be done. Frederic did a bit of the translation for me - the solution requires 22 moves.
I played with Dinosaur Egg for a good hour and after getting stuck and resetting the puzzle at least a half dozen times, I managed to reach the end stage. I am not sure if the 22-moves solution is "unique" though? Meaning that you need to get the sequence correct right from beginning to the end or you will invariably get stuck in the middle and have to back-track to the last correct position. Or could more moves be taken and still reach the end?
Only four pieces, but a unique and interesting idea for a sliding block design, and challenging too!
There appears to be very little information about Minoru Abe, the man himself. But check out Holt Davey's FaceBook page here about Abe.
| START |
The instructions are in Japanese but the accompanying diagrams are pretty clear on what must be done. Frederic did a bit of the translation for me - the solution requires 22 moves.
| FINISH |
Only four pieces, but a unique and interesting idea for a sliding block design, and challenging too!
There appears to be very little information about Minoru Abe, the man himself. But check out Holt Davey's FaceBook page here about Abe.
Saturday, 13 December 2014
The World's Most Expensive Exchange Puzzle?
Is this the world's most expensive Exchange Puzzle? Probably...but we'll talk about the price later...
Sequential discovery puzzles don't come onto the market often. In fact the last one I played with was Wil Strijbos Angel Box over a year ago..
But when a new one comes along, it's usually a winner. The Big Ben is such a puzzle!
The Big Ben (a miniature replica modeled after the clock tower at the north end of the Palace of Westminster), was John Moores' Exchange Puzzle at IPP34 in London this year. Without a doubt, it made ninety-nine Exchange participants (including me) very happy people, especially so when we later found out how much it was retailing for. It was jointly designed by John Moores, Junichi Yananose and Brian Young.
Made by Brian Young of Mr Puzzle, Australia, the Big Ben comprises of Papua New Guinean Rosewood, Western Australia Jarrah and Queensland Silver Ash, all native woods of Australia. The attention to detail is amazing and you really need to see the actual copy to appreciate the intricate design that has gone into the puzzle, not only externally from an aesthetic point of view but also the trick and mechanism of the internals. Quality, fit and finish is excellent.
The Big Ben retails on Mr Puzzle for a whopping A$385! Likely the most expensive exchange puzzle at retail price. However probably not, if you also consider aftermarket online auctions where exchange puzzles have attracted bids in excess of US$500 (thanks to Nick Baxter for this info). Even if it had cost John Moores A$100 to have each of these puzzles made (and I am just guessing here the price) it would have set him back a cool A$10,000 to use them for the exchange, since he would have needed a minimum of ninety-nine copies. But then again, John is from Monaco....
As mentioned this is a sequential discovery (or progressive move) puzzle where you solve little sub-puzzles along the way (using tools that are part of the puzzle; but no other external tools permitted) leading to the eventual solving of the main puzzle.
The object is to find the "Big Ben" (in this case a tiny plastic bell, a miniature like the real one) hidden somewhere in the recesses of the clock tower. Along the way, another item, a representation of Queen's Elizabeth's crown can also be picked up.
Like any good sequential discovery puzzle, there are many things to do to solve the puzzle. In the case of the Big Ben, there are broadly four main challenges, each with multiple steps. I don't want to give away too much here since this is an expensive puzzle and one should have the maximum pleasure from the solve.
The first challenge is the perhaps the easiest...for confidence building and getting one into the groove of things. Here you will discover some tools which are to be used later and are necessary. Didn't take me long to figure things out here.
The second challenge is harder and IMHO, a lot harder than the first challenge. The main portions of the Big Ben has to be taken apart. I took a good half an hour or so to get through this stage. Once this was over, a sigh of relief, an a-ha moment to savour for a while.
The third challenge....which is the hardest and stumped me for a long time. Not that I couldn't solve the puzzle (ie getting the bell out of the clock tower); in fact I did solve it...only that I did it the unintended way!. Two other puzzlers solved it the wrong way too before finding out the correct method; one of them Kevin Sadler whom I approached for help for the right solution method after showing him how I had solved my copy, which proved to be incorrect. I tried the correct method and I must say that it is really quite an elegant solution and works well, but very subtle and tricky. As Allard Walker aptly puts it in his blog post, the solution requires "the detective skills of Poirot and the imagination of Heath Robinson".
The fourth and last challenge is to put everything back together again AND including setting all the four clock faces back to the original 9 o'clock. I managed to reassemble everything back in place but was quite happy to leave the clocks in whatever facings they happened to end up. Didn't see the need to give myself any more extra work. The Big Ben looks just fine as it is!
Expensive yes, but loads of puzzling value for the money. Overall a really fine puzzle from the puzzling perspective. Difficult yes, especially the last part, but gradual and manageable most of the way with a-ha moments thrown in. A puzzle that you probably won't want to put down once you start.
Oh...and John, if you are reading this, we puzzlers would love for you to continue to participate in future IPP Exchanges with puzzles just like your Big Ben!!!
Sequential discovery puzzles don't come onto the market often. In fact the last one I played with was Wil Strijbos Angel Box over a year ago..
But when a new one comes along, it's usually a winner. The Big Ben is such a puzzle!
The Big Ben (a miniature replica modeled after the clock tower at the north end of the Palace of Westminster), was John Moores' Exchange Puzzle at IPP34 in London this year. Without a doubt, it made ninety-nine Exchange participants (including me) very happy people, especially so when we later found out how much it was retailing for. It was jointly designed by John Moores, Junichi Yananose and Brian Young.
Made by Brian Young of Mr Puzzle, Australia, the Big Ben comprises of Papua New Guinean Rosewood, Western Australia Jarrah and Queensland Silver Ash, all native woods of Australia. The attention to detail is amazing and you really need to see the actual copy to appreciate the intricate design that has gone into the puzzle, not only externally from an aesthetic point of view but also the trick and mechanism of the internals. Quality, fit and finish is excellent.
The Big Ben retails on Mr Puzzle for a whopping A$385! Likely the most expensive exchange puzzle at retail price. However probably not, if you also consider aftermarket online auctions where exchange puzzles have attracted bids in excess of US$500 (thanks to Nick Baxter for this info). Even if it had cost John Moores A$100 to have each of these puzzles made (and I am just guessing here the price) it would have set him back a cool A$10,000 to use them for the exchange, since he would have needed a minimum of ninety-nine copies. But then again, John is from Monaco....
As mentioned this is a sequential discovery (or progressive move) puzzle where you solve little sub-puzzles along the way (using tools that are part of the puzzle; but no other external tools permitted) leading to the eventual solving of the main puzzle.
The object is to find the "Big Ben" (in this case a tiny plastic bell, a miniature like the real one) hidden somewhere in the recesses of the clock tower. Along the way, another item, a representation of Queen's Elizabeth's crown can also be picked up.
Like any good sequential discovery puzzle, there are many things to do to solve the puzzle. In the case of the Big Ben, there are broadly four main challenges, each with multiple steps. I don't want to give away too much here since this is an expensive puzzle and one should have the maximum pleasure from the solve.
The first challenge is the perhaps the easiest...for confidence building and getting one into the groove of things. Here you will discover some tools which are to be used later and are necessary. Didn't take me long to figure things out here.
The second challenge is harder and IMHO, a lot harder than the first challenge. The main portions of the Big Ben has to be taken apart. I took a good half an hour or so to get through this stage. Once this was over, a sigh of relief, an a-ha moment to savour for a while.
| The Big Ben and Queen Elizabeth's Crown found |
The third challenge....which is the hardest and stumped me for a long time. Not that I couldn't solve the puzzle (ie getting the bell out of the clock tower); in fact I did solve it...only that I did it the unintended way!. Two other puzzlers solved it the wrong way too before finding out the correct method; one of them Kevin Sadler whom I approached for help for the right solution method after showing him how I had solved my copy, which proved to be incorrect. I tried the correct method and I must say that it is really quite an elegant solution and works well, but very subtle and tricky. As Allard Walker aptly puts it in his blog post, the solution requires "the detective skills of Poirot and the imagination of Heath Robinson".
The fourth and last challenge is to put everything back together again AND including setting all the four clock faces back to the original 9 o'clock. I managed to reassemble everything back in place but was quite happy to leave the clocks in whatever facings they happened to end up. Didn't see the need to give myself any more extra work. The Big Ben looks just fine as it is!
Expensive yes, but loads of puzzling value for the money. Overall a really fine puzzle from the puzzling perspective. Difficult yes, especially the last part, but gradual and manageable most of the way with a-ha moments thrown in. A puzzle that you probably won't want to put down once you start.
Oh...and John, if you are reading this, we puzzlers would love for you to continue to participate in future IPP Exchanges with puzzles just like your Big Ben!!!
Tuesday, 9 December 2014
Skunk Attack
This very nice puzzle came to me from one of the recent Baxterweb puzzle auctions. It was designed and made by Yoh Kakuda from the Karakuri Creation Group of Hakone, Japan. Who are these people, what sort of puzzles do they make, how to "join the club" and and get their "Christmas Presents" (soon to happen this month)?...well, you can check out Allard Walker's blog post which gives a good concise summary.
Yoh Kakuda, who is one of just several puzzle craftswomen, among the many men in the Group has so far centered her creations mainly around animals. The Skunk Attack was made by her in early 2011.
It is made from a combination of woods including Wenge, Cucumber and Shiuri Cherry. Karakuri puzzles are of really exceptional build quality and craftsmanship, which accounts for their high retail price. And the Skunk is no different. The refinement and attention to detail of the puzzle is incredible. Even the packaging is high class. My Skunk Attack came in a rectangular blue box and if you didn't know it contains a puzzle, you would probably have thought it was something from Tiffany's. (For those less well informed, Tiffany's is a luxury goods and jewelry retailer whose trademark colour is egg blue, quite similar to the colour here).
From a puzzling perspective, the difficulty levels of Karakuri puzzles vary greatly. They can range from being extremely difficult right down to downright simple (ie; one or two moves to solve). If I had to grade my Skunk Attack, I would say its probably 1 or 1.5/10. For experienced puzzlers, no sweat at all.
The object here is to open a secret drawer. What I like about the Skunk Attack (even tho it is very easy) is the cute way its solved...really gels in with the theme of "stink". In fact I have played with another of Yoh Kaduda's, the "Anteater" and that one is also very easy. Some may feel that the puzzling experience of some Karakuri puzzles do not justify the cost...well to each his own. I tend to look upon a Karakuri puzzle as a sculpture or work of art that also happens to be a puzzle.
Yoh Kakuda, who is one of just several puzzle craftswomen, among the many men in the Group has so far centered her creations mainly around animals. The Skunk Attack was made by her in early 2011.
It is made from a combination of woods including Wenge, Cucumber and Shiuri Cherry. Karakuri puzzles are of really exceptional build quality and craftsmanship, which accounts for their high retail price. And the Skunk is no different. The refinement and attention to detail of the puzzle is incredible. Even the packaging is high class. My Skunk Attack came in a rectangular blue box and if you didn't know it contains a puzzle, you would probably have thought it was something from Tiffany's. (For those less well informed, Tiffany's is a luxury goods and jewelry retailer whose trademark colour is egg blue, quite similar to the colour here).
From a puzzling perspective, the difficulty levels of Karakuri puzzles vary greatly. They can range from being extremely difficult right down to downright simple (ie; one or two moves to solve). If I had to grade my Skunk Attack, I would say its probably 1 or 1.5/10. For experienced puzzlers, no sweat at all.
The object here is to open a secret drawer. What I like about the Skunk Attack (even tho it is very easy) is the cute way its solved...really gels in with the theme of "stink". In fact I have played with another of Yoh Kaduda's, the "Anteater" and that one is also very easy. Some may feel that the puzzling experience of some Karakuri puzzles do not justify the cost...well to each his own. I tend to look upon a Karakuri puzzle as a sculpture or work of art that also happens to be a puzzle.
Sunday, 7 December 2014
Cross & Crown 2013
The Cross & Crown (C&C) puzzle you see here is not a modern puzzle design by any means, no, not at all. In fact, the C&C has its roots in a puzzle designed by Louis S. Burbank in 1913, which was patented by the US Patent Office.
The C&C was Dr Goetz Schwandtner's IPP34 Exchange Puzzle. It all started when Goetz had a chance to see and play with a very rare metal version of the original design belonging to puzzle collector Rob Stegman at IPP32. Goetz collaborated with another collector, Michel van Ipenburg and together, worked with IPP31 award winning designer Robrecht Louage to reproduce the version that we have today, making it available to puzzle enthusiasts.
The modern C&C is made of trespa, a strong and durable material widely associated with table surfaces. Metal would have been too expensive and impractical for production in large quantities. The puzzle is precision cut to tight tolerances but everything slides smoothly as intended. Quality of construction and finish is very good like in all of Robrecht's work.
The C&C is a N-ary puzzle. I still have little idea what this means but you can see examples of these and read more about it on Goetz's site. Like the original design, the C&C consists of a "cross" pivoting on a circular disc containing cut-outs. Both the cross and disc are "linked" by four rivets that can slide along each arm of the cross as well as along the channels of the cut-outs. The object is to move all the rivets through these zig-zag channels and reach a point at the end where the cross can be disengaged from the circular disc.
Like an N-ary puzzle, there is a kind of repeating pattern of moves (this aspect I know!); sort of a back-and-forth motion. I have played with several other n-ary puzzles such as the Lock 250, Alles Schiebung and Numlock and have solved them without help. Yet, for this C&C, despite spending a lot of time on it, I just could not get beyond a certain point and found myself keep getting stuck halfway. Perhaps I am way off-tangent on this one, but I am finding the C&C very difficult!
N-ary puzzles exist in all styles, shapes and sizes. The Chinese Rings is perhaps the early originator of such puzzles but it is binary rather than N-nary. The C&C is yet another example of a growing number of N-ary puzzles that have come to the market since Jean-Claude Constantin's 1250-move Kugellager a while back. For those keen to acquire a copy of C&C, you can contact Goetz via his puzzle site.
Puzzle Master of Canada and Mr Puzzle of Australia also retail different N-ary puzzles, as do Wil Strijbos.
The C&C was Dr Goetz Schwandtner's IPP34 Exchange Puzzle. It all started when Goetz had a chance to see and play with a very rare metal version of the original design belonging to puzzle collector Rob Stegman at IPP32. Goetz collaborated with another collector, Michel van Ipenburg and together, worked with IPP31 award winning designer Robrecht Louage to reproduce the version that we have today, making it available to puzzle enthusiasts.
The modern C&C is made of trespa, a strong and durable material widely associated with table surfaces. Metal would have been too expensive and impractical for production in large quantities. The puzzle is precision cut to tight tolerances but everything slides smoothly as intended. Quality of construction and finish is very good like in all of Robrecht's work.
The C&C is a N-ary puzzle. I still have little idea what this means but you can see examples of these and read more about it on Goetz's site. Like the original design, the C&C consists of a "cross" pivoting on a circular disc containing cut-outs. Both the cross and disc are "linked" by four rivets that can slide along each arm of the cross as well as along the channels of the cut-outs. The object is to move all the rivets through these zig-zag channels and reach a point at the end where the cross can be disengaged from the circular disc.
Like an N-ary puzzle, there is a kind of repeating pattern of moves (this aspect I know!); sort of a back-and-forth motion. I have played with several other n-ary puzzles such as the Lock 250, Alles Schiebung and Numlock and have solved them without help. Yet, for this C&C, despite spending a lot of time on it, I just could not get beyond a certain point and found myself keep getting stuck halfway. Perhaps I am way off-tangent on this one, but I am finding the C&C very difficult!
N-ary puzzles exist in all styles, shapes and sizes. The Chinese Rings is perhaps the early originator of such puzzles but it is binary rather than N-nary. The C&C is yet another example of a growing number of N-ary puzzles that have come to the market since Jean-Claude Constantin's 1250-move Kugellager a while back. For those keen to acquire a copy of C&C, you can contact Goetz via his puzzle site.
Puzzle Master of Canada and Mr Puzzle of Australia also retail different N-ary puzzles, as do Wil Strijbos.
Tuesday, 2 December 2014
A Coffin Puzzle
Nope...this is not a puzzle from a super famous designer of the same name we all know so well.
But this puzzle (a.k.a Escape The Plague, ETP) is actually the design of and IPP34 Exchange Puzzle from Kate Jones, who runs Gamepuzzles, a US online retailer of games and puzzles, the latter which are also all designed in-house.
If there was a prize at IPP34 for packaging, ETP would surely have won hands down for originality. ETP is a "maze connection" puzzle where the first challenge is to form a single "escape route", by placing the 16 square tiles within a square formed by the 4 side strips and navigating from the start point (red dot) to the exit gate (round dot). The second challenge is the arrange the tiles to form separate loops.
ETP was designed around the theme of The Great Plague Of London, a major epidemic which killed hundreds of thousands of people in England during 1665-1666.
In "deathly" fashion and true to its theme, the laser cut tiles and strips are packaged in a miniature wooden coffin; which is probably just large enough to contain a small (dead) rat. The puzzle even comes with a sheet containing instructions and the history of The Great Plague.
The puzzle has more than one solution and the total number of solutions are not known. Kate is offering a nice prize to the first puzzler that can offer proof of the number of solutions. Well, I wasn't gunning for Kate's prize but merely content to find at least one solution. And I did! While not very difficult, it's no walk in the park either. There are 16 possible positions for the tiles and each tile has 4 different orientations. The side strips forming the square have 6 possible arrangements. To top it off, the route has to run through each of the 16 tiles as well as along all the 4 strips in a single continuous direction with no doubling back or crossing paths. It took me a while to figure out the entire route and I encountered several dead ends along the way before finally reaching the exit.
ETP is limited to 125 copies, so there may still be some left. If anyone is interested, you may contact Kate via Gamepuzzles.
But this puzzle (a.k.a Escape The Plague, ETP) is actually the design of and IPP34 Exchange Puzzle from Kate Jones, who runs Gamepuzzles, a US online retailer of games and puzzles, the latter which are also all designed in-house.
If there was a prize at IPP34 for packaging, ETP would surely have won hands down for originality. ETP is a "maze connection" puzzle where the first challenge is to form a single "escape route", by placing the 16 square tiles within a square formed by the 4 side strips and navigating from the start point (red dot) to the exit gate (round dot). The second challenge is the arrange the tiles to form separate loops.
ETP was designed around the theme of The Great Plague Of London, a major epidemic which killed hundreds of thousands of people in England during 1665-1666.
In "deathly" fashion and true to its theme, the laser cut tiles and strips are packaged in a miniature wooden coffin; which is probably just large enough to contain a small (dead) rat. The puzzle even comes with a sheet containing instructions and the history of The Great Plague.
The puzzle has more than one solution and the total number of solutions are not known. Kate is offering a nice prize to the first puzzler that can offer proof of the number of solutions. Well, I wasn't gunning for Kate's prize but merely content to find at least one solution. And I did! While not very difficult, it's no walk in the park either. There are 16 possible positions for the tiles and each tile has 4 different orientations. The side strips forming the square have 6 possible arrangements. To top it off, the route has to run through each of the 16 tiles as well as along all the 4 strips in a single continuous direction with no doubling back or crossing paths. It took me a while to figure out the entire route and I encountered several dead ends along the way before finally reaching the exit.
ETP is limited to 125 copies, so there may still be some left. If anyone is interested, you may contact Kate via Gamepuzzles.
Sunday, 30 November 2014
The Kray Twins
The Kray Twins, designed by Steve Nicholls was also his Exchange Puzzle during IPP34 in London this past August. For those of you non-English folks who may not know who the Kray Twins were, they were notorious gangsters that were responsible for much of the organised crime in London during the 1950s and 1960s.
The puzzle is 3D printed in ABS resin and has six pieces comprising three congruent pairs in three colours. The puzzle holds itself together pretty well with tolerance between the pieces just right. This allows the pieces to slide pretty smoothly and no force whatsoever was needed for my copy.
This one is a "diagonal" burr with sixty degree angles; thereby making it much more confusing and harder to solve than a traditional rectilinear burr, the latter, depending on the number of moves, is already by no means easy.
This notoriously difficult puzzle has a level 6.10.6.12.6 solution (total 40 moves), meaning it takes 6 moves to remove the first piece, followed by 10 for the second and so on. Once you get past the first six moves, you will understand why its called the Kray Twins. This one really stumped me for a long time. I just could not get past move six for some reason.
I contacted Steve for the solution and after studying the Burr Tools file; I realized where I had gone wrong. It was unlikely I could have solved this one on my own without help. Even with Burr Tools, focus and concentration was needed to get the moves right. I found the re-assembly even harder than the taking apart. The angles just seem to make it so much harder!
Overall IMHO, a very difficult puzzle, but I am lousy at burrs anyhow. Experienced burrists may probably find it a less of a challenge perhaps.
Steve runs a 3D printing website (www.threedyprinters.com) so if you would like a copy of the Kray Twins, I am sure he would be most happy to make you a one...and possibly with the colours of your choice too!
The puzzle is 3D printed in ABS resin and has six pieces comprising three congruent pairs in three colours. The puzzle holds itself together pretty well with tolerance between the pieces just right. This allows the pieces to slide pretty smoothly and no force whatsoever was needed for my copy.
This one is a "diagonal" burr with sixty degree angles; thereby making it much more confusing and harder to solve than a traditional rectilinear burr, the latter, depending on the number of moves, is already by no means easy.
| 6 pieces all with diagonal cuts and 3D printed in red, white and blue, representing the colours of the Union Jack :-) |
This notoriously difficult puzzle has a level 6.10.6.12.6 solution (total 40 moves), meaning it takes 6 moves to remove the first piece, followed by 10 for the second and so on. Once you get past the first six moves, you will understand why its called the Kray Twins. This one really stumped me for a long time. I just could not get past move six for some reason.
I contacted Steve for the solution and after studying the Burr Tools file; I realized where I had gone wrong. It was unlikely I could have solved this one on my own without help. Even with Burr Tools, focus and concentration was needed to get the moves right. I found the re-assembly even harder than the taking apart. The angles just seem to make it so much harder!
Overall IMHO, a very difficult puzzle, but I am lousy at burrs anyhow. Experienced burrists may probably find it a less of a challenge perhaps.
Steve runs a 3D printing website (www.threedyprinters.com) so if you would like a copy of the Kray Twins, I am sure he would be most happy to make you a one...and possibly with the colours of your choice too!
Subscribe to:
Posts (Atom)