Wednesday, 28 March 2012

Aluminium Washer Cylinder

In September 2011, I reviewed William Strijbos' Aluminium Cylinder Box. In the last several weeks, I got around to trying out his sequel to the Cylinder box, the Washer Cylinder. I had thought that the earlier Cylinder Box was difficult...well, this second one was even more difficult than I imagined and what an unexpected surprise at the end! I acquired my copy directly from William and its currently available from Finnish online retailer Oy Sloyd Ab as well. My puzzle was engraved No 13...hmm....


The Washer Cylinder is slightly taller than the Cylinder box at 5.5cm with a diameter of 4cm. Made completely of aluminium, it bears all the usual hallmarks of a high quality Wil Strijbos puzzle. Similar to the Cylinder Box, the Washer Cylinder has a cap which can rotate freely and smoothly in either direction (but this one does not have any spring-back effect like the Cylinder Box). Externally, the Washer Cylinder takes on more of a matt surface than a shiny one adorning its predecessor. Shaking the cylinder, one can also hear a number of ball bearings spinning around inside. And of course the object here is to remove the cap from the cylinder body, which will in turn lead to the removal of a washer at the bottom of the cylinder.

Cylinder Box on the left and the taller Washer Cylinder on the right
I should have known better not to try to open the Washer Cylinder like how I did for the Cylinder Box, but I went ahead anyway to no avail! I tried all sorts of ways and means including tapping, knocking and shaking but nothing worked. I read the reviews by Allard, Oli and Kevin (including checking out Kevin's x-ray photos of the cylinder) to see if I could gain some clues and insight into the puzzle...but here no luck as well....again I should have known better than to expect puzzle bloggers to reveal any secrets.

After quite a while of trying, I decided to put away the puzzle and give it a rest...just like I did with the Cylinder Box previously and made up my mind to come back to it some time later. But right about the same time, William sent out an email containing a number of clues/hints (with photos of various opened puzzles and the obligatory requisite spoiler warnings) to all the owners of the Washer Cylinder (from No1, basic clue to No 5, the solution). From the pretty long list of owners on record, it seems only a handful of puzzlers had managed to solve the puzzle on their own. So it was back to the Washer Cylinder for me...after all, now with Wil's hints in my email, I couldn't resist giving the Washer Cylinder another stab immediately. I started with hint No1 but nothing happened, went on to No2, still nothing happened....well, to cut a long story short...I finally had to resort to hint No5 before I managed to remove the cap.


The way the cap was designed to open was a real surprise for me! I did not expect it to open the way it did. To be honest, without Wil's hints, I don't think I would have solved the puzzle on my own, at least not for quite a while, although I would like to think I got quite close at one point. Lets just say I got side-tracked and distracted by some red herrings (aka bearings).

After the cap was removed and as I looked at the insides of the puzzle, I was pretty amazed at the precision machining that went into the making of the puzzle and how everything was constructed to such tight tolerances. Comparing the Cylinder Box and the Washer Cylinder, now that I know both solutions, I would say that the latter actually is easier to solve than the first puzzle with a somewhat simpler but unique mechanism, provided the correct steps are followed. Of course I am able to say this only now with the benefit of hindsight.

Overall, I would say that as difficult as it was for me, I think this is a fantastic puzzle worth the not inexpensive price. Very well made overall and I did not experience any jamming problems as a couple of puzzlers had. Definitely a collector's item and I am already looking forward to the next incarnation of the Aluminium Cylinder!

Tuesday, 20 March 2012

Star Shape 3.5sun Japanese Puzzle Box

This star-shaped puzzle box was acquired from Japanese craftsman Hiroyuki Oka from his Etsy online shop. This is my first real traditional Japanese puzzle box and I was drawn to its different shape and design. Made of walnut and Japanese Keyaki with different colour tones, combined with a mosaic pattern (Yosegi) on the top and bottom surfaces, the box measures 9cm x 10.5cm x 4.7cm. In Japanese puzzle box dimensions, this is considered a 3.5sun box, 1sun = 3cm. Quality, fit and finish is excellent and all the moving parts slide against each other snugly but smoothly.


This box requires 5 moves to open. Like most Japanese puzzle boxes, the opening requires a sliding of panels which form the sides of the box. While not difficult from a puzzling perspective, it does require a bit of trial and error to figure out which panels to move and in which particular order. Given the odd shape, the usable space inside the box is very limited but you can still place small items like rings, keys and jewellery, but not all of it together tho'. Not that the box would afford any serious protection against theft, as the panels which form the shape of the box are all very delicately cut to fit and mesh against each other so precisely. Really quite amazing when you look at the craftsmanship and attention to details found on the inside. In the closed position, the box feels solid when handled but excessive use of force or abuse is definitely to be avoided, especially when sliding the panels.

Overall a nice and unusual shaped box which is out of the norm. At a very reasonable price of US$48 with worldwide shipping of US$7.40, the latter damn cheap compared with many other online puzzle retailers, I think this is one item that puzzle box lovers should get their hands on.

Wednesday, 29 February 2012

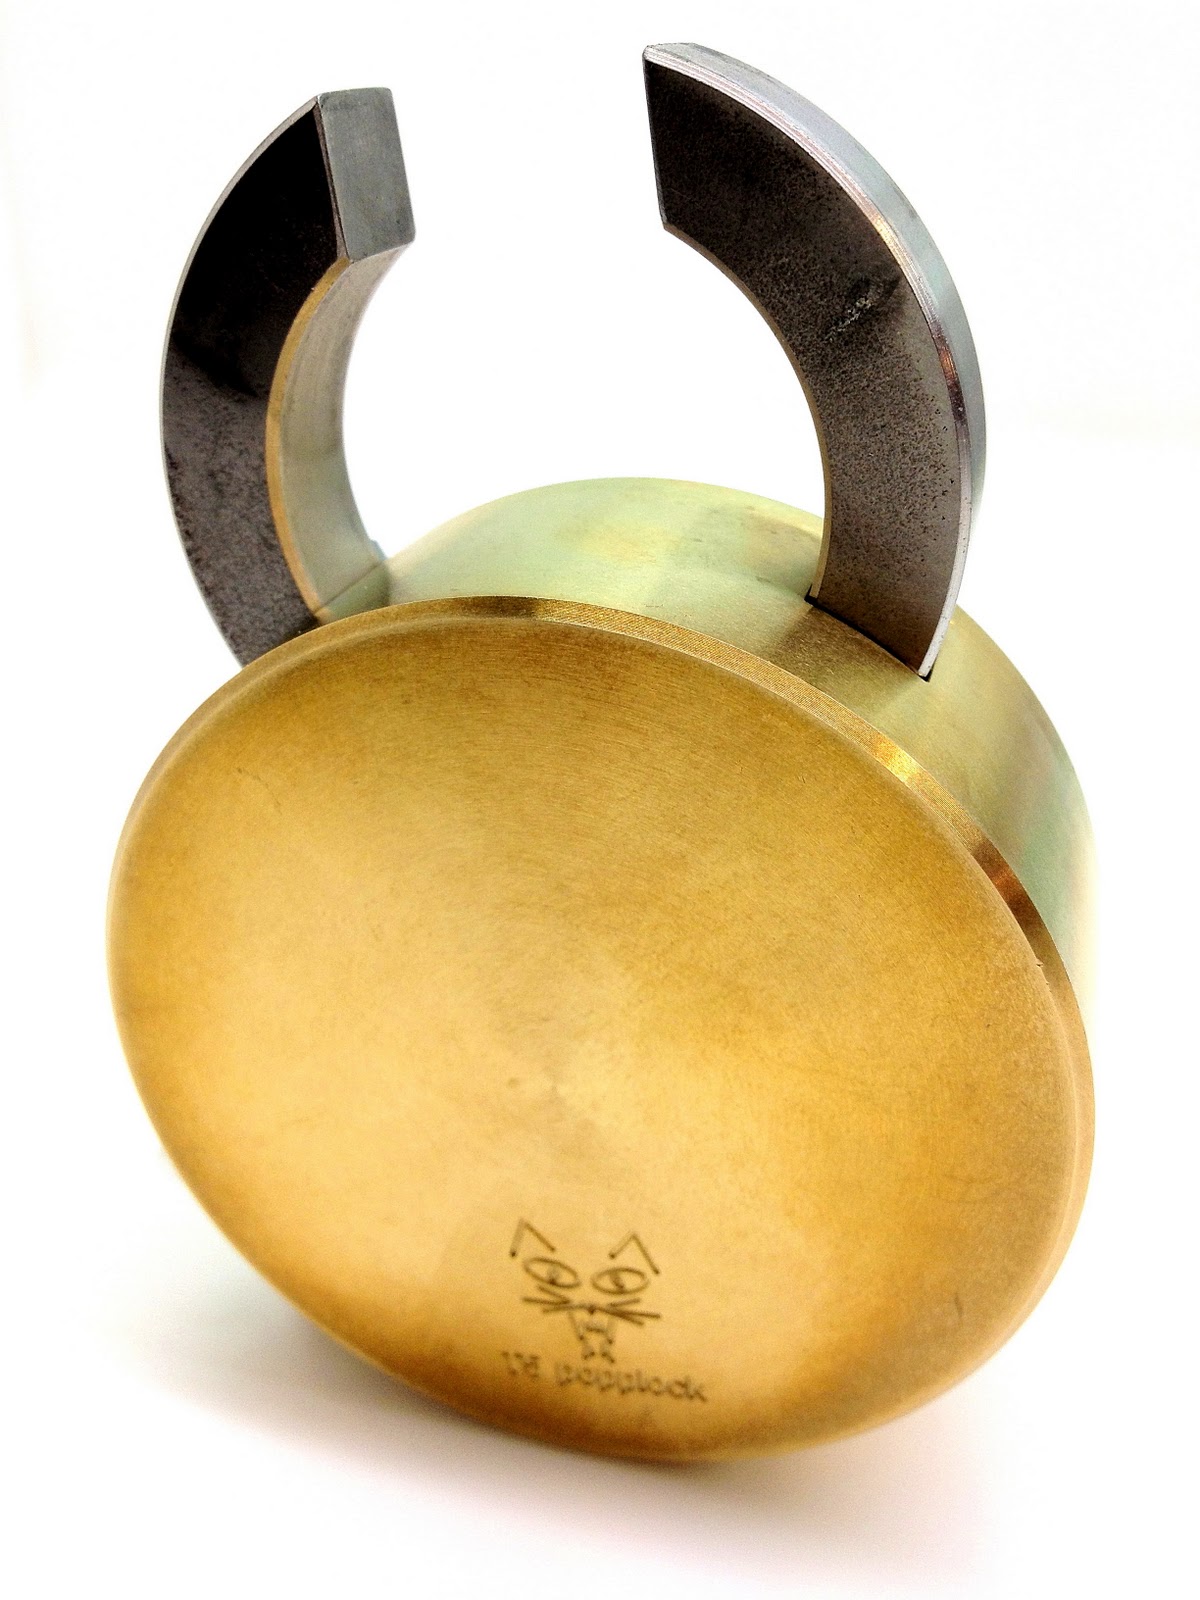
Popplock T6

In January this year, I had reviewed the Popplock T3 and Popplock T5 in this blog. While sufficiently challenging, both the T3 and T5 were the two easiest of the Popplock series to solve. This is not to say they are easy; not at all, but easier than the rest. With the T6, the difficulty quotient seems to have gone up several notches. It took me a couple of weeks over a number of sessions before I managed to "crack" it open.


Measuring a diminutive 5cm x 4cm x 1.5cm in the locked position, the T6 is the smallest in the Popplock series and also the most affordable. The T6 is made of 4 layers of steel held together by rivets (here owners have a choice of copper or aluminium) to form the lock body. I chose the copper rivet version as I felt a contrast of colours gave the lock more character and uniqueness. The twin shackles are also formed from two thick layers of steel. All this is probably necessary to keep the cost down. The rest of the series from T1 to T5 is milled from a single block of brass (with the exception of the Limited Edition all-steel T2). While the T6 is a fraction of what it's larger siblings cost, there is no lacking in quality.

In the usual Rainer Popp style, the construction, fit and finish of the T6 is excellent. Despite its small size, the T6 still feels relatively hefty in the hand and probably serves its function as a normal lock just as well as a non-puzzle lock of similar dimensions.

Depending on how you count, there are a total of 5 or 6 steps to opening the lock. To those who are still struggling with the T6, the rivets do not play a part in the solving, neither does just simply inserting the key into the keyhole and trying to unlock it in the usual way. To solve it, you must turn the key in a certain way and in different directions. However, this will only get you to about the second last step of the solution. There is one final step which must be executed before the shackles can be released. This final step is totally unexpected for a puzzle of this nature. It really came as a real surprise to me when I eventually discovered it after my longish struggle with the T6. A very clever and usual mechanism indeed! Hint: there is a clue left by Rainer to give some indication how the shackles might be released but you have to study the T6 carefully.

Overall, a very challenging puzzle lock with a surprising twist at the end. If this is any indication of the increasing level of difficulty of the next two locks in the series I am going to attempt, ie the T2 and T4, well, I would have to hunker down for a long and arduous battle ahead....stay tuned for my review of the T2 after I have solved it!

Four other puzzlers have reviewed and given their thumbs up to this tiny lock which packs a quite a wallop. Do check out Neil's, Oli's, Allard's and Kevin's blogs for their take on it.

Saturday, 18 February 2012

Knot Simple

The Knot Simple is another of Doug Engel's many interesting puzzle designs. I had reviewed his Great Collision in an earlier post. Measuring about 5cm x 5cm x 5cm, it consist of three interlocking U-shaped pieces. For an all-metal puzzle, it is really good value for money at only CS$9.99 from PuzzleMaster of Canada. My shipping charges to Singapore cost me twice as much  :-(


The puzzle pieces are entirely made of (what I think) is brass and each piece has been coated (or anodised) a different colour; gold, silver and copper. Quality and fit and finish for the price is surprisingly pretty decent. Although I have to say that once you play with the puzzle, rub marks start to form on the shiny surfaces...but then again, what do you expect for CA$9.99?

The object of the Knot Simple is to take apart the three interlocking pieces. This is "knot" that difficult. I managed to separate the three quite quickly; mainly through trial and error, fiddling and pulling each piece here and there, trying to figure what works. Putting the puzzle back together was also pretty easy, since there are only three pieces to work with. While the top photo appears to show a tightly fit unit, this is not really the case. When the puzzle is picked up, there is a fair amount of free-play between the pieces, hence don't expect the dis-assembly to be smooth and precise like that of a burr.


You may think that all the three pieces look identical, but not so. There are actually minor differences in the shape of each piece upon closer inspection. This because there is really an intended sequence to disengaging the pieces, although I didn't really know this at the time of solving, since I was just trying to move whichever piece that could move. Later as I checked the accompanying solution, I saw the sequence of dis-assembly and re-assembly which was in accordance with the colour of the pieces.

PuzzleMaster rates it at level 7 but I think its more a 6. There also appears to be a disparity between the printed copy of the solution and the puzzle itself; the colours assigned to the pieces in the diagram of the solution do not match the actual pieces of the puzzle. Either the diagram was wrongly printed or the pieces were coated with the wrong colours; I think its easier to change the former (NB: To the folks at PuzzleMaster, please take note).

Wednesday, 15 February 2012

Havana's Box No 1

I was really lucky to get my hands on this last unit of Eric Fuller's Havana's Box No 1. I had missed out on the opportunity to purchase one when 40 boxes were available for sale on Eric's Cubicdissection online store. So when Eric recently emailed me saying that he had this one No1 box left (apparently someone had ordered it but didn't follow up with the requiste payment), I immediately bought one without hesitation. About a week or so later, the box arrived at my home. How Eric came about making the No1, which is the first in a series of more to come and why it was named "The Chris", you can read about it here.


First impression is that the No1 looks much better in the real thing than in photos. It is made entirely of Sapele with darker coloured Wenge adorning both the top and bottom of the box. The Wenge surface is "ribbed", hence apart from giving the top and bottom sides a different colour tone from the rest of the box, it also feels textured which makes handling more grippy. Dimensionally the No1 is 18.5cm long, 3.8cm wide and 3.8cm tall. Quality of construction, fit and finish is excellent and attention to detail is superb.


The object of the No1 is to open the box and remove a cigar within (yes, its a real smokable cigar under the brand Free Cuba). I would not say the No1 is difficult, but tricky perhaps. I managed to open the box within several minutes, after some trial and error pushing and sliding the panels of the box. However the mechanism which keeps the box locked is rather clever. Even after I had opened the box and examined the insides, short of ripping things apart to see more and damaging the box forever, I am still not too sure how the locking and unlocking mechanism works. There are in my solution 6 steps to opening the box completely. I say "completely" because half the steps will only get you half the box opened. You may think that you have solved the puzzle, but not yet!.....you cannot get the cigar out with only the box half-opened. Unless you deliberately bend the cigar and force it out...but I don't think that's the way Eric intended. Well I am quite happy I got it fully opened and can now open it quickly and repeatedly without a cinch.

The No1 being the first is the easiest to solve and the rest of the series will come with increasing difficulty. What I really like about it is the design of the box (having a slim long oblong shape, quite different from the traditional Japanese trick boxes) and the rather clever way it is opened. If you don't want to leave the cigar inside, you can use the No1 as a nice wooden box to hold some pens, although it is probably too short for brand new pencils. It may be expensive, but it is certainly worth the money and definitely worth acquiring.

Like Brian, Roxanne and Allard, (who have all reviewed the No1 in their respective blogs and have only positive things to say), I am also eagerly looking forward to No2!

Saturday, 11 February 2012

Iso Crate

This puzzle was designed by the late Robert Rose who's other well know award winning puzzle is the Six Key Mine reviewed some time back in this blog. Measuring about 4.5cm x 4.5cm x 4.5cm, this cube puzzle is made of aluminium and anodised in gold colour. Quality of my copy is only average as there were a number of marks on the pieces and the fit and finish was really not quite up to par. My copy was produced by PuzzleMaster of Canada and sold to me by online retailer Serious Puzzles in the US.

The Iso Crate consist of 8 individual L-shaped pieces and the object of the puzzle is to "assemble" the pieces to form a cube with a hollow centre. Quality issues aside, what is unique about the Iso Crate is that the individual pieces need to be "locked" together via the use of magnets. Within each L-shaped piece are 3 round magnets, situated at the ends of the piece. The trick is the find the "like" poles of the magnets in the pieces to join them together. If you have an "unlike" pole, the pieces would simply repel each other.


While not unduly difficult, the Iso Crate still provides a fair bit of challenge as I found myself trying each piece to find the matching poles to form the cube. PuzzleMaster rates it as level 8 but I think its more of a level 7. What especially is useful in aiding the solving is that all the black magnets must not be visible on the outer surfaces, so this helps quite a bit in the orientation of the pieces with each other. Also there is one piece that has a bevelled corner so this piece can act as the reference point for the rest.

Overall pretty fun to play with as you fiddle with the pieces and find them trying to steer away from each other when the magnetic poles are mis-matched. Even as I was taking the photo of the loose pieces, I had to arrange them sufficiently far apart less some of the pieces would attract and stick together. Pity my copy is let down by the less than satisfactory quality.

Wednesday, 8 February 2012

Cross Threaded

This is my first bolt and nut puzzle (not counting my Hanayama Cast Nut Case reviewed earlier in this blog) and it came from Mr Puzzle Australia. Measuring 8.5 cm long with a bolt head 3cm across, the Cross Threaded is big, heavy and a real handful. Made of brass with its patina finish giving it an aged look, this bolt puzzle really looks like a genuine part from some hugh machine. My copy is from the Enigma Series and overall quality is good.


The object of the puzzle is of course to remove the nut from the bolt. It is a tricky puzzle. Initially when I first started playing with the puzzle, I could not even move the nut a bit. It was screwed tight to the point where I really thought the parts were jammed. I did not expect that the nut could be unscrewed in the normal fashion (afterall, it can't possibly be so easy right?, given that it has a difficulty level of around 7). But I did the obvious anyway, trying to unscrew it, in both directions. Nevertheless the nut refused to budge.


I tried some of the tested methods like as tapping, banging and shaking, thinking that these may help and lo and behold, after knocking the bolt a couple of times on my puzzle table, the nut moved ever so slightly and here is where I suddenly discovered the solution to removing the nut. Once I had separated the nut from the bolt, I realised that the way the nut is kept in place is actually quite simple but clever. TIP: no force is needed to solve this puzzle.

Overall a nice tricky little bolt puzzle and as stated by Mr Puzzle Australia, it is "hard but not extreme".....I agree. If you are into bolt and nut puzzles, well worth acquiring since it is also good value for money.

Saturday, 4 February 2012

Platypus

This nice little interlocking animal puzzle came from Mr Puzzle Australia. Made by Australian jewellery designer Kathy Bass, who has produced four other animal puzzles in the series, these have been termed as "the poor man's Berrocals". Just in case you have never heard of who Miguel Berrocal is and his amazing "torso" puzzles, check out the website featuring the man and his work.


The Platypus is not large, measuring about 8.5cm from nose to tail and 4.5cm at its widest from left webbed forefoot to right webbed forefoot. It is handmade of pewter and the surface finished with bronze oxide. Mr Puzzle Australia informs me that a real platypus in the wild is of a similar body colour. My copy is very well made and quality, fit and finish is excellent. Well I suppose one cannot expect anything less, since this is meant to be an ornamental display piece.


Consisting of 6 interlocking pieces, the object of the puzzle is to take the Platypus apart. This is a relatively easy process and the moment you remove the first piece (and it is not hard to determine which part of the Platypus is the first piece), the rest of the individual pieces can be removed pretty easily. Like many take-apart puzzles, there is still a sequence of steps here to follow, so if you happen to try to remove the wrong piece, nothing will come apart. There is, however no need whatsoever for a computer software such as BurrTools to find the solution. Assembly is everything done in reverse (but a bit more tricky) and the Platypus becomes whole again.

Overall, a very nice and well-crafted display item for the desk or mantle, which also does double duty as a mechanical puzzle.

Saturday, 28 January 2012

Man The Torpedo

Man The Torpedo is very similar to the Cast Cage and Aluminium Hedgehog In Cage puzzles, both of which have been reviewed earlier in this blog. The goal is to remove an object from within an enclosure or cage.
In this instance, the object is the "torpedo" a stubby solid aluminium cylinder with 8 brass rods/spikes of varying lengths sticking out.The enclosure or cage consist of two solid aluminium rings connected in-between by 6 brass rods. The Torpedo puzzle is 7.8cm tall and 5cm across in diameter. It is just the right size, not too large or small for average size hands and comfortable to hold. The spacing between the brass rods is also wide enough so that you can comfortably handle and manipulate the torpedo with your figures. Even larger fingers should have no problem, since you can grip the spikes quite easily.

My copy of the puzzle came from PuzzleMaster of Canada and its overall quality, fit and finish here is good. Unlike similar plastic ones, this metal version has a good weight to it and feels sturdy and solid.


From a puzzling aspect, it is not a difficult puzzle. A fair bit of patience, dexterity and finger work is required to manoeuvre the torpedo out of the cage. While externally it may look rather simple considering the cage bars seem to be widely spaced apart, it is actually quite tricky to get the torpedo through them. The obstacle being the different length spikes that are protruding from the torpedo, which tends to get the torpedo stuck in all sorts of positions inside the cage preventing any exit.

I spent a good half an hour or so before finally managing to release the torpedo out. There was a lot of turning, pulling and twisting and at one point, I must have applied a little too much force and even caused the torpedo to get temporarily jammed between the bars. Putting the torpedo back inside was easier and I managed this within several minutes. However, taking it out again required more time, but it didn't take me as long as the first time.

PuzzleMaster rates it at 8/10 for difficulty but I would put it at 6.5/10....it is fairly challenging but not unduly difficult. Personally I also think the Torpedo puzzle is quite unusual looking and does look pretty good sitting atop my desk.

Tuesday, 24 January 2012

Brass Treasure Chest

Update 23 October 2017 - Dear Reader, please check out my new puzzle blog and e-store at http://mechanical-puzzles.com

The Brass Treasure Chest is a cute little puzzle which I obtained from PuzzleMaster of Canada. Designed by Rocky Chiaro and made entirely of brass, the chest measures 5.4cm long, 2.6cm wide and 3.3cm tall. It is a little box which sits on four short legs and has a diagonal criss-cross pattern on the top of the 6mm lid. While the fit and finish is not perfect, the overall quality and construction of my copy is generally good (and taking into account the puzzle aspect) I would consider it value for money. Despite its smallish size, the chest feels heavy and solid in the hand.

The swirly mark on the front side of the chest  bears Rocky Chiaro's signature
The object of the puzzle is to open the Treasure Chest (ie the lid). Upon unwrapping the chest, I can hear within the chest "parts" that appear to be loose and moving about inside. I cannot be sure if they are ball bearings or not but definitely there appears to be at least two moving pieces. Initially I tried the few ways that I am aware of to try to open the chest, such as those employed in the Aluminium Dovetail, Moscow, Cast News and Fire Plug puzzles, all reviewed earlier in this blog.

Those who have solved any of these puzzles would know what I am talking about. I banged, tapped, spun and turned the puzzle in all manner of directions but to no avail. At one point I did manage to swing the lid open several millimetres in either direction but it remained firmly "locked" in place and would not budge beyond that.

Something interesting awaits those who succeed in opening the Treasure Chest

I puzzled over the chest for several days and just as I was about to give up on what I was doing, suddenly the lid swung open to reveal a empty cavity. While I did have an "A-ha" moment, this was temporary because when I looked at how the lid was locked in place, I knew I had got it opened purely by chance. I didn't really know what I had done correctly up to this point. Closing the lid was even much harder, the lid simply refused to close. Somewhere deep inside the chest and hidden from view, Rocky had designed a mechanism which requires one to solve the puzzle through a pre-determined sequence of steps with dexterity, very similar to the Centrale and Remove The Yoke puzzles.

This is very difficult as one cannot see whatever is going on with the mechanism inside the chest. This was confirmed when I downloaded the solution from PuzzleMaster. I counted a sequence of 10 steps to open the lid and 8 steps to close it....something which would have been impossible for me to carry out without the solution. PuzzleMaster rates the Treasure Chest 10/10 on the scale of difficulty. I fully agree. If the scale was 15, I would say the puzzle is around 13/15.

Once you have seen the solution and memorised the steps, repeated solving becomes very easy. If you like a real challenge that you cannot see, well here's the puzzle for you! The chest is also very sturdy and strong and there is enough space inside to put something small, like a 1-carat diamond ring. Well, if you have nothing to place inside, the chest performs quite well as a shiny paperweight.

Sunday, 22 January 2012

Houdini's Torture Cell

Houdini's Torture Cell ranks as one of the top puzzles amongst the mechanical-puzzle blogging group (see Oli's, Allard's, Kevin's and Neil's reviews where all have given the thumbs up!). My guess is that it is also probably the favourite of many puzzlers out there. Designed and made by Brian Young of Mr Puzzle Australia, the Houdini was Brian's exchange puzzle at IPP31 in Berlin last year. It is currently available from Mr Puzzle Australia (and I think William Strijbos has a few left as well).


The Houdini measures 10cm x 4.8cm x 4.8cm and is made of a combination of wood (not sure what type tho'), acrylic and metal. The Houdini consists of a vertical acrylic square hollow tube placed on a wooden pedestal. Inside the acrylic tube is a small ball bearing that rolls around. On the top is a round wooden peg inverted into the acrylic tube. This peg represents Houdini (who himself was actually tied and suspended upside down during his first public performance in the Torture Cell at the Circus Busch in Berlin in 1912). Quality, construction, fit and finish of my copy is overall very good (although there was a little roughness on the edges of the top and bottom wood blocks inside the acrylic tube).

The object of the puzzle is to free Houdini from his upside down position (ie to get the peg to become right side up). Everything that is needed to get the wooden peg (Houdini) right side on top of the tube is found within the puzzle itself. Within the puzzle are also a number of magnets as one would gradually discover. There is no need for external tools and certainly no force whatsoever in the form of banging, tapping, shaking the puzzle etc is necessary (and Brian states this in the accompanying puzzle leaflet). For this puzzle, you can see everything you are doing... just the kind of puzzle I like very much! From my own experience here, there are 7 steps needed to free Houdini and make the peg upright. The Houdini is a sequential puzzle in that you must go through all the necessary steps one at a time (and in the correct sequence) to finally solve the puzzle.


For me, the Houdini is a relatively easy puzzle and I was able to solve it in under 10 minutes (TIP - nothing is hidden from view.... if you examine the puzzle carefully and spend some time thinking first, you will probably be able to figure out how the puzzle is solved). Notwithstanding, I enjoyed this puzzle very much because I can see and am aware of the progress (or regress) of each step that is needed to take me to the final solution; that is getting the inverted peg from inside the acrylic tube to the top in the upright position. I got more and more excited as I got closer to the end. As a puzzle, the Houdini is rather elegant in its simplicity...yet the design approach and solution are both very unique. All that makes for a very unusual and interesting yet sufficiently challenging puzzle for most people. The Houdini in my opinion is really a breath of fresh air and differentiates itself from the normal and traditional genres of puzzles we are generally accustomed to.

Tuesday, 17 January 2012

Popplock T5

After solving the T3 recently, I decided to try my hand on my next puzzle lock, the humongous T5. Although the T5 is the fifth lock in the Popplock series, from what I gather, its the second easiest to solve after the T3.

The T5 is a monster! Measuring a massive 10cm tall, 7cm wide and 4.4 cm thick, it weighs a whopping 900g.  That's about a third more than a Revomaze Extreme, which is considered already very heavy for a puzzle. Your hands get tired quickly while playing with this puzzle lock. The T5 is reminiscent of the old style "bullring" locks. The T5 body is milled out of a solid block of brass while the shackle is made of stainless steel. Quality of the T5 is first class with excellent precision, fit and finish. This puzzle feels super solid and probably can withstand anything short of a nuclear explosion. But such quality comes at a price and the T5 like all the other Popplocks, is very expensive. Notwithstanding, this solid T5 will outlast me and be puzzled over by my descendants from the next couple of generations. About 100 of these locks were produced in 2010 but currently none are commercially available except perhaps through private sales.


There are 4 steps to unlocking the T5 and I easily discovered the first 3. However the last step eluded me for quite a few days. Each time I would get stuck after step No3 and spend a long while pushing, twisting and pulling at the various parts of the T5 in my vain attempts to free the shackle...but with no success. Both Oli and Brian had commented in their blogs that the final step is the most challenging and the key (no pun intended) to unlocking the T5. After being stuck for some time, I suddenly realised that the last step was actually right before my eyes...it was my own perception of how a lock should be opened that had prevented me from solving the T5 much quicker! Indeed the final step is very clever and for me, totally unexpected. Looking back now with hindsight, the T5 is actually a rather fairly simple puzzle lock to solve.

Overall, the T5 is well conceived and an excellent puzzle in all respects (other than the price). As far as I can tell, it is not commercially available from any of the usual online puzzle retailers. So if one does surface from a private sale, just spend the money and don't miss the chance to acquire one!

Sunday, 15 January 2012

Great Collision

The Great Collision was designed by Doug Engel, who runs his own website selling a wide variety of interesting  puzzles. My copy came from PuzzleMaster of Canada. I can only guess why the puzzle is called the Great Collision; because atoms collide in nature and it resembles an atomic nucleus.


This puzzle comprises of 3 curve-shaped pieces all made of aluminium, of which two are identical. Together they interlock to form a "space" which traps a red plastic ball. The overall dimensions of the puzzle are 10cm x 11cm x 7.5cm and the red ball is about 2.5cm in diameter. Overall the quality and finish of the puzzle is pretty decent. It would have received a better rating had the aluminium pieces been anodised instead of merely powder coated black to make it more durable. As the pieces rub against each other in the course of puzzling, bits of black paint start to come off leaving tiny scuff marks on the surfaces.


The object is pretty obvious...to remove the red ball from the centre. The two identical pieces are interlocked together horizontally, like jigsaw pieces, while the third piece holds the two identical ones in place through the vertical axis. This third piece can "rotate" along the plane of the other two interlocked pieces. To solve, one would have to manipulate this third piece as well as disengage the two interlocked pieces, all at the same time to free the red ball. Everything that needs to be done is visible and I found it pretty easy to take-apart the puzzle.

Re-assembling everything into a whole again was much harder. Here, much more dexterity is also required, especially so when trying to fit the red ball back in place. PuzzleMaster rates it as a 7 in the level of difficulty. I don't really think so...I would rate it somewhere between 5 and 6, with the added fact that it is more difficult to put the puzzle back together. Generally a suitable puzzle for those new to puzzling.

Something interesting to note....on the outside of the plastic packaging, there is also the printed phrase which states..."The More You Play, The Smarter You Get"...Hmm..I am not sure how I can get smarter with repeated playing of this puzzle though!

Tuesday, 10 January 2012

Cube In Cube / Sputnik

The Cube-In-Cube (aka Sputnik) was designed by Marcel Gillen, best known for his Chess Piece puzzles, some which have been reviewed in earlier postings. My copy of the Cube puzzle came from Finnish online retailer Oy Sloyd Ab. Produced by Bits & Pieces, the larger hollowed-out outer cube is made of aluminium and measures about 5 cm all round. The inner cube is solid brass and about 3 cm. Quality of the puzzle is above average and the overall finishing could have been better. Nonetheless, the combination of the two makes the puzzle very heavy in the palm.

This is a take-apart type puzzle similar to the Cast Cage and Aluminium Hedgehog, where the object is to remove the centre piece, in this case the inner brass cube. There is only one solution to the puzzle; the brass cube can only be extracted from one of the 6 open circular holes on one of the sides of the outer cube. Each of the circular holes have 4 tiny v-grooves cut into the sides. In order for the brass cube to be freed, the corners of the brass cube must fit nicely into the v-grooves for a smooth exit out of the hole. The difficulty is enhanced by the fact that the brass cube itself is not a perfect cube with equal dimensions (although this is not obvious), as the differences in lengths of the edges are approximately -/+ 0.5mm. Similarly the v-grooves for each of the 6 holes are also not all identical in their respective positions. As a result, there is only one correct side of the brass cube where all 4 corners will be able to pass through the v-grooves of the correct hole. 

Notice the 4 v-grooves cut into each side of the 6 circular holes
The solution is purely trial and error here and a good memory certainly helps when you try the various combinations and not repeat the ones that don't work. It is not a difficult puzzle; just that it requires a bit of patience (and dexterity) to try to match the correct side of the brass cube with the correct hole of the outer cube. Puzzlers with big fingers may also find it a bit cumbersome to try to manipulate the brass cube within the confines of the outer cube. Notwithstanding, there is some replay value here.....unless you have marked the puzzle to remember which side of the brass cube can be removed from which hole, you will invariably find yourself doing the trial and error thing in order to repeat solving the puzzle.

Sunday, 8 January 2012

Remove The Yolk

I received this puzzle with the kind courtesy of Robrecht Louage. Robrecht, as you may remember was the winner of last year's IPP31's Puzzle Design Competition Jury Grand Prize for his 4-Steps Visible Lock; and also the designer and maker of the La Cerradura Doble, both of which have been reviewed earlier in this blog.

The Remove The Yolk was also an entrant 2 years ago for the IPP30 in Osaka, Japan. Unfortunately, being very limited in numbers, it is not commercially available from any puzzle retailer, as far as I am aware.


The Yolk is a relatively large puzzle measuring 12cm x 8cm x 1.5cm. Made of Corian (the material used in domestic kitchen counter tops) and metal (ie; internal ball bearings you can hear rolling about), the Yolk is very well constructed and exudes quality. The only visible moving part of the puzzle, the "sliding key" slides smoothly and nothing gets stuck during play. Corian is not light so the puzzle feels weighty in the palm.

The object of the puzzle is to remove a 1 Euro coin which is lodged inside the sliding key. The key is locked in the body of the puzzle. The key can slide left and right and protrude from both ends of the puzzle but within certain limits. While I had no sight of the internals of the Yolk, I can only assume that the locking mechanism is similar to that of the 4-Steps visible lock, employing the use of a maze and ball bearings. Hence the Yolk requires a certain dexterity to solve.

There are two holes on the top of the puzzle, a small one where you can see part of the Euro coin and a larger one for the coin to come out once the key is unlocked and the puzzle is solved. If you have ever puzzled over Jean Claude Constantine's Centrale puzzle, you will find the Yolk very similar to the Centrale.

However, that being said, while the locking mechanisms of both puzzles adopt the same principle in the way they work, they are well likely to be entirely different in design and construction. I guess unless both puzzles are cracked open (ie rendering them damaged and useless forever), we will never know for sure.

Like the Centrale, I spent a substantial amount of time on-off puzzling over the Yolk but could not solve it. I even placed the 4-Steps and Yolk side by side and tried to trace the movements of the 4-Steps to the Yolk, hoping that since they were both from the same designer, similar in dimensions and consist of sliding keys with ball bearings etc, there was a slim off-chance that the Yolk might have a similar mechanism to the 4-Steps, as the Yolk came out a year earlier before the 4-Steps...wishful thinking!!

Nothing worked and in the end I gave in and referred to the IPP30 online solution for the Yolk. I followed the movements from a series of photos but still the key refused to budge and the coin remained trapped. Finally I emailed Robrecht for help and he directed me to a YouTube video where (Robrecht's son) shows the way to remove the coin. Following the steps, I eventually managed to solve the Yolk. There are a total of 6 steps required to remove the coin.

Once you remember the steps, solving becomes easy and repeatable (which is always the case isn't it?... with the benefit of hindsight). Compare this to the 4-Steps Visible Lock + NOTHING VISIBLE....well you can guess how difficult it is! This is one of those puzzles which I would never have been able to solve without the full solution; even clues would not have helped, since you can't see what you are doing and you can't feel your way around either (unlike a Revomaze).

In conclusion, I wish to thank Robrecht for the Yolk and I am very happy to have one in my collection.

Wednesday, 4 January 2012

Popplock T3

Happy New Year everyone! My first post for the new year will feature the Popplock T3 which actually has been around for some time already, since 2009. I obtained the T3 from lock collector Peter Friedhelm von Knorre. The T3 is part of a series of six puzzle locks (T1 to T6) designed and manufactured by Rainer Popp of Germany. Having so far acquired the entire series from T2 to T6 (except the ultra/super rare T1, of which I am informed by Rainer that there are only 30 in existence), I was wondering which lock would be best to start my Popplock adventure with. Prudence and good sense suggested that I should start with the easiest and work my way towards the hardest. Having read the reviews of Allard, Oli, Brian, Jeff and Jonas and after checking with Oli, it seemed that the T3 was the easiest of the lot that I should begin with.


While not physically the largest lock in the series, The T3 is in fact the second smallest after the T6. Construction, fit and finish of the T3 is really excellent. Dimensionally the T3 is 10.3cm tall, 5.4cm wide and about 2.2cm thick and it is really hefty in the hand. A real quality product, which accounts for the rather high cost. The lock body is milled from a solid block of brass and the shackle is steel. In the middle of the T3 is a circular disc which is actually a knurled dial (not shown in the photo, but visible from the other side of the body) that runs through the centre of the lock. The face of the dial is engraved with the Popplock logo. This dial can turn both clockwise and anti-clockwise as well as be depressed into the brass body. The shackle runs through the body and protrudes out the bottom end by over 2cm. Unlike the other Popplocks, the T3 does not come with a key and there is also no key hole.


The objective of the T3 is of course to unlock the shackle. There are 4 steps to opening and unlocking the T3; well...depending on how you choose to count each step. These consist of, amongst other things, manipulating and twisting the dial. I took about 2.5 hours of on-off puzzling to solve the T3. Once you discover the solution, it is really simple to repeat solving the T3. You can literally do it in under 10 seconds! The mechanism involved appears to be deceptively simple, but because the lock is so well crafted, the final key (no pun intended) to solving the T3 is really very tricky and clever and unexpected. This step is certainly not easily discoverable, to say the least. I was really quite surprised at the way the T3 is solved.

Overall, I felt quite satisfied that I had solved this puzzle with minimal frustration and without resorting to the accompanied solution....a nice way to start off the puzzling year! And now, for the next lock up the difficulty scale.... the T5!

Sunday, 18 December 2011

One In A Trillion

This tray packing puzzle, designed by Joseph Becker came from Steve Strickland's puzzle shop and is limited to 30 copies. Measuring 130mm square and about 18mm thick (including the blocks), it is made from 8 different woods including Walnut, Rosewood, Granadillo, Bocote, Canarywood, Purpleheart, Cherry and Teak. I am not that huge a fan of wooden puzzles and one look at the puzzle and I knew it was not going to be easy. But the combination of 8 exotic woods of different colour tones was just too hard to resist. Another plus was the very reasonable price.

The tray contains 9 separate pieces, each of which is made of individual cube blocks glued together to form irregular shaped units. Several blocks come permanently affixed to the tray. Quality of the puzzle is reasonably good; with each of the cube block edges even bevelled. The only minus here is that the bottom of the tray feels like it has not been sanded smooth sufficiently or at all.


The puzzle is called One-In-A-Trillion I think, for very good reason! It really is very difficult, at least for moi! There are two objectives to this puzzle. One, which is the easier (not easy) of the two is to fit all the 9 pieces back into the tray, and here there are two ways of doing it, according to Steve. I was "fortunate" to receive the puzzled sealed in plastic in the solved state...this gave me a chance to have a really good look at the puzzle pieces. Two caught my attention; one was the Purpleheart (so purple you just can't miss it!) and the other was a very light coloured wood. Luckily I was able to roughly recall where their positions were in the tray. Hence, it was now a lot easier as I had only 6 pieces left to deal with, since one of the pieces, a straight 4-block unit already has a pre-determined slot in the tray.

Through trial and error, I managed to put the rest of the pieces into position, but then, it still took me a very long while to complete. Let's face it, if all the pieces had been made of the same coloured wood, I seriously doubt I could have solved it. Perhaps that was why the puzzle has been made the way it is...otherwise it would have been too difficult??


The second objective is to use the 9 pieces to form a 4x4x4 cube. This one really got me super-stumped! I spent several days trying all sorts of configurations but got no where. Not wanting to frustrate myself any further, I checked out the solution. Even this was no walk in the park and I knew I would never have been able to solve it without the solution. I also found out that only 8 pieces out of the 9 were required! I think BurrTools might probably do the trick here, but I haven't learnt how to use the software yet!


For those that enjoy packing or 3D assembly puzzles with loads of challenge, I think the One-In-A-Trillion is really excellent for being able to combine two puzzles in one, not to mention that it is very good value for money too, effectively two for the price of one! An added bonus is the different exotic woods used which makes the puzzle aesthetically pleasing and exude quality, especially with the 4x4x4 cube. Definitely worth acquiring.

Sunday, 11 December 2011

Kuku

Update 24 October 2017 - Dear Reader, please check out my new puzzle blog and e-store at http://mechanical-puzzles.com

The Kuku has been sold by Sonic Games in the UK for quite a while already, since 2009. Measuring a rather small 40mm in diameter, it comprises three symmetrical pieces which interlock together to form a sphere. The three pieces are coloured polished aluminium, anodised blue and gold. There have been some criticism in cyberspace levied on the Kuku as to the quality of manufacture. (see Neil's review on his puzzle blog). I suppose this is not entirely surprising since Sonic Games' earlier puzzle the Isis, at one time touted as the "hardest puzzle in the world" also received a plethora of negative comments over quality issues.

Although I hesitated at first, I was interested to see for myself the Kuku's puzzle mechanism. So I finally bought one after Sonic Games offered a special website price discount. Thankfully my copy did not appear to have quality issues and overall fit and finish is of a very high standard.


The object of the puzzle is to unlock the three pieces and remove a small plastic token with an imprinted number. Kuku owners, once they solve the puzzle, can register this number on the related Kuku website, play a game and stand to win a prize. According to both Neil and Jonas Bengtsson in his blog, there are apparently two versions, medium and hard; but I do not know which my copy is, the medium or the hard.


When I first examined the puzzle, I had a pretty good idea how the three interlocking pieces were held together. A number of other metal puzzles in the same genre, several of which have been reviewed on this blog, apply a similar principle to that of the Kuku. Gravity plays an important part. The difficulty of the Kuku perhaps stems from the fact that all three interlocking pieces forming the sphere are symmetrical, so trying to determine the orientation of the puzzle vis-a-vis how gravity applies makes it very challenging indeed. Like the Purple Isis I wrote about earlier in this blog, I had no intention of spending a lot of time on the Kuku. Checking out the internet and help videos on YouTube, I was able to take apart the Kuku quite quickly. I will not go into any "spoiler" details here since there may be readers here who are determined to solve the Kuku on their own. But looking at the internal mechanism, this one is not easy to solve repeatedly.

For the design and engineering that goes into the manufacture of a Kuku and from both the puzzle aspect and price point (and just so long as there are no quality issues), I would say the Kuku is certainly worth acquiring.

Friday, 2 December 2011

Zauberflote

I was fortunate to get my hands on the Zauberflote a while back from Eric Fuller/Cubicdissections. It was their last piece available for sale. This little puzzle designed by Gregory Benedetti, is diminutive in size (measuring 55mm x 40mm x 22mm) but don't let its small size fool you! This one is tough! The puzzle consists of two flat panels of acrylic with different shaped cut-outs and  four different size/shaped blocks of Yellowheart wood. Although it does not look like one, the Zauberflote is classified as a burr puzzle. The object is to fit the four wooden blocks from the largest to smallest (left to right) into the cut-outs of the two acrylic panels to form an assembled unit. This requires manipulation and movement of both the Yellowheart blocks and the two acrylic slabs, similar to how one would go about solving a traditional burr.


Quality is very high for this puzzle; both the Yellowheart blocks and acrylic pieces are very precisely cut and fit and finish is excellent. Even though the blocks may be small and even look a bit fragile, there is no fear of breaking them since Yellowheart is a really tough and durable hardwood with a Janka hardness rating even higher than Mahogany and Maple. My only gripe (no fault of Eric's) is that in Singapore where humidity is very high, the Yellowheart blocks tend to expand, making their fit very much tighter than it should be. But an overnight stay in my camera dry-box at a No. 45 setting took care of the problem quite easily.

Prior to attempting the puzzle, I had already read reviews of the Zauberflote by 4 other very experienced puzzlers, Neil, Allard, Kevin and Brian and from what I gathered, I knew I would not have an easy time with this puzzle. There were comments about using BurrTools, rotation of the pieces and more than one way of solving the Zauberflote. But the general consensus was that this little bugger is very challenging. True enough after getting the first 3 blocks into the acrylic slabs, I was stuck with the 4th block...and stuck for a really long time. No amount of sliding or rotating helped.

Generally for most of my puzzles, I would go for the solution (or help) if I find I am getting nowhere after some time, usually not very long...ha ha (PS - there are other equally or more important things in my life apart from puzzling!). But in the case of the Zauberflote, for some reason, I actually stuck with it for quite a number of days. In fact I think it was ego that drove me on - I did not want to admit defeat to such a tiny puzzle. But alas, after almost a week of frustration, I finally threw in the towel. Since the puzzle did not come with a solution, I decided to seek the help of fellow puzzler Kevin Sadler of PuzzleMad.

Kevin was kind enough to email me some clues but also offered to send the solution on a BurrTools PDF should the clues be insufficient. I looked at his clues and realised that I had one crucial one step wrong, hence my inability to assemble the blocks correctly. After I corrected my misstep, I pretty quickly managed to solve the Zauberflote using the rotation method. And after a couple of practice runs, I was able to solve and unsolve the puzzle quite easily.

Tiny and cute though it might be, the Zauberflote packs a real wallop! It is very challenging, compounded by the fact that its small size and small pieces make it even harder and at times quite fiddly to handle. Not really suitable for those with very large hands and fingers. But for the very reasonable price of $20 and given its quality and level of challenge, it is excellent value for money. If you come across one available, don't hesitate to buy it!

Friday, 11 November 2011

Aluminium Hedgehog In Cage

The Aluminium Hedgehog puzzle is in the same genre of puzzles including the Hanayama Cast Cage and Man The Torpedo. All three puzzles are similar in that they require you to remove an object from the puzzle "cage". In the case of the Hedgehog, the object to be removed from its cage is a hedgehog represented by a sphere with 10 rods of varying lengths inserted into it.


My copy of the puzzle came from William Strijbos and is entirely made of polished aluminium, both the cage as well as the hedgehog. Quality is very good and even the insides of the cage is pretty well finished with virtually no rough edges. The puzzle measures about 70mm tall with a diameter of 50mm. The cage is made from five openings cut into an aluminium cylinder covered at the top and bottom. The size of this puzzle is really nice since it is large enough for the hands to hold it comfortably and I had little problems gripping the hedgehog.

I did not find the puzzle difficult after my previous experience with the Cast Cage and I removed the hedgehog within a couple of minutes. This is not to say that the puzzle is easy; by no means is it so and for the uninitiated handling a puzzle like that for the first time, it may take quite a while to solve it, as was proven by a non-puzzling relative of mine who dropped by for a visit. He was fiddling with it the whole evening and still couldn't solve it by the time he left. (PS-If you need a clue on how to go about getting the hedgehog out, please see my review of the Cast Cage).

Overall this is a fun puzzle which can be solved very quickly and repeatedly once you figure out the initial solution. With its nice shiny polished exterior and relatively large dimensions, it also makes an interesting conversation piece.

Tuesday, 8 November 2011

La Cerradura Doble

This puzzle, which was an entry for IPP28 in 2008, was acquired from Robrecht Louage, who was this year's IPP 31 Grand Jury Prize winner for his 4 Steps Visible Lock reviewed some time back in this blog. Cerradura in Spanish means "lock" and one look at the puzzle and you probably can tell why.

The Cerradura measures 160mm(L) x 95mm(W) x 16mm(H). Made of Corian (the type of material found in kitchen counter tops), steel and acrylic, the puzzle is not only hefty but also very well constructed and finished to tight tolerances. All moving parts slide and move as they should. The overall combination of the three different materials and contrasting colour tones gives the puzzle a very solid and industrial kind of look.

The puzzle consist of two flat steel plates or "keys" that are "locked" in place by 5 movable sliders with grooves or "teeth", each of which can be pushed either up or down within a narrow range of movement. Covering this assembly is a acrylic top plate screwed into position at the corners.

The object of the puzzle is to remove both steel keys from the puzzle. To do this, you have to navigate each of the steel keys out of the puzzle by moving the sliders individually to free the steel keys in order for them to pass through. This puzzle has been designed in such a way that you cannot remove one key entirely and then followed by the other. Both keys need to be worked on and moved in tandem. Occasionally you will also need to move one key backwards in order for a slider to disengage the other key for the latter to move.


This is not a very difficult puzzle and I was able to remove both keys after about 40 minutes of pushing, pulling and sliding. As usual I applied my trial and error method which did the trick quite well here for this particular puzzle. The Cerradura is one of those puzzles that not only can you see exactly what you are doing and what you need to do next, but you also remain constantly aware of the progress you are making as you slowly manipulate the two keys out to reach your goal.


Returning the puzzle back to the original state required almost the same effort as removing the keys but somehow I felt the reverse was slightly easier to carry out. Overall, a nice puzzle that is sufficiently challenging not just for the enthusiast; but with everything in full view (without hidden magnets, pins, mazes etc), can quite easily accommodate non-puzzlers as well.

For another take on the La Cerradura Doble, check out Allard's review on his puzzle blog.

Sunday, 6 November 2011

Cat & Dog Sliding Puzzle

This sliding puzzle comes from Dutch collector and puzzle designer Ton Delsing. Ton's area of interest in particular are sliding puzzles and he also designs his own sliding puzzles for sale and exchange. Ton's Horrible Hexagon was one of the design entries of IPP 31 in Berlin this year. I had first come upon the Cat & Dog featured in Geduldspiele's website where it was described as "one of Delsing's best puzzles...". My only previous encounter with sliding puzzles was some years ago with the 15 puzzle and more recently, making my own Lego version posted earlier in this blog. With my limited experience, I decided to have a go at the Cat & Dog. I happened to have a puzzle that Ton wanted and eventually exchanged mine with one of his.


The Cat & Dog measures 116mm x 92mm x 18mm and is formed by a number of wood layers glued together. The frame and sliding tiles are cut by LaserExact!. Overall construction, fit and finish is very good. The object of the puzzle is to rearrange the tiles in the unsolved state (as in the photo above) to one of two finishes printed on the back of the puzzle (as in the photo below).


Unlike the traditional 15 type sliding puzzle where all the pieces can slide in various directions, the difficulty level of the Cat & Dog is significantly increased by the restricted movement of the upper middle blank tile in the centre; which can only move either up or down one position. This severely curtails the movement of all the other tiles, especially since horizontal movement along the centre is no longer possible. If both the upper and lower blank tiles are not moved, the rest of the tiles can only move within the frame in a circular fashion and there would be no way to rearrange the order or position of the lettered tiles. Thankfully, the lower blank tile is movable along with the rest of the lettered tiles and this frees up "more space" for repositioning of the lettered tiles.

I started off with much gusto! But after nearly half a day of continuous trying, I still ended up with at least two tiles in the wrong position. This puzzle can literally make you go round in circles! I emailed Ton for some assistance but unfortunately even with his hints, I could not achieve Finish No.1. I spent another day or so sliding but still got nowhere.  A second email from me saw Ton send me a detailed solution. The solution looks rather complicated and would require I think, some time for me to properly digest. My only consolation is that Ton did say the solutions to his sliding designs are not easy...yes, I fully agree! I have decided to put away the Cat & Dog for the moment and come back to it another day. Probably its my lack of experience, but this is one heck of a tough cookie!